
Table of Contents
Gas furnaces are an important part of home heating systems. It’s good to know how to adjust the flame if there are problems with pressure, size, and the pilot light.

First, find the gas valve and take off the front access panel for a better view. Use a manometer to check the pressure setting. If it’s too high, turn the screw counterclockwise. Then switch on the furnace and check the flame height.
Next, look for leaks in the gas pipe and valves. Check for damage or leakage in metal boxes, adapters, hoses, shutters, tubes, and connections. If you see a leak, get help from a pro.
Remember to regularly clean and change your air filter. Dirty filters can cause CO exposure and bad air quality.
Be a pro at adjusting gas furnaces with these easy tips. Fire up!
Preparing the Gas Pressure
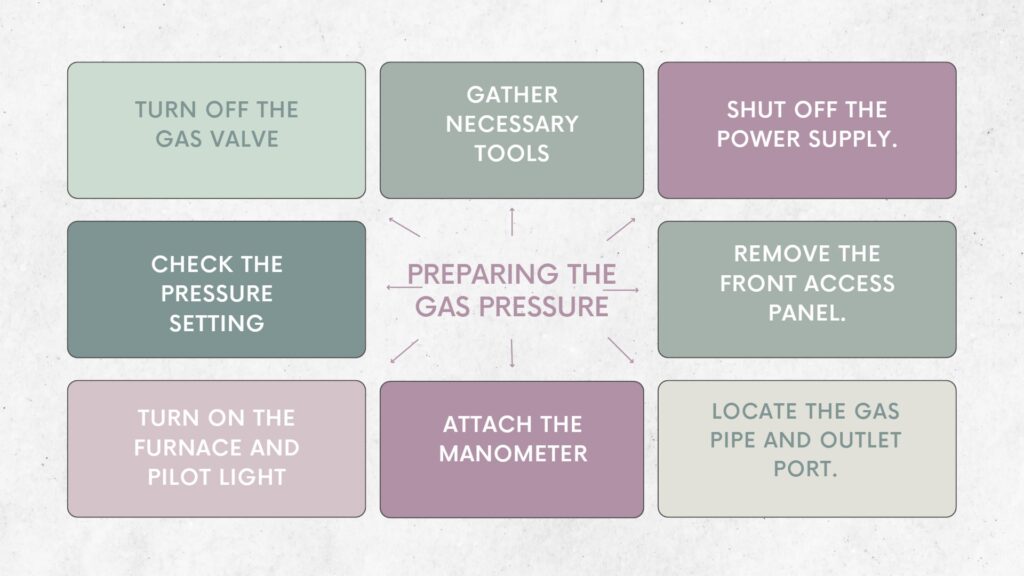
- Turn off the gas valve and make sure no gas is leaking out.
- Gather necessary tools like a manometer, screwdriver, control knob, etc.
- Shut off the power supply.
- Remove the front access panel.
- Locate the gas pipe and outlet port.
- Attach the manometer to the gas valve adapter.
- Turn on the furnace and pilot light, but keep it on low flame.
- Check the pressure setting and adjust the flame if needed by turning the control knob counterclockwise.
It’s essential to read the manufacturer’s instructions carefully. Also, follow all copyright laws when using content from outside sources. If having issues, call a professional. Don’t try to fix it yourself!
Improper adjustments can cause high CO levels or even death due to carbon monoxide poisoning. So, take precautions and follow protocols before changing your furnace’s settings. Checking the gas pressure is vital for your furnace’s well-being.
Measuring the Gas Pressure

To measure gas pressure in a furnace, you will need a manometer. This device measures pressure and is key when dealing with furnaces. Follow these steps to measure the gas pressure:
- Step 1: Turn off the furnace and wait for the components to cool.
- Step 2: Locate the pressure valve or port.
- Step 3: Connect one end of the manometer hose to the outlet port and attach the other end to the pressure valve using an adapter.
- Step 4: Turn on your manometer and set it to inches from the water column.
- Step 5: Run the furnace for at least one minute.
- Step 6: Check the manometer reading—should be within the range indicated by the manufacturer’s instructions.
- Step 7: To adjust gas pressure settings, turn off the burner. Locate the control knob/screw in the front access panel (see manual).
- Step 8: Use a screwdriver to turn clockwise/anti-clockwise till desired adjustment point. Mark this point for easier next steps.
Safety precautions are essential when measuring gas pressure. Wear protective gear such as gloves, glasses, and aprons. Professional help is necessary for adjusting gas pressure settings. If you decide to work on it yourself, follow the furnace manual strictly. Get your gas pressure right and your furnace will be hotter than a summer fling in Miami!
Adjusting the Gas Pressure

It’s essential to adjust the gas pressure on your furnace for a safe and efficient heating system. To do this, locate the gas valve behind the front access panel and attach a manometer to the outlet port of the valve to measure the pressure. Here’s how:
- Turn off the power and remove the access panel.
- Attach the manometer and turn on the power.
- Set the control knob to half capacity.
- Adjust the pilot light until it has a crisp blue flame.
- Tweak the adjustment screw clockwise or counterclockwise according to manufacturer guidelines or professional advice. Then, shut off the valves and put everything back on again.
Also, check for leaks in gas pipe connections and water inlet lines. Make sure the air filter is clean and up-to-date. Monitor oil levels and burner ignition issues for oil furnaces.
These tips will help you set gas pressure safely and avoid future problems. If in doubt, consult an HVAC professional. And don’t forget to secure your eyebrows before checking the flame!
Check the Flame of the gas furnace

When you turn your gas furnace on, it’s important to check the flame’s quality often. A yellow or flickering flame might mean high levels of carbon monoxide. To check it, open the furnace’s front panel. Locate the gas valve and adjust the pressure setting with a manometer, if needed. Turn on the pilot light and look at the flame’s color and height.
Also, make sure there are no gas pipe leaks or other parts of the furnace blocked. Check for stickers or ads that can block airflow and cause a bad flame. Clear any blockages in air filters for better heat output.
Fatal accidents have happened with poorly maintained furnaces due to CO poisoning. So, if you have trouble adjusting the flames or other issues with the furnace, call a professional.
Be careful when handling shutters and pipes – even small mistakes can cause huge damage. Remember to prioritize safety when dealing with furnaces and heating systems at home.
You can be an expert at setting your furnace flame – just follow the right steps for safe results!
Conclusion
After following the instructions, adjusting the flame on your gas furnace should now be easy-peasy! Remember: turn off the gas valve before opening any access panels. Double-check for leaks and parts before turning it back on. Gas pressure varies depending on your location and the pipe size. Use a manometer to measure the pressure setting and make sure your furnace is running safely and efficiently. When you’re adjusting the flame, don’t forget other maintenance tasks like replacing filters and checking oil levels, if you have an oil furnace. And if you’re stuck, always get help from a professional.