
Table of Contents
How To Adjust Pilot Light On Furnace? As a homeowner, nothing could be more aggravating than having issues with the furnace’s pilot light. If it won’t light, something’s wrong and you need to take action. Knowing how to adjust the pilot light on your furnace comes in handy majorly, especially in winter when heating is a must.
We’ve got simple and easy-to-follow steps to help you fix the pilot light on your furnace.
- Start by ensuring there’s gas flowing to the appliance and the gas valve control is on.
- Carefully remove the front panel of your furnace to access the pilot light section.
- Turn off all ignition sources and air conditioning units around.
- Use a flashlight to locate the standing pilot – a nozzle connected to a probe coming from the gas valve or manifold near its opening.
- To adjust the height of the standing pilot flame, and light it manually:
- Turn off the gas supply at the display switch or wall-mounted switch, then wait 5 minutes.
- Do this repeatedly until you complete adjusting anything per the manufacturer’s instructions, including opening the size of the unit valve aperture if needed.
- Grab an adjustment screwdriver and turn clockwise/anticlockwise as needed for the preferred flame height.
- Look for a color change or signal from the burner’s flame that indicates good combustion conditions (closed valve shuts them off).
Gaining this knowledge puts the control in your hands. You can maintain home appliances without calling an expert. Years ago, homeowners had no other choice than phone technicians each time furnaces posed problems due to lack of knowledge. Now, with articles like this that lay out the processes clearly, homeowners are confident to take charge of maintaining their home appliances.
Understanding the Pilot Light
As a homeowner, it is important to have a clear understanding of the standing pilot light in your furnace. The pilot light is a small flame that is constantly burning and serves as the ignition source for the furnace to turn on. The flame must be a sufficient size to signal to the control unit to begin heating the air.
To understand the pilot light, it is crucial to know where it is located and what it looks like. Typically, it will be located near the gas valve control and will have a small nozzle that protrudes from the front of the furnace. The flame should be a blue color and around 1 inch in height.
In addition, it is important to know how to troubleshoot any issues with the pilot light. If it goes out, it can usually be relit by turning the valve control to “pilot”, holding down the reset button, and using a match to light the pilot flame. If the flame is too small or not reaching the probe, the adjustment screw can be used to raise the height of the flame.
It is important to note that working with gas appliances can be dangerous, and if you are not comfortable making adjustments, it is best to call in a professional. According to the manufacturer of the furnace, “For safety and warranty reasons, it’s best to leave most repairs to a qualified technician.”
In summary, understanding the pilot light in your furnace is crucial for proper heating in your home. Knowing where it is located, what it looks like, and how to troubleshoot any issues can save you time and money in the long run. However, it is important to prioritize safety and call in professional help when needed.
“Why light a fire in your heart when you can light a pilot light in your furnace?”
What is a Pilot Light?
A pilot light is a small flame that lights up the main burner of gas-powered appliances. It’s found in older models of water heaters, ovens, and stoves. This flame stays on constantly and is used when you need to heat something.
Though old, it still works well. Some newer models use electric ignition sources. However, these can fail during power outages. But, with a pilot light, this won’t be a problem.
Safety is key when dealing with a pilot light. It’s an open flame, so it can cause fire or gas leaks. To avoid issues, make sure your appliance is properly vented. Also, follow manufacturer instructions carefully.
If you’re having difficulty lighting or extinguishing the pilot light, it may be time for repairs or replacement. Don’t delay this – it could cause further problems.
Keep your appliances in good working order for the safety of your home and family. If unsure about how to maintain the pilot light, consult with a professional technician. They can help you out. No matter the appliance, there’s a pilot light for it.
Types of Pilot Lights
When it comes to pilot lights, you have plenty of options! Let’s take a look at some of the most common types. There’s the standing pilot light, which has a constantly burning flame used in older furnaces and water heaters. Then there’s the intermittent pilot light, which ignites gas burners only when needed. And for something even more advanced, there’s the DIRECT Spark Ignition Pilot Light (DSI). This one uses a high-voltage spark to ignite the gas burner without a pilot light.
It is important to choose the right type of pilot light for your application. Both newer models and traditional ones have their own benefits and drawbacks. Hot surface ignition (HSI) is an alternative to the traditional pilot light.
Did you know? According to the National Institute of Standards and Technology, standing pilot lights can account for up to 3% of household energy costs. So, stand up for the sitting pilot and save energy!
Standing Pilot
A standing pilot is a flame that continuously burns on gas appliances. It works by letting a small amount of gas flow through the pilot tube. This flame must stay lit for gas to flow into the appliance.
But, standing pilots can be wasteful and costly, as they run all the time. Plus, they aren’t as secure as electronic ignition systems. If the flame gets extinguished or unsteady, it can lead to gas leaks or even explosions.
For this reason, newer gas appliances come with electronic ignition systems. The gas is only released when needed. There are also automated safety shut-off valves, which turn off the gas if the flame is extinguished or unsteady.
Energy.gov says replacing standing pilots with electronic ignition systems can save up to 30% on fuel consumption. Meaning, homeowners save a lot of money.
Intermittent Pilot
The Intermittent Pilot system is a type of ignition system that uses electricity to spark a pilot flame. Let’s take a look at its components:
| Component | Description |
| Control Module | It’s the brain, which opens and closes valves and initiates the spark sequence. |
| Ignition Electrode | It’s a metal rod that creates an electric spark at the pilot burner to ignite the gas. |
| Pilot Burner Assembly | It consists of a burner, orifice, thermocouple, and gas control valve. The orifice controls gas flow while the thermocouple sends signals to the control module. The gas control valve regulates gas flow to maintain pilot light stability. |
Intermittent pilots can also monitor flame conditions. This can be done in various ways, such as using UV sensors or current sensing through the ground wire that goes into the flame.
The Intermittent Pilot system was introduced in furnaces during the mid-20th century. It replaced standing pilots, which were known for wasting fuel and posing a fire hazard when they went out.
Understanding how an intermittent pilot works is beneficial if you’re troubleshooting or repairing HVAC systems that use it. Fortunately, there are now more efficient and reliable ignition systems available on newer models. So here’s hoping your direct ignition is more successful than your attempts at direct messaging.
Direct Ignition
Direct ignition is a type of ignition system that doesn’t need a pilot light. It instead uses electronics to ignite the burner when heat is needed. This tech has revolutionized gas appliance efficiency and reliability.
Direct ignition systems offer high efficiency, improved reliability, and low maintenance. They get rid of the pilot light, which can be wasteful and cause problems. Plus, they reduce emissions, making them an eco-friendly option.
If you’re updating or buying a new gas appliance, consider one with direct ignition. You’ll get better energy savings, more reliable operation, and less maintenance.
Don’t let your gas appliance become outdated. Upgrade to direct ignition for efficiency and reliability advantages. Get the difference – no more adjusting the pilot light.
Why Adjust the Pilot Light?
Adjusting the pilot light on a furnace is crucial for its efficient performance. A pilot light is a small flame that burns continuously in a gas furnace and provides the ignition source to light the main burner when needed. If the pilot light is not adjusted properly, it can cause the furnace to not heat properly, or not work at all.
To adjust the pilot light, follow these steps:
- Locate the pilot flame near the standing pilot, usually located in the front or side of the furnace.
- If the flame is too small, adjust the pilot valve control or the gas supply valve to increase the gas flow and the pilot flame’s size.
- If the flame is too high, reduce the gas flow by turning the valve control or the adjustment screw counterclockwise until the flame reaches the desired height.
- Ensure that the pilot light flame is hitting the probe, which signals the furnace to operate properly. If not, adjust its height.
- If the pilot light still does not light, you may need to relight it or check the furnace’s manual for further troubleshooting steps.
When adjusting the pilot light, always turn off the furnace’s power switch and wait for the furnace to cool down before starting. Additionally, it is advisable to have a carbon monoxide detector near the furnace, especially if you have a gas furnace.
In summary, adjusting the pilot light on a furnace is a crucial and simple process. By following these steps, you can ensure that your furnace is running efficiently and reliably. If your furnace pilot light is flickering more than your ex’s Instagram story, it’s time to address the issue.
Signs of a Problematic Pilot Light
Pilot lights are necessary for the secure and effective operation of gas appliances. Issues with pilot lights need to be fixed fast to prevent potential risks and make your appliances work better.
Flickering or yellow-colored pilots may suggest there’s not enough gas, air, or ventilation. If the pilot won’t stay lit, it might be due to a broken thermocouple or a blocked pilot orifice. Sounds coming from your appliance could be caused by too much carbon built up near the pilot assembly.
Gas appliances with issues in their pilot light can lead to hazardous cases, like gas leaks and carbon monoxide poisoning. Check your pilot lights often to spot these common signs of trouble.
It’s wise to keep an eye on when and why you need to adjust the pilot light. Clear any debris from around the pilot assembly, replace a worn-out thermocouple, and adjust the gas pressure if there are changes in flame color or quality. But, make sure a professional does this repair job.
By following these tips, you can make your gas appliances last longer and make sure they’re working safely and efficiently. Adjusting the pilot light is beneficial not only for saving up on gas bills but also for getting a break from your in-laws.
Benefits of Adjusting Pilot Light
Adjusting the pilot light is key to the efficient functioning of your gas appliances. Not adjusting it can result in hefty energy bills, frequent breakdowns, and safety issues. Give yourself several advantages by regularly tweaking the pilot light: improved efficiency, increased appliance lifespan, savings on energy bills, safety benefits, a more eco-friendly environment, and maintaining appliance warranties.
Ensuring your gas appliances have an adjusted pilot light can bring you peace of mind, fewer hazards, and fewer costs – all through a simple process. Don’t wait until it’s too late – costly repairs or worse, compromising safety or voiding warranties may be the outcome! Put your foot on the accelerator and take off with the steps for adjusting that furnace light.
Steps for adjusting that furnace light:
- Gather the necessary tools: You will need a screwdriver and your appliance manual.
- Turn off the appliance: Turn off all knobs and power switches to the appliance and let it cool down completely.
- Locate the pilot light: The pilot light fixture is usually located next to the main gas control valve.
- Remove the cover: Use the screwdriver to remove the fixture cover and access the pilot light.
- Adjust the pilot light: Follow the instructions in the appliance manual to adjust the pilot light to the preferred level. Usually, a blue flame is best as it indicates the right mixture of gas and oxygen.
- Replace the cover: Once the pilot light is adjusted properly, replace the fixture cover securely.
- Test the pilot light: Turn the appliance back on to test the pilot light and ensure it is working properly.
Steps to Adjust Pilot Light on Furnace
Adjusting the pilot light on a furnace is an essential step in troubleshooting heating issues in your home. A standing pilot light serves as a signal for the gas valve to control the flow of gas to the main burner. If the pilot light flame is too weak or too high, it can cause the furnace to malfunction. Here’s a guide on how to adjust the pilot light on your furnace.
- Locate the pilot light and gas valve control. The pilot light is typically located at the front or side of the furnace, and the gas valve control is located near it. Turn the thermostat and furnace switch to the off position.
- Turn the gas supply off and wait for several minutes to allow any residual gas to escape.
- Remove the front panel of the furnace to reveal the pilot light and gas valve control.
- Use a match or lighter to relight the pilot flame. Once the flame is lit, use a screwdriver to adjust the pilot flame height by turning the flame adjustment screw.
- Replace the front panel and turn the thermostat and furnace switch back on. If the pilot light flame remains stable, your furnace is now functioning properly.
It’s important to note that not all furnaces have the same pilot valve and adjustment screw locations. Always refer to your furnace manual or call a professional technician for assistance.
A tip when adjusting the pilot light is to use a probe to reach the adjustment screw if it’s hard to access.
According to the manufacturer of the furnace, failing to adjust the pilot light flame height can cause insufficient heat output and may lead to a fire hazard.
Get ready to ignite your inner handyman with these easy steps for adjusting your furnace’s pilot light.
Preparation
Before adjusting the furnace pilot light, preparation is key. Make sure to shut off the power and gas first. Get all the right tools and gear ready. Here’s what to do:
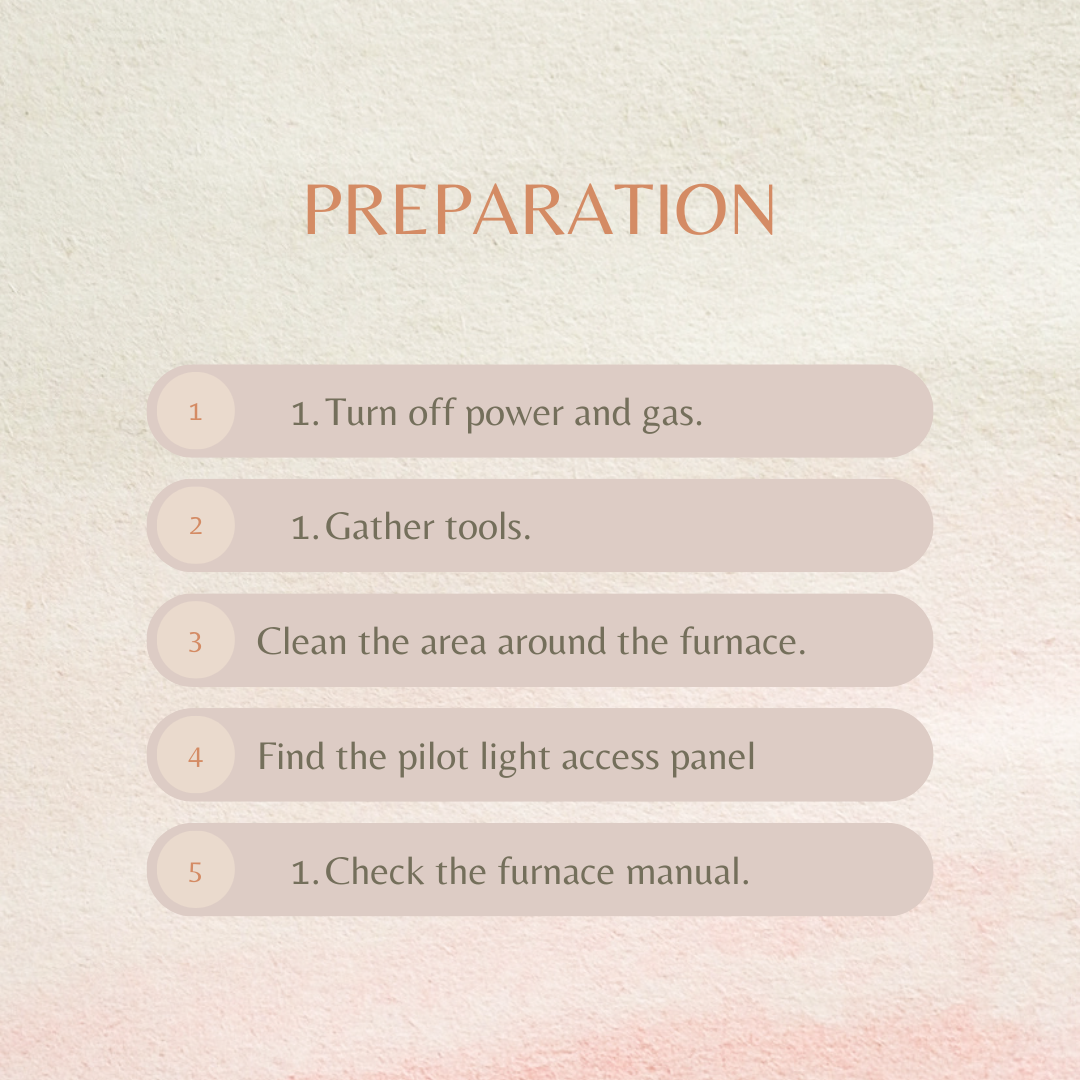
Some furnaces need extra steps. If you’re having trouble with the manual or accessing the pilot light, ask a pro for help.
Safety first! Whenever working with gas appliances, wear gloves and a mask. Don’t be scared of turning off the gas. The real fright is forgetting you left the stove on!
Turn Off Gas Supply
To adjust the pilot light, start by turning off the gas supply. It’s for safety and to prevent leaks. Follow these 5 steps:
- Find the gas shut-off valve near your furnace.
- Turn the valve so it’s perpendicular to the gas line.
- Can’t find it? Check your furnace manual or ask a pro for help.
- Wait 5 minutes for any lingering gas to clear.
- Once done, turn the gas supply back on by reversing steps 1-2.
Remember, if you smell gas or suspect a leak, evacuate right away and call the gas company emergency hotline.
Locate the Pilot Light Adjustment Screw and Gas Valve Control Knob
Are you ready to adjust the pilot light on your furnace? You’ll need to find the pilot light adjustment screw and gas valve control knob. Here’s what to do:
- Start by unscrewing the cover panel with a screwdriver.
- Look near the bottom of the furnace for the gas valve control knob.
- Find the pilot light adjustment screw by looking in the manual or at the gas valve knob for a slot labeled “pilot.”
- Use a flathead screwdriver to turn the screw clockwise or counterclockwise, depending on whether you want to increase or decrease the flame size.
Different furnace models require different steps, so always check the user manual first. Now you can enjoy the warmth of your repaired furnace during cold seasons!
Adjusting the pilot light may seem intimidating, but with these steps, it can be done quickly by a pro. So, get ready to stoke the fire and make your furnace hot!
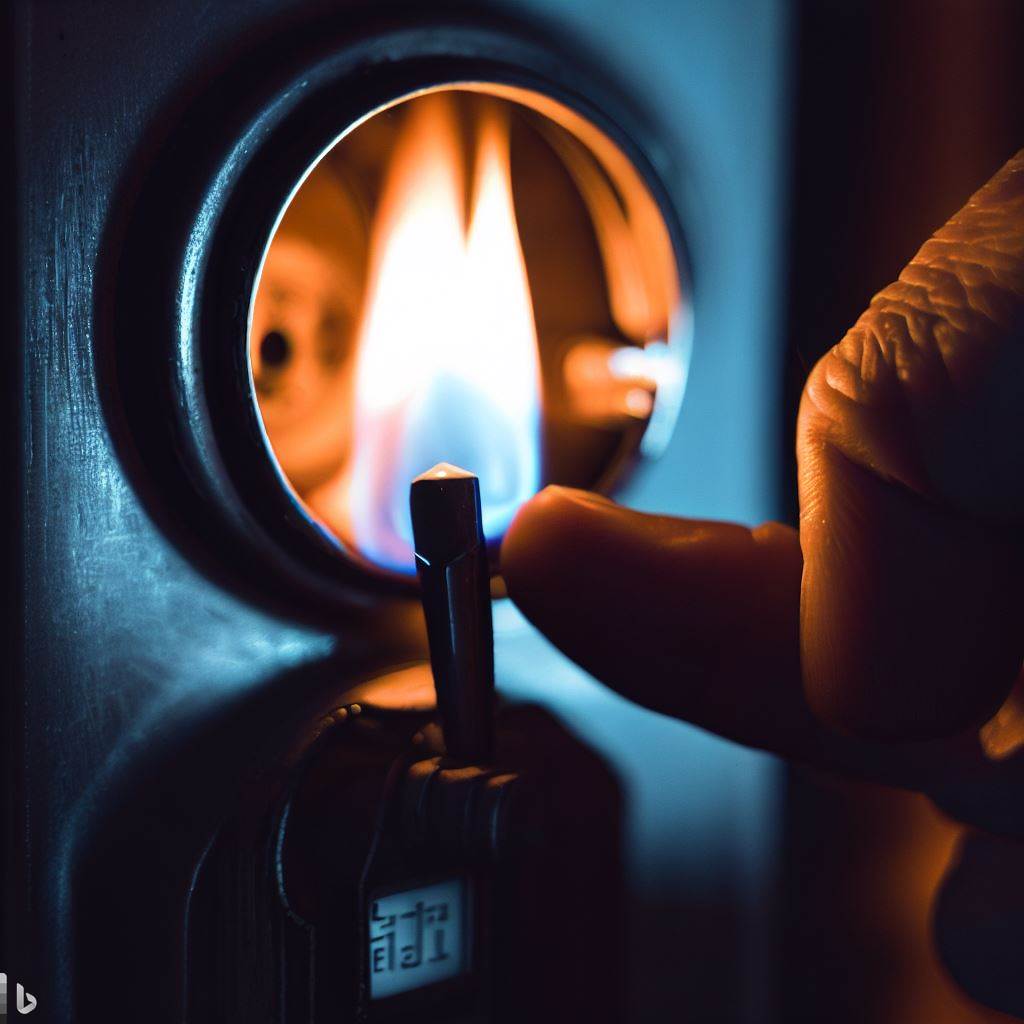
Adjust the Pilot Flame Height
It’s essential to adjust the pilot light of your furnace for steady heating and lower costs. Here are 5 simple steps:
- Locate the pilot light assembly.
- Remove the burner access panel cover.
- Light the pilot with a lighter or match.
- Adjust the flame height so it’s blue with no yellow tinge.
- Tighten the back screws, replace the cover, and turn on the furnace.
Be careful not to cover any safety features near the pilot assembly, as this can trigger system shutdown and increase carbon monoxide risks.
Schedule an annual furnace tune-up during pre-winter for best performance. This will stop unexpected breakdowns, boost furnace function, and lower energy costs.
Proper maintenance helps extend your furnace’s life and improve its heat output while keeping gas expenses low. So let’s re-ignite that pilot flame!
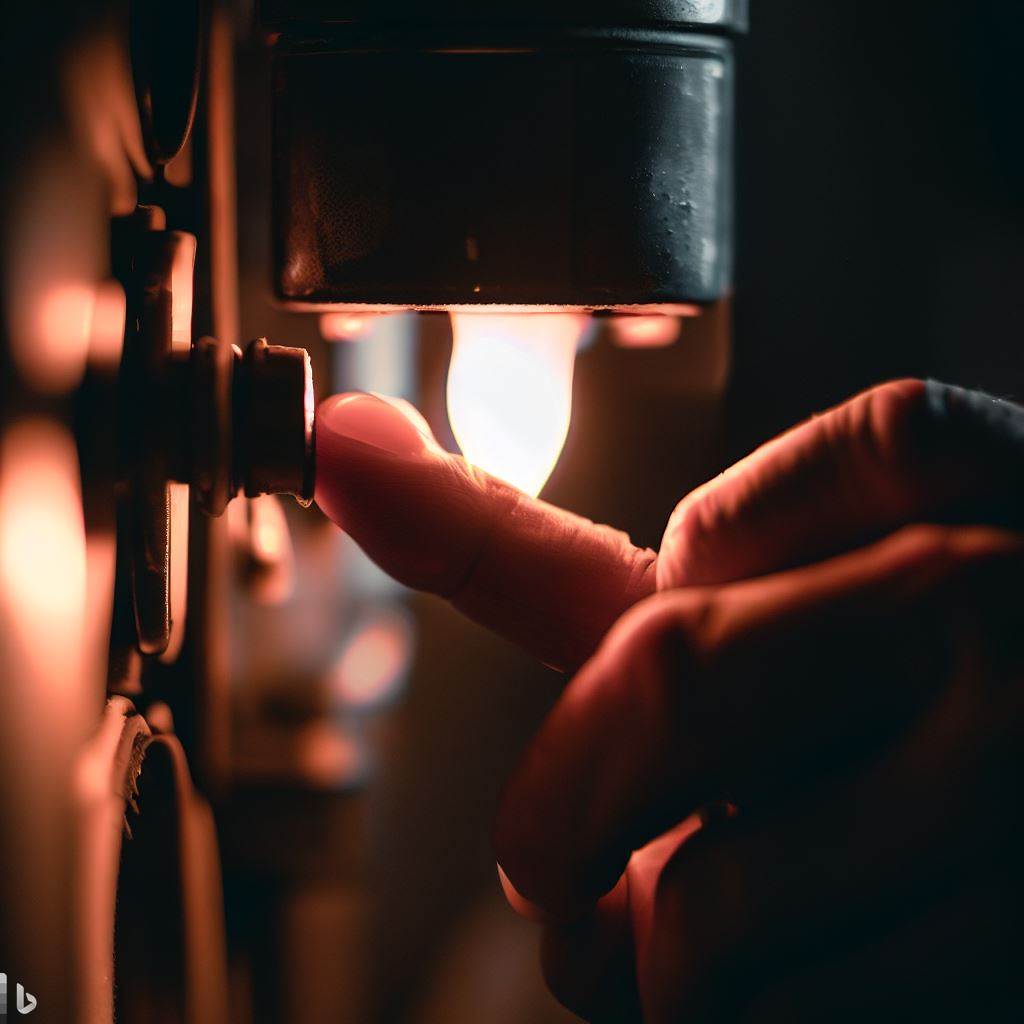
Re-Light the Pilot Flame
Pilot light out? No worries. Here’s how to get it back up and shining:
- Find the gas control valve and turn it off.
- Wait 5 minutes for any leftover gas to clear.
- Locate the pilot light assembly near the burner. Take off its cover.
- Spot the pilot burner and press down on the reset button while lighting a match or lighter close by.
- Look to see if a blue flame is around the burner. If so, release the button and put the cover back on. You’re done!
- If not, go back to step 4 until a flame shows up.
But be careful: if you smell gas, turn off your furnace immediately and call a professional.
Plus, if you find yourself relighting the pilot light more often than usual or it’s got other issues, you may need help from a pro. Ignoring furnace problems can be dangerous – like the Ohio homeowner who experienced carbon monoxide poisoning from her improperly maintained furnace. Don’t take chances; follow these tips for safety!
Troubleshooting Pilot Light Problems
As a homeowner, it can be frustrating when your furnace’s pilot light goes out. Here’s how I troubleshoot pilot light problems:
- Check the Gas Supply: Make sure the gas supply is turned on and that the pilot light’s nozzle is clean and unobstructed.
- Inspect the Pilot Light Flame: Observe the pilot light flame to see if it is blue or yellow. A blue flame indicates that the gas flow is correct, while a yellow flame may indicate a problem with the furnace’s air intake. In some cases, the flame height may need adjustment.
- Reset the Unit: If the pilot light will not stay lit or relight, try resetting the unit by turning off the gas valve control and waiting a few minutes before attempting to relight the pilot light.
It is important to follow the manufacturer’s manual when working with furnace components and gas heaters. If the troubleshooting steps do not work, it is advisable to call in a professional technician to avoid accidents.
History shows that pilot lights were once commonly used as a signal for the heater to begin heating. Today, many furnaces and appliances have moved towards electronic ignition systems. Nonetheless, the troubleshooting steps for pilot light problems remain relevant for homeowners with gas furnaces and appliances.
Looks like my furnace is having commitment issues, can’t seem to keep that pilot flame lit.
Pilot Flame Does Not Stay Lit
Frustrating times call for heroic measures when pilot flames don’t stay lit. Commonly, this could be due to a few reasons.
- The thermocouple may be dirty or damaged, thus misreading the temperature and shutting off the gas supply.
- A draft in the room can put out the flame.
- Lastly, insufficient gas flow can also be a culprit.
To get to the root of the problem, turn off the gas supply and unscrew the thermocouple from the pilot assembly with a wrench. To avoid the draft, close any nearby windows and doors and turn off fans blowing air towards the pilot light. If that doesn’t help, adjust the gas valve to increase the gas flow.
Safety first when playing around with a home’s heating system is paramount. If unsure how to troubleshoot, get an HVAC technician to help.
Take Sarah’s story, for example. It took her several weeks of huddling up in the cold before she decided to bring in a pro. She found out that her cat had knocked a plant onto an open vent grille near her furnace. This had congested the filter with dust and debris causing issues with the thermocouple. The technician changed her filter and cleaned the dust bunnies from the furnace’s inner workings. Sarah was over the moon – all thanks to the expert!
Pilot Flame Height is Too High or Too Low
Too high or too low a Pilot flame height can cause appliance problems. To get your appliance running smoothly, take action quickly. Here’s how:
- Shut off the gas to the pilot and let it cool.
- Use a wire brush or compressed air to get rid of dirt and debris from the pilot orifice.
- Change the flame height by turning the adjustment screw near the pilot light assembly.
Remember, sealed combustion chambers should be left to the professionals – tampering with them could be dangerous. Also, if adjusting the flame height doesn’t work, there might be a bigger issue requiring urgent attention.
To avoid future problems with your gas appliance, inspect and maintain it regularly. Watch for flame color changes, as these could signal dirty burners or not enough combustion air. Ultimately, keeping your appliance running optimally improves performance, and safety, and lowers repair costs in the long run.
Pilot Flame is Flickering or Yellow
The flickering or yellow pilot flame is a common sight but must be addressed quickly. This flame means an issue with the gas-to-air ratio. This could lead to poor combustion and toxic carbon monoxide.
- First, clean the pilot assembly and adjust it.
- Then, double-check for drafts.
- If there is a faulty thermocouple or control valve, get help right away.
It is essential to take action when it comes to any problems with the pilot light. Flickering or yellow flames can signify serious issues. To keep your family safe and comfortable, take note of any issues and address them quickly.
Let’s hope the pilot light troubles disappear, but if not, you know how to tackle them now!
Conclusion
Adjust the pilot light flame on your gas furnace with a simple process. It’s easy and only takes a few minutes. Use the adjustment screw or knob near the pilot valve control. Take caution when working with gas and follow manufacturer instructions. If you can’t relight the pilot flame, call for professional help. Make sure there’s enough gas and clean the nozzle or probe if needed. Pilot lights have been around since 1815. John Barber invented a gas turbine engine with a standing pilot light. They are used in fireplaces and heaters. However, safety and efficiency concerns have made manufacturers produce units without them.