
Table of Contents
Gas water heaters are everyday appliances that give us hot water. But sometimes they stop working, leaving us in the lurch. We’ll look at what can cause a gas water heater to stop working, and what we can do to fix it.
Understanding what stops a gas water heater from working is key for troubleshooting. Relighting the pilot flame, checking the gas valve, clearing sediment buildup and ensuring water and electrical connections will restore the gas water heater’s functionality. Enjoy hot water again!
Key Takeaways
- Lack of gas supply
- Pilot light issues
- Faulty thermocouple
- Sediment buildup
- Pressure relief valve issues
- Age and wear
- Professional inspection and maintenance
Common Reasons for a Gas Water Heater to Stop Working
A gas water heater can stop working due to various common reasons. These may include issues such as a pilot light that won’t stay lit, faulty gas valves, a faulty heating element, a gas leak, sediment buildup, or a faulty thermostat.
- A pilot light that won’t stay lit: This can be caused by a faulty thermocouple or a dirty pilot orifice. The thermocouple is a safety device that detects the pilot flame and prevents gas from flowing if it goes out. Cleaning the orifice or replacing the thermocouple can usually fix this issue.
- Faulty gas valves: If the gas valve is faulty, it may not allow sufficient gas flow to the burner. This can result in the water heater not heating up properly or not working at all. In such cases, a professional plumber should be called to inspect and repair or replace the faulty gas valve.
- Faulty heating element: In a gas water heater, the heating element may become faulty and fail to heat the water. This can be due to a buildup of sediment, which prevents proper heat transfer. Flushing the tank or replacing the heating element can resolve this issue.
- Sediment buildup: Over time, sediment can accumulate at the bottom of the tank. This can reduce the efficiency of the water heater and eventually cause it to stop working. Regular maintenance, such as flushing the tank, can help prevent sediment buildup and ensure the water heater works properly.
It is important to note that these are just a few common reasons why a gas water heater may stop working. Other issues such as a gas leak, faulty thermostat, or problems with the water supply or pressure can also affect its performance. Regular maintenance and prompt professional repair can help ensure the water heater functions efficiently and provides a reliable supply of hot water.
Gas Valve Issues
Gas valves are key for a gas water heater; it controls the flow of gas to the burner. Facing issues with it can have a great effect on the heater, potentially leading to a complete system breakdown.
A worn-out solenoid is one common problem. It can stop gas from flowing correctly. A blocked or dirty pilot tube can also be an issue. Buildup in this tube can block the flow of gas and the pilot light won’t ignite.
The thermocouple can cause problems too. It senses if the pilot light is lit and tells the gas valve. If it malfunctions or doesn’t work, the valve will turn off the gas.
Pilot Light Problems
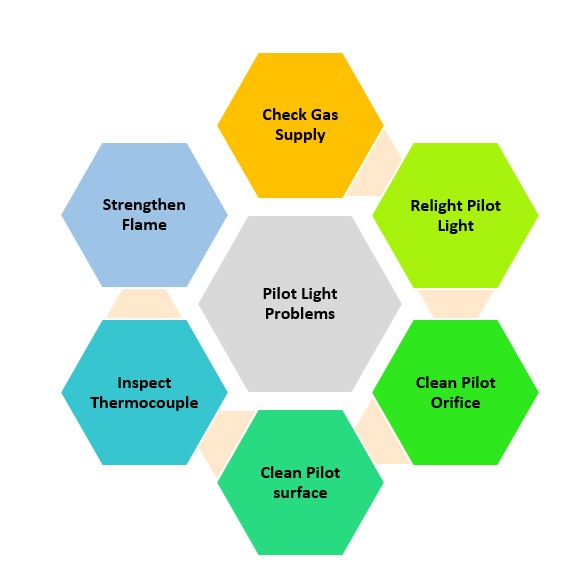
- Check Gas Supply: Ensure that the gas supply valve is open and sending enough gas to the pilot light.
- Relight Pilot Light: Spot the pilot light assembly and relight it with instructions from the heater manufacturer.
- Clean Pilot Orifice: Use a wire or needle to unclog any debris from the orifice.
- Inspect Thermocouple: Check for any damage or corrosion in the thermocouple. Replace if needed as it plays a key role in keeping the pilot light lit.
- Strengthen Flame: Make sure that the flame of the pilot light is strong enough to heat the thermocouple. Adjust the flame on the control knob if needed.
In addition, gas pressure issues, faulty ignition systems, or safety features not working could be the root of this problem. If these common solutions don’t fix it, call a professional to help you out.
Faulty Heating Element
A faulty heating element can cause your gas water heater to malfunction. It is responsible for heating the water in the tank. But over time, it can burn out or become damaged due to wear and tear. Sediment buildup can also prevent the element from working. So, it is important to fix a faulty element quickly.
This can lead to no hot water, lukewarm showers, or inconsistent hot water. Plus, it can make your heater use more energy.
For example, Lisa lost her hot water one winter morning. She called a plumber for help. They found the heating element was faulty and replaced it. Then Lisa and her family could enjoy warm showers.
Without maintenance, sediment buildup is likely. So, take care of your gas water heater.
Sediment Buildup
Sediment buildup can cause problems in a gas water heater. It reduces the efficiency of the heating element, making less hot water. It can also lead to loud noises during operation. Plus, sediment can clog the drain valve or restrict water flow, causing leaks or complete failure. Buildup may be due to mineral deposits over time. So, regular maintenance and flushing is key!
Gas leaks in water heaters are like bad breakups. They’re dangerous, smelly, and leave you feeling cold.
Gas Leaks
Gas leaks can be a real headache for gas water heaters. If there is a gas leak, it stops the heater from working and poses a threat to safety. A crack or damage in the gas line causes gas to escape. This can cause a flammable and explosive buildup in small spaces. Address any suspected gas leaks right away and get professional help to ensure safety and proper functioning of the heater.
Old and worn fittings and connections can lead to gas leaks. Over time, these components deteriorate or become loose. Improper installation or maintenance can also result in gas leaks. Natural disasters or accidents can damage pipelines and cause cracks, leading to gas release. It’s important to be aware of these risks and take precautions.
A sad event occurred years ago in a residential building. A faulty connection in a gas water heater had leaked for a long time, putting residents in danger. The result was an explosion that caused destruction and casualties. This stresses the importance of regular inspections and prompt action when dealing with gas water heaters.
Solving your gas water heater’s mystery is not as exciting as finding a missing artifact. But it is just as important!
Troubleshooting Steps to Identify the Cause
Troubleshooting Steps to Identify the Cause:
If your gas water heater has stopped working, there are several steps you can take to troubleshoot and identify the cause of the problem. Here are six steps to guide you:
- Check the pilot light: Ensure that the pilot light is lit. If it’s not, relight it following the manufacturer’s instructions. If the pilot light won’t stay lit, there may be an issue with the gas supply or the thermocouple.
- Verify the gas supply: Make sure that the gas valve supplying the water heater is open. If it’s closed, open it and wait a few minutes for the gas to reach the appliance. If there’s a gas leak or a problem with the gas supply, contact a professional plumber.
- Confirm the power source: For gas water heaters that have an electric ignition, verify that the electrical panel or circuit breaker providing power to the unit is functioning properly. A tripped breaker could be the cause of the problem.
- Check for a faulty heating element: Electric water heaters may have a faulty heating element. Use a multimeter to test for continuity and replace the element if necessary. If you’re unsure how to do this, consult a licensed plumber.
- Inspect for sediment buildup: Sediment can accumulate at the bottom of the tank and cause the water heater to stop working efficiently. Drain some water from the tank to check for excessive sediment buildup. If there’s a significant amount, consider flushing the tank or contacting a professional plumber for assistance.
- Examine the pressure relief valve: The pressure relief valve is designed to release excess pressure from the water heater. Test it by lifting the lever and allowing some water to escape. If the valve is faulty or there’s a problem with water pressure, it may need to be replaced.
These troubleshooting steps should help you identify the cause of your gas water heater not working. However, if you’re unsure or unable to resolve the issue, it’s recommended to seek professional plumbing services.
In addition to the steps mentioned above, it’s worth mentioning that a common problem in gas water heaters is a buildup of rust and corrosion. These can lead to leaks and other issues, so regular maintenance and inspection are important.
Checking the Gas Supply
Check the gas supply to tackle gas-related issues. Visually inspect the fuel line for leaks or damage. Ensure no blockages in the gas line. Use a pressure gauge to measure the gas pressure. Compare it to the manual’s suggested pressure. Contact your gas provider if there are any interruptions. Verify other appliances using gas are functioning. Tighten connections and inspect regularly.
Relighting the Pilot Light
- Make sure the gas is off.
- Find the gas valve and switch it to “off”.
- Spot the pilot light near the burner. Use a torch if needed.
- Grab a long match or extended lighter to light it.
- Hold down the reset button while lighting the pilot light.
- Keep the button pressed for 30 seconds to make sure it stays lit.
Safety is key when handling gas appliances. If you face issues, ask an expert who specializes in gas appliances. Read the user manual for your appliance’s model and make. Igniting the pilot light incorrectly can trigger gas leaks, which is dangerous. So, take all precautions and look for professional help.
The National Fire Protection Association (NFPA) reported that faulty ignitions and pilot lights caused 14% of residential fires from 2014-2018. So, take proper care of your appliances and ensure their safe operation. Inspect and clean the heating element to give your toaster the attention it needs.
Inspecting and Cleaning the Heating Element
The heating element in a device may sometimes encounter problems that lead to malfunctioning. To identify the cause, inspecting and cleaning the element is crucial.
- Inspection:
- Disconnect power source first for safety.
- Remove external covers or panels to get to the heating element.
- Check for any signs of damage, like cracks or discoloration.
- Make sure connections and wires are secure.
- Cleaning:
- Prepare a cleaning solution with warm water and gentle detergent.
- Use a soft cloth or sponge to wipe the surface of the element.
- Pay attention to remove any dirt, grease, or debris.
- Don’t use abrasive materials or harsh chemicals.
- Reassembly:
- Allow time for the heating element to dry before reassembling.
- Fasten connections according to manufacturer’s guidelines.
- Double-check there are no obstructions to the proper functioning.
- Testing:
- Reconnect power and switch on the device.
- Make sure the element operates without any issues.
- Monitor for strange smells, sparks, or noises.
Regular inspection and cleaning can extend the lifespan and performance of your device’s heating element. If you have persistent issues despite this, consult a professional technician.
Flushing the Tank to Remove Sediment
Turn off the power supply and close all valves connected to the tank. Open the drain valve at the bottom of the tank. Let the water flow out until it runs clear. Then, close the drain valve. Fill up the tank and turn on the power supply for normal operation.
Periodic flushing and cleaning the tank can prevent sediment buildup and lengthen its life. A study by Water Quality Association found that regular tank flushing significantly boosts water quality. Locating gas leaks can be a challenge; make sure you don’t look for it in the wrong spots!
Detecting and Addressing Gas Leaks
Stay aware! If you smell something fishy, like rotten eggs, or hear a hissing sound near gas lines or appliances, it could be a gas leak. Open windows and doors to let fresh air in and turn off your gas meter or main shut-off valve right away. Avoid open flames and electrical equipment that can cause sparks. Contact your local gas company or emergency services immediately.
Have regular maintenance checks for all gas appliances by qualified technicians. And remember, stay proactive and prioritize safety at all times – taking immediate action could save lives and prevent damage.
Fixing and Repairing the Water Heater
When it comes to fixing and repairing your water heater, there are certain steps you can take to resolve common issues. By following these simple guidelines, you can potentially save time and money by avoiding the need for professional plumbing services.
- Check the Power Source: Start by ensuring that the water heater is receiving power. Check the circuit breaker or the electrical panel to make sure there are no tripped breakers or blown fuses. If necessary, reset the breaker or replace the fuse.
- Relight the Pilot Light: If you have a gas water heater, the pilot light may have gone out. Follow the manufacturer’s instructions to relight the pilot light. If the pilot light keeps going out, it could be a sign of faulty thermocouple or gas valve, which may require professional repair.
- Inspect the Heating Element: In the case of electric water heaters, a faulty heating element could be the culprit behind the lack of hot water. Use a multimeter to test the heating elements for continuity. If either of them is defective, it will need to be replaced.
- Clear Sediment Buildup: Over time, sediment can accumulate at the bottom of the tank, causing various issues such as reduced heating efficiency and even tank failure. Drain or flush the water heater to remove any sediment buildup and improve its performance.
- Check for Leaks and Gas Supply: Inspect the water heater for any signs of leaking water or gas. Leaking water can indicate a faulty temperature pressure relief valve or a leaking water tank, while a gas leak can be potentially dangerous. If you detect any leaks, it is essential to seek professional plumbing repair immediately.
By following these steps, you can troubleshoot and fix common water heater problems. However, please note that if you are unsure or uncomfortable performing these tasks, it is always recommended to consult a licensed plumber for proper diagnosis and repair of your water heater.
Replacing Faulty Gas Valves
To successfully replace faulty gas valves, follow this 3-step guide.
- Step 1: Turn off the gas supply. Locate the valve and switch it to “Off”. This stops any gas from flowing.
- Step 2: Use a wrench to disconnect the gas line from the faulty valve. Support any fittings or connections with an extra wrench or pliers, and unscrew and detach the old valve.
- Step 3: Apply thread sealant tape to the new gas valve’s threaded end. Align and screw it in place using a wrench – not too tight. Reconnect the gas line, ensuring all fittings are secured.
After completion, turn on the gas supply and check for leaks with soapy water. Test your water heater to make sure it works properly.
Safety is key when replacing faulty gas valves. If you are unsure, it’s best to get professional help. Check your water heater manufacturer manual for tailored instructions.
HomeAdvisor states that replacing a faulty gas valve costs between $150 and $500, depending on access and location. With the right guidance and caution, you can restore your water heater’s functionality.
Repairing or Replacing the Pilot Light
The pilot light in a water heater is very important. If it stops working, the water heater won’t work either. So, knowing how to repair or replace it is essential. Here’s how:
- Turn off the gas supply. This should be done first to avoid any accidents. Find the valve near the bottom of the water heater and turn it clockwise.
- Remove the access panel. It gives access to the pilot light assembly.
- Clean or replace the pilot light. See if it’s dirty, has debris, or corrosion. Clean it with a small brush and compressed air. If that doesn’t work, then you may need to replace it. Check your water heater manual for instructions.
Some modern water heaters don’t need pilot lights. They use electronic ignition systems or hot surface igniters instead. If yours has one and isn’t working, ask a professional technician for help.
Replacing a Faulty Heating Element
For a successful replacement of a faulty heating element, it is important to take note of details. Choose a compatible heating element that matches the model and wattage requirements. Here are the steps to follow:
- Turn off the power supply to the water heater for safety.
- Attach a hose to the drain valve and place it in a suitable drainage area.
- Remove the access panel to expose the heating element and thermostat.
- Disconnect the wires using pliers or a wrench, then replace the old heating element with a new one.
- Reconnect the wires and ensure insulation, then check for any leaks or loose connections.
Going back in time, public bathhouses in ancient Rome relied on innovative hot water systems. People had to repair their faulty heating elements as early as 200 AD.
Replacing a faulty heating element is necessary to regain control over your water heater and warm up your daily routine. So, don’t be afraid to flaunt your DIY skills and save some bucks!
Flushing and Maintaining the Water Heater
Flush and maintain your water heater for optimal performance and long life. Regular maintenance removes sediment and avoids issues. Follow these steps:
- Turn off the power supply. For electric, switch the circuit breaker, for gas, turn off the gas valve.
- Find the drain valve at the bottom of the tank. Place a bucket or hose to collect the water that will be flushed out.
- Open the pressure relief valve and the drain valve. All the water should drain out.
- Close both valves, remove sediment from the drain valve outlet, and switch on the cold-water supply.
- Restore power to the electric heater with the circuit breaker, and to the gas heater with the gas supply valve.
Flushing prevents sediment buildup that can reduce efficiency and cause leaks. Did you know that HomeServe USA say regular maintenance can extend the water heater’s lifespan past 10-15 years? Leave gas leak fixes to the pros, because DIY gas leaks are no joke.
Calling a Professional Plumber for Gas Leak Repair
Gas leak repair is something that only professionals should do. Here are five reasons why it’s right to hire a plumber:
- Experience and Expertise: Professional plumbers possess the necessary experience and know-how to fix gas leaks.
- Safety: These professionals are trained to handle dangerous situations, keeping you safe.
- Equipment: Plumbers have specialized tools for accurate repairs.
- Code Compliance: They guarantee compliance with local building codes.
- Peace of Mind: You can be sure the job will be done right.
Preventive Measures to Keep the Water Heater Working
Preventive Measures to Maintain the Functionality of a Water Heater
To ensure that your water heater continues to work efficiently, it is important to take some preventive measures. Here are some steps you can follow:
- Schedule Regular Maintenance: Arrange for regular maintenance by a professional plumber to inspect and service your water heater. They can identify any potential issues and perform necessary repairs to keep your heater in good working condition.
- Check the Pressure Relief Valve: Regularly check the pressure relief valve on your water heater to ensure it is operating properly. This valve helps release excess pressure and prevents potential damage to the tank and other components.
- Flush the Tank: Over time, sediment can build up in the tank, affecting the efficiency of your water heater. Flushing the tank annually helps remove any sediment and maintains optimal performance.
- Inspect and Clean the Heating Element: If you have an electric water heater, inspect and clean the heating element regularly. A buildup of mineral deposits can reduce its efficiency and lifespan.
- Insulate Exposed Pipes: Insulating exposed pipes can help prevent heat loss and maintain a constant supply of hot water. This is especially important in colder climates where pipes are more susceptible to freezing.
By following these preventive measures, you can extend the lifespan of your water heater and minimize the risk of malfunctions or costly repairs.
Remember, if you experience any issues with your water heater, it is always recommended to seek the assistance of a licensed plumber. They have the expertise to diagnose and fix any problems, ensuring your water heater continues to function properly.
Don’t neglect your gas water heater, or it might give you the cold shoulder.
Regular Maintenance and Inspection
Regular maintenance and inspection of your water heater is essential for proper functioning and longevity. Not doing so means frequent breakdowns and expensive repairs. Here’s how to keep your water heater in top shape:
- Check the pressure relief valve. This valve releases excess pressure and prevents explosions. Test it by turning off the power, placing a bucket under the valve, and lifting the lever. Water should flow smoothly.
- Flush out sediment buildup. Minerals and sediments accumulate at the bottom of the tank, reducing efficiency. Attach a hose to the drain valve, direct it to a safe area, and open it fully. Let the tank flush until clear water runs through.
- Inspect for leaks or corrosion. Leaks or corrosion from damaged pipes or connections can cause major problems. Inspect all visible components for moisture or rust. Replace or repair faulty parts quickly.
- Insulate exposed pipes. Hot-water pipes lose heat during transit, wasting energy and increasing bills. Insulating pipes with foam sleeves or wraps reduces heat loss and boosts efficiency.
Regular maintenance prolongs your water heater’s life and ensures optimal performance. By checking valves, flushing sediments, inspecting for leaks or corrosion, and insulating exposed pipes, you can avoid costly repairs and enjoy uninterrupted hot water for years! Plus, flushing the tank regularly removes junk, keeping it fresh and ready to heat.
Flushing the Tank Regularly
Flushing your water heater is an essential preventive measure that boosts its performance and lengthens its lifespan. Not flushing it can cause sediment buildup, reduced heating and more energy wasted. Here are the steps:
- Turn off the power or gas valve to the heater.
- Attach a hose to the tank’s drain valve.
- Run the hose to a suitable drainage area like a floor drain or outside.
Then, open the pressure relief and drain valves. Let the water flow until it is clear with no sediment or debris.
For safety, never flush hot water from an electric heater. Be careful when handling hot water.
Flushing the water heater prevents the pipes from clogging and reduces heating costs. It also removes rust and mineral deposits that can affect performance.
A friend of mine didn’t flush regularly and sediments built up in their tank. This caused corrosion, leaks, and finally they needed a new unit. Regular maintenance would have saved them money.
Flushing regularly can save you money on energy bills and repairs. Keep the gas valves and pilot light in good shape. A cold shower isn’t refreshing!
Maintaining the Gas Valves and Pilot Light
Maintain the gas valves and pilot light: essential for your water heater’s proper functioning. Neglecting this step may lead to inefficient heating, or worse, a breakdown requiring costly repairs. Here’s a 3-step guide to help you:
- Inspect: Check the gas valves and pilot light monthly. Are there any damages or leaks? Is the pilot light lit and burning evenly? If not, call a pro.
- Clean: Turn off the gas supply first. Use a soft brush or cloth to remove dirt and grime from around the valves and pilot light. Avoid harsh chemicals.
- Lubricate: Consult the manual for the type of lubricant to use. Apply a small amount to each valve, following the manufacturer’s instructions.
Monitoring and Addressing Sediment Buildup
Monitoring and addressing sediment buildup in your water heater is important for its optimal performance. Neglecting this can cause reduced heating efficiency, higher energy use, and even damage to the appliance. Here’s a simple guide to help avoid sediment buildup:
- Regular Drainage: Drain the water heater at least once a year. Attach a hose to the drain valve and let the water flow until it’s clear.
- Flushing Method: Close the cold-water supply valve and attach a garden hose to the drain valve. Then, let the water flow into a bucket till it’s clear.
- Anode Replacement: The sacrificial anode rod inside your water heater stops corrosion. It gets less effective over time, so check and replace it as needed.
- Water Softener: If you have hard water, install a water softener system. Hard water contains more minerals that form sediment buildup. A water softener will eliminate these minerals and prolong the life of your heater.
Monitor the system for signs of sediment buildup like decreased hot water pressure, unusual noises, and discolored hot water. Address these issues before they cause more damage. Take preventive measures now and enjoy the benefits of a well-maintained water heater. Save money on energy bills, prolong its lifespan, and have consistent hot water in your home. Don’t let gas leaks and lack of ventilation turn your water heater into a fiery hot mess. Start now!
Ensuring a Safe Gas Supply and Adequate Ventilation
Saving money? Hot showers are great but not when they lead to a Kardashian-level shopping spree! Avoid water heater issues by ensuring the safety of your gas supply and proper ventilation. Neglecting these aspects can result in hazardous situations and inefficient performance.
For gas supply: Check connections for any leakage and make sure they are tightly sealed. Also, get a professional inspection to identify potential issues quickly.
Ventilation: Adequate air circulation is key. Ensure the area around the water heater is well-ventilated. Installing vents or fans will improve air quality and help maintain optimal functioning. Plus, it will prevent dangerous gases like carbon monoxide from accumulating. Ventilating adjacent areas will also protect against mold growth.
Frequently Asked Questions
1. What are some common reasons why a gas water heater may stop working?
There are several common reasons why a gas water heater may stop working, including:
- Water leaks
- Gas leaks and faulty gas valves
- Faulty heating element
- Faulty temperature pressure valve
- Rust and corrosion
- Failing anode rod
- Thermostat control issues
- An improperly sized water heater
- Damaged burner assembly or gas control valve
- Age1
2. Do gas water heaters have to be reset if they stop working?
It depends on the reason why the gas water heater stopped working. If the issue is due to a tripped circuit breaker or blown fuse, then resetting the circuit breaker or replacing the fuse may fix the problem. However, if the issue is due to a faulty component, such as a faulty heating element or gas control valve, then resetting the water heater will not fix the problem1.
3. What can cause a gas water heater to keep running without producing hot water?
If a gas water heater keeps running without producing hot water, the problem may be with the burner assembly or gas control valve. The gas burner is one part of the larger burner assembly, which includes the thermocouple, main orifice, main gas supply tube, pilot burner, pilot orifice, and pilot burner gas supply. If any of these elements are clogged or not functioning properly, then the entire system won’t work as intended1.
4. What can cause a gas water heater to not work at all?
A gas water heater may not work at all due to several reasons, including:
- Faulty gas valve
- Faulty thermocouple
- Faulty pilot light
- Tripped circuit breaker or blown fuse
- Faulty heating element
- Clogged gas burner orifice
- Gas supply issues2
5. Can an electric hot water heater stop working for the same reasons as a gas water heater?
Yes, an electric hot water heater can stop working for some of the same reasons as a gas water heater, such as a faulty heating element, thermostat control issues, and age. However, there are also some issues that are unique to electric water heaters, such as a faulty thermostat, tripped circuit breaker, or blown fuse6.
6. What should I do if my gas water heater stops working?
If your gas water heater stops working, you should:
- Check the pilot light to see if it is lit
- Check the circuit breaker or fuse box to see if the circuit has tripped or the fuse has blown
- Check the thermostat to see if it is set correctly
- Check for any leaks in the gas line or water supply line
- Check the burner assembly and gas control valve for any damage or clogs
- Call a professional plumber if you are unable to diagnose or fix the problem yourself
Conclusion
Summarizing, several reasons can cause a gas water heater to stop functioning. Common issues include a faulty pilot light, sediment buildup, gas leaks, and faulty heating elements. It is essential to schedule regular maintenance to avoid these problems.
Additional factors, such as low water pressure or a discolored water supply, can also affect the performance of a water heater. Checking the gas supply and the condition of the gas valve is important for proper functioning.
References :