
Table of Contents
Struggling to figure out the size of your RV water heater’s drain plug can be a daunting task. Did you know, for instance, that Atwood water heaters typically use a 1/2 inch pipe thread for their drain plugs? This blog post will provide a comprehensive guide on how to understand and measure the size of various brands’ RV water heater drain plugs such as Dometic and Suburban, besides necessary tools required for removing or replacing it.
Stay with us if you don’t want shower issues to hold up your next adventure!
Key Takeaways
- Atwood water heaters typically use a 1/2 inch pipe thread for their drain plugs, Dometic uses a 7/8 inch drain plug size, and Suburban uses a 3/4 inch drain plug size.
- To determine the drain plug size on your RV water heater, locate the plug, measure the diameter of the threads, convert it to inches if necessary, and consult the manufacturer’s specifications.
- Tools needed for removing and replacing the drain plug include a wrench or socket of the correct size, Teflon tape for sealing, and a rubber gasket or O-ring.
- Regular maintenance includes inspecting for leaks or damage, cleaning and lubricating the threads, and replacing the drain plug if necessary.
The Size of the Drain Plug on an RV Water Heater
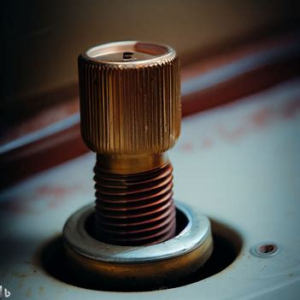
The size of the drain plug on an RV water heater varies depending on the brand, with Atwood water heaters typically using a 1/2 inch pipe thread for the drain plug.
Atwood Water Heater Drain Plug Size
Atwood, a well-recognized brand in the RV industry, designs its water heaters with a 1/2 inch pipe thread for the drain plug size. This particular detail is critical to know as it impacts maintenance and replacement procedures.
The location of this white plastic drain plug sits typically on the lower left side of your Atwood water heater. For removal purposes, you’ll need a 15/16 inch socket – another essential aspect to remember about an Atwood’s plug size when equipping yourself with tools.
Replacing this component becomes simplified if you utilize four layers of Teflon tape around it; rendering a wrench unnecessary. Being aware and understanding these specifics enhances your ability to care for and extend the longevity of your Atwood water heater while avoiding hiccups during routine maintenance or necessary replacements.
Dometic Water Heater Drain Plug Size
The Dometic water heater, another popular brand for RVs, typically has a drain plug size of 7/8 inch. This is the measurement you’ll need to keep in mind when removing or replacing the drain plug on your Dometic water heater.
It’s important to have the correct size wrench or socket to ensure a proper fit and avoid damaging the plug. Proper maintenance of your Dometic water heater drain plug will help prevent leaks and extend the lifespan of your RV’s water heating system.
Regular inspection and cleaning are key to ensuring that everything functions smoothly and efficiently during your travels.
Suburban Water Heater Drain Plug Size
The Suburban water heater is another popular choice for RV owners, and understanding the drain plug size is crucial for proper maintenance. The drain plug on a Suburban water heater typically has a 3/4 inch pipe thread, which is important to know when selecting replacement plugs or tools for removal.
To remove the drain plug from a Suburban water heater, you will need a wrench or socket that fits the 3/4 inch size. It’s essential to have the correct tools on hand to ensure easy removal and prevent any damage to the plug or water heater.
Regular inspection and timely replacement of the drain plug are necessary to maintain the functionality of your Suburban RV water heater.
How to Determine the Drain Plug Size on an RV Water Heater
Determining the drain plug size on your RV water heater is essential for proper maintenance and replacement. Here’s a step-by-step guide on how to determine the drain plug size:
- Locate the drain plug: The drain plug is typically found on the lower left side of the water heater. It is usually a white plastic plug that can be easily identified.
- Measure the thread size: Use a ruler or tape measure to measure the diameter of the threads on the drain plug. The thread size refers to the outer diameter of the threads.
- Convert measurements: Once you have measured the diameter, convert it into inches if necessary. Most drain plugs have standard imperial measurements.
- Consult manufacturer specifications: Check the manufacturer’s specifications or user manual for your RV water heater to find out the recommended drain plug size.
- Seek professional assistance if unsure: If you are still unsure about the drain plug size, contact an RV expert or dealer who can provide guidance and help you find the correct size.
Tools Needed for Removing and Replacing the Drain Plug
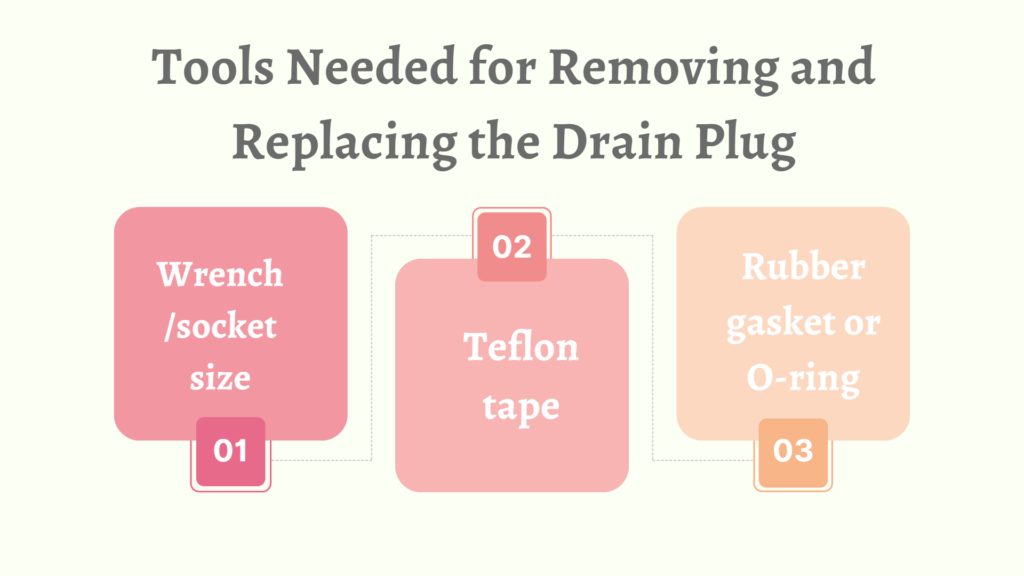
To remove and replace the drain plug on an RV water heater, you will need a wrench or socket of the proper size, Teflon tape for sealing, and a rubber gasket or O-ring. Find out more about these essential tools and their role in maintaining your RV water heater.
Wrench/socket size
The wrench/socket size is a crucial factor when it comes to removing and replacing the drain plug on an RV water heater. For most Atwood water heaters, which are commonly found in RVs, you will need a 15/16 inch socket for easy removal of the drain plug.
It’s important to have the right-sized socket as using incorrect tools can result in stripped or damaged threads on the drain plug.
In addition to the socket, it’s also recommended to use Teflon tape when replacing the drain plug. This helps create a tight seal and prevents any leaks from occurring. Simply wrap four layers of Teflon tape around the threads of the new drain plug before inserting it into place.
Teflon tape
To ensure a proper seal and prevent leaks, it’s important to use Teflon tape when removing and replacing the drain plug on your RV water heater. Teflon tape is a thin, white tape that is wrapped around the threads of the drain plug before installation.
This tape acts as a lubricant and creates a tight seal between the plug and the water heater, preventing any water from escaping.
Using Teflon tape is easy. Simply wrap 2-3 layers of tape clockwise around the threads of the drain plug before screwing it back into place. Make sure to tighten it securely but be careful not to overtighten as this can damage the threads or strip them.
Using Teflon tape has several benefits. It helps prevent leaks by creating an effective barrier between threaded surfaces, reducing friction and ensuring a watertight connection. Additionally, it makes future removal easier by providing lubrication for smooth threading.
Rubber gasket or O-ring
A rubber gasket or O-ring is an essential component when it comes to the maintenance and replacement of the drain plug on an RV water heater. This small, circular piece helps create a watertight seal between the drain plug and the water heater tank.
It prevents any leaks or drips from occurring after you have drained the water from your RV’s heater. The rubber gasket or O-ring should be inspected regularly for signs of wear or damage, such as cracks or tears.
If necessary, it should be replaced to ensure that you have a reliable seal every time you use your RV’s water heater.
Proper Maintenance of the RV Water Heater Drain Plug
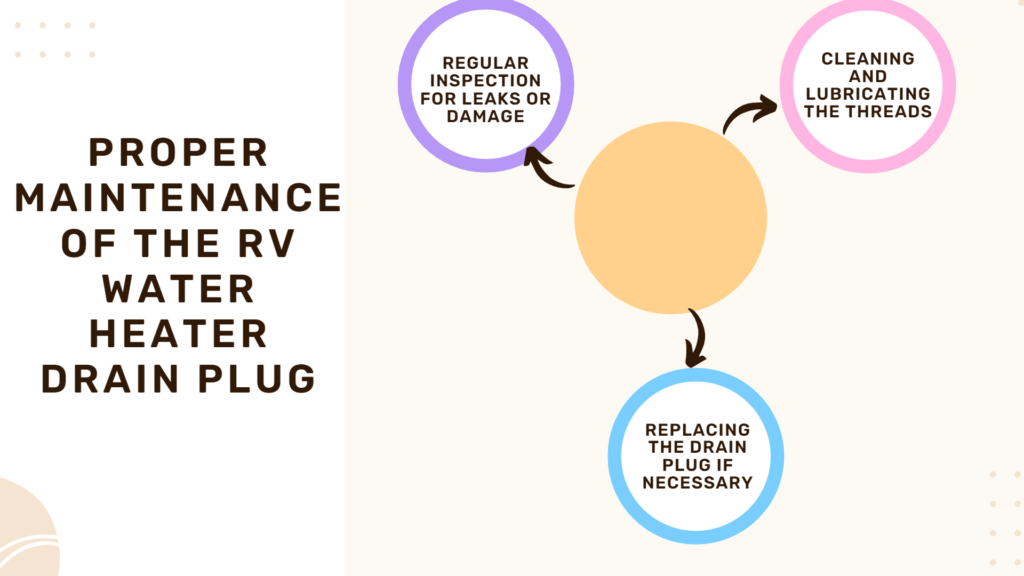
Regular inspection is necessary to check for any leaks or damage, and cleaning and lubricating the threads should be done as part of routine maintenance.
Regular inspection for leaks or damage
Regular inspection of the drain plug on your RV water heater is essential to ensure it is functioning properly and to prevent any potential leaks or damage. Here’s what you need to do:
- Visually inspect the drain plug for any signs of cracks, chips, or wear. If you notice any damage, replace the drain plug immediately to prevent leaks.
- Check for any signs of water leakage around the drain plug area. This could indicate a faulty or loose plug that needs to be tightened or replaced.
- Look for any rust or corrosion on the drain plug threads. Corrosion can cause the drain plug to become difficult to remove or may result in leaks. If you notice any rust, clean the threads thoroughly and consider applying some lubricant to prevent future issues.
- Inspect the rubber gasket or O – ring on the drain plug for any signs of deterioration or cracking. A damaged gasket may not create a proper seal, leading to leaks. Replace the gasket if necessary.
- Don’t forget to check other components around the drain plug area, such as the anode rod (if applicable). The anode rod helps prevent corrosion inside your RV water heater tank and should also be inspected regularly.
Cleaning and lubricating the threads
Cleaning and lubricating the threads of your RV water heater drain plug is an important part of proper maintenance. Here’s how to do it:
- Start by turning off the power or gas supply to the water heater and allowing it to cool down completely.
- Locate the drain plug on the lower left side of the water heater. It will have threads that can accumulate dirt, debris, and mineral deposits over time.
- Use a clean cloth or brush to remove any visible dirt or debris from the drain plug and its surrounding area.
- Mix a solution of warm water and mild dish soap in a bucket or container.
- Dip a soft – bristle brush into the soapy water solution and gently scrub the threads of the drain plug. Make sure to reach all areas of the threads to remove any buildup.
- Rinse the drain plug thoroughly with clean water to remove any soap residue.
- Once clean, dry the drain plug completely with a clean towel or let it air dry.
- Apply a small amount of silicone – based lubricant onto your finger or a clean cloth.
- Rub this lubricant onto the cleaned threads of the drain plug, ensuring that they are evenly coated.
- Reinstall the drain plug by carefully threading it back into place using your hands. If necessary, use a 15/16 inch socket wrench for tightening.*
- Turn on the power or gas supply to your RV’s water heater and check for any leaks around the drain plug area.
Replacing the drain plug if necessary
To ensure the proper functioning of your RV water heater, it’s important to replace the drain plug when necessary. Here are some steps to follow:
- Turn off the power and gas supply to the water heater.
- Locate the drain plug on the lower left side of the water heater.
- Use a 15/16 inch socket wrench or appropriate tool to loosen and remove the drain plug.
- Inspect the drain plug for any signs of damage or wear.
- If the drain plug is damaged, replace it with a new one of the same size and thread type.
- Apply 4 layers of Teflon tape to the threads of the new drain plug before screwing it back into place.
- Tighten the drain plug securely, but avoid overtightening as this can cause damage.
- Turn on the power and gas supply to restore functionality to your RV water heater.
Conclusion
In conclusion, understanding the size of the drain plug on an RV water heater is crucial for proper maintenance and replacement. By knowing the specific drain plug size, using the correct tools and following recommended procedures, RV owners can ensure their water heaters function efficiently.
Whether it’s Atwood, Dometic, or Suburban, taking care of the drain plug will help extend the lifespan of your RV water heater and prevent potential issues down the road. So don’t overlook this small but essential component in maintaining your RV’s plumbing system.
FAQs
1. What is the purpose of the drain plug on an RV water heater?
The drain plug on an RV water heater is used to empty and flush out the tank, removing any accumulated sediment or debris.
2. How do I determine the size of the drain plug on my RV water heater?
To determine the size of your RV water heater’s drain plug, you can refer to your owner’s manual or contact the manufacturer for specifications. Alternatively, you can measure the diameter and threads per inch (TPI) of your current drain plug.
3. Can I replace a missing or damaged drain plug myself?
Yes, in most cases, you can replace a missing or damaged drain plug yourself. You will need to purchase a replacement that matches the size and threads of your original drain plug. It is important to ensure a proper fit to prevent leaks.
4. Are there any special considerations when replacing a drain plug on an RV water heater?
When replacing a drain plug on an RV water heater, it is recommended to use thread sealant tape or plumbing sealant paste to provide a watertight seal. Additionally, be sure not to overtighten as this can cause damage to both the threads and surrounding components of the water heater tank.