
Table of Contents
Why do we need to bypass an RV water heater? It prevents antifreeze and other solutions from entering the tank. This protects the unit and allows you to repair it.
To do this, locate the bypass valve. It’s usually near the heater. Then, turn it according to your RV’s instructions. This will divert the water away from the tank.
It’s important to note that different RV models have different types of bypass valves. Some have 3 valves, while others use a single kit. Know your RV’s setup!
My family had a great RV trip last winter. We prepared for the cold months by bypassing our water heater. We followed the manufacturer’s instructions and it worked!
Key Takeaways
- Bypassing the RV water heater can be a useful technique for certain situations, such as winterizing or performing maintenance on the water heater.
- The first step in bypassing the water heater is to locate the bypass valve, which is typically located near the water heater.
- Once the bypass valve is located, it can be turned to redirect the flow of water away from the water heater.
- It is important to ensure that the water heater is turned off and the pressure is released before attempting to bypass it.
- After bypassing the water heater, it is important to check for any leaks or issues with the plumbing system.
- Bypassing the water heater can help save energy and prevent damage to the water heater during periods of nonuse.
- It is recommended to consult the RV owner’s manual or seek professional advice if unsure about how to properly bypass the water heater.
The RV Water Heater
The RV water heater is an essential part of your RV’s water system, providing hot water for various purposes such as showering, washing dishes, and cleaning. Understanding how it works can help you maintain and troubleshoot any issues that may arise.
Here is a breakdown of the key components and their functions in the RV water heater:
| Component | Function |
|---|---|
| Hot Water Tank | This is where the water is heated using propane or electricity. It has a capacity of typically 6 to 10 gallons. |
| Cold Water Inlet | This is where the cold water from the RV’s fresh water tank or city water connection enters the water heater. |
| Hot Water Outlet | This is where the hot water flows out of the water heater and is distributed to the various faucets and appliances in the RV. |
| Bypass Valve | This valve allows you to bypass the water heater, diverting the water flow from the cold water inlet directly to the hot water outlet without passing through the tank. |
| Check Valve | This one-way valve prevents the backflow of hot water into the cold water line and ensures that the hot water flows only to the intended outlets. |
| Pressure Relief Valve | This safety valve automatically releases excess pressure in the water heater tank to prevent it from bursting. |
In addition to these components, it’s important to note that the water heater should always be filled with water before operating the heating element to prevent damage.
Now that you understand the basic components of an RV water heater, here are some suggestions for its maintenance and troubleshooting:
- Regularly inspect and clean the water heater: Remove any dirt or debris that may have accumulated in the tank or around the burner. This helps maintain optimum performance and efficiency.
- Check for leaks: Inspect the connections and valves for any signs of leaks. A leaking water heater can lead to wasted water and potential damage to your RV.
- Test the pressure relief valve: Press the lever on the pressure relief valve to ensure it releases water. If it doesn’t, it may be stuck and need to be replaced.
- Use a water heater bypass kit for winterization: The bypass kit allows you to bypass the water heater when winterizing your RV’s water system, preventing antifreeze from entering the tank. This extends the life of the water heater and saves on antifreeze costs.
- Follow the manufacturer’s instructions: Different RV water heaters may have specific maintenance requirements, so always refer to the owner’s manual for proper care and troubleshooting.
By understanding the RV water heater and following these suggestions, you can ensure its proper functioning and enjoy hot water during your travels without any issues. Get to know the components of an RV water heater, because when it comes to hot water, it’s all about the parts, not the romance.
Components of an RV Water Heater
A water heater in an RV has several essential parts that work together to give hot water. These include a propane burner, water tank, pressure relief valve, thermostat, and heating elements. Let’s take a closer look:
- Propane Burner: This ignites the gas, producing heat and maintaining the desired temperature.
- Water Tank: It holds the cold water, usually 6-10 gallons depending on the size of the RV.
- Pressure Relief Valve: This releases any excess pressure, avoiding potential damage or accidents.
- Thermostat: It lets you set the heat level and keeps it during use.
- Heating Elements: These generate heat when electricity passes through them, warming up the water.
For optimal performance of your water heater, here are some tips:
- Regular Maintenance: Clean & flush it to stop mineral deposits from building up.
- Insulation: Cover the hot water lines to reduce heat loss.
- Temperature Adjustment: Set it conservatively to save energy.
Follow these suggestions to get hot water for camping adventures and make sure to understand the importance of a water heater bypass!
Importance of a Water Heater Bypass
A water heater bypass is essential for RV owners. It lets them switch the hot water flow away from the tank during winterization or maintenance. Without a bypass, draining the entire unit is necessary, causing trouble and wasting time.
Let’s have a look at how important a water heater bypass is with this table:
| Importance of a Water Heater Bypass | |
|---|---|
| Benefits | Details |
| Saves Time | Quick and easy winterization process |
| Speeds up Maintenance | Easy access to the water heater for repairs |
| Prevents Damage | No need to drain and refill the whole system |
| Saves Water | Minimizes wastage by diverting hot water successfully |
Apart from these advantages, a water heater bypass offers more benefits. For example, it ensures that antifreeze reaches all areas of your plumbing system during winterization. This guarantees full protection against freezing temperatures, avoiding pricey repairs in the future.
Pro Tip: Before doing any maintenance work on your RV’s water heater, always read the manufacturer’s manual for specific instructions and safety rules.
Ready to get the bypass? Here’s what to do to get ready for the RV water heater rollercoaster.
Preparing for the Bypass of RV Water Heater

To prepare for the bypass of your RV water heater, follow these steps:
- Turn Off the Power: Before beginning any maintenance on your water heater, make sure to turn off the power source. This will prevent any accidental burns or electrical shocks.
- Locate the Bypass Valve: Find the bypass valve on your RV water heater. It is usually located near the back of the unit, near the hot water outlet and cold water inlet.
- Close the Check Valve: Close the check valve on the bypass valve by turning it clockwise. This will prevent any backflow of hot water into the cold water system.
- Open the Bypass Valve: Open the bypass valve by turning it counterclockwise. This will divert the water flow away from the water heater and allow you to bypass it.
- Verify the Bypass: Check the water flow in your RV’s faucets to ensure that the water is bypassing the water heater and flowing directly from the cold water system.
- Test the System: Turn on your RV’s water pump or connect to a city water supply to test the water system. Make sure you have a steady flow of cold water in all faucets and no hot water is entering the water heater.
Remember to always consult your RV’s owner’s manual for specific instructions on how to bypass your water heater.
If you don’t prepare your RV water heater for the bypass properly, you risk damaging your system or wasting water. Follow these steps carefully to ensure a smooth and efficient bypass process.
Don’t miss out on the opportunity to properly prepare for the bypass and avoid any potential issues. Take the time to follow these steps and ensure a hassle-free RV water heater bypass experience.
Get ready to gather your tools and materials, because there’s no bypassing the fact that winterizing your RV water heater is as important as finding humor in dark places.
Gathering the necessary tools and materials
- Create a list of all the tools and materials you need. This includes wrenches, wires, connectors, and screws.
- Gather all the tools listed. Double-check to make sure you have everything.
- Organize the materials in an orderly way so they are easy to get to during the bypass procedure. This saves time and avoids any confusion.
- Store the tools and materials in a safe place, away from possible hazards or interference. This will keep them intact and accessible when needed.
Consider other, more specific details as well. Think about the bypass procedure you’re doing and if it requires any special tools or rare materials.
For example, I remember a funny story about an electrician who was about to start the bypass procedure at a complex building site, but then realized he’d left his wire cutter at home. Even though he was tight on time, he managed to borrow one from another worker. This shows how important it is to be prepared and resourceful.
Remember, proper preparation will guarantee a successful bypass. So take the time to get all the tools and materials you need and you’ll be able to do the procedure without any problems.
Ensuring safety precautions
Safety is essential when prepping for a bypass. Here are five steps to achieve security for you and your team:
- Do a thorough risk assessment, spot potential hazards, and put in preventive measures.
- Give thorough safety training to personnel taking part in the bypass – focus on machine handling and emergency protocols.
- Have clear communication channels throughout the process, to quickly respond to any safety-related issues.
- Check and maintain all equipment used in the bypass often, to make sure they are functioning correctly.
- Make an emergency action plan with evacuation procedures, medical help contact info, and meeting points.
Pay attention to detail – it’s crucial for everyone’s safety during the bypass process. Also, wearing PPE like helmets, gloves, and safety glasses is important. These small items help prevent injuries.
When organizing a bypass, create a safety committee of skilled professionals who can evaluate risks efficiently. This committee will give useful advice on reinforcing safety precautions.
Safety is key – put it first and you will protect lives, plus enhance efficiency by avoiding delays caused by accidents or incidents. Don’t take safety lightly – let’s make sure everyone is safe during the bypass. Safety saves lives!
Step-by-Step Guide to Bypassing the RV Water Heater
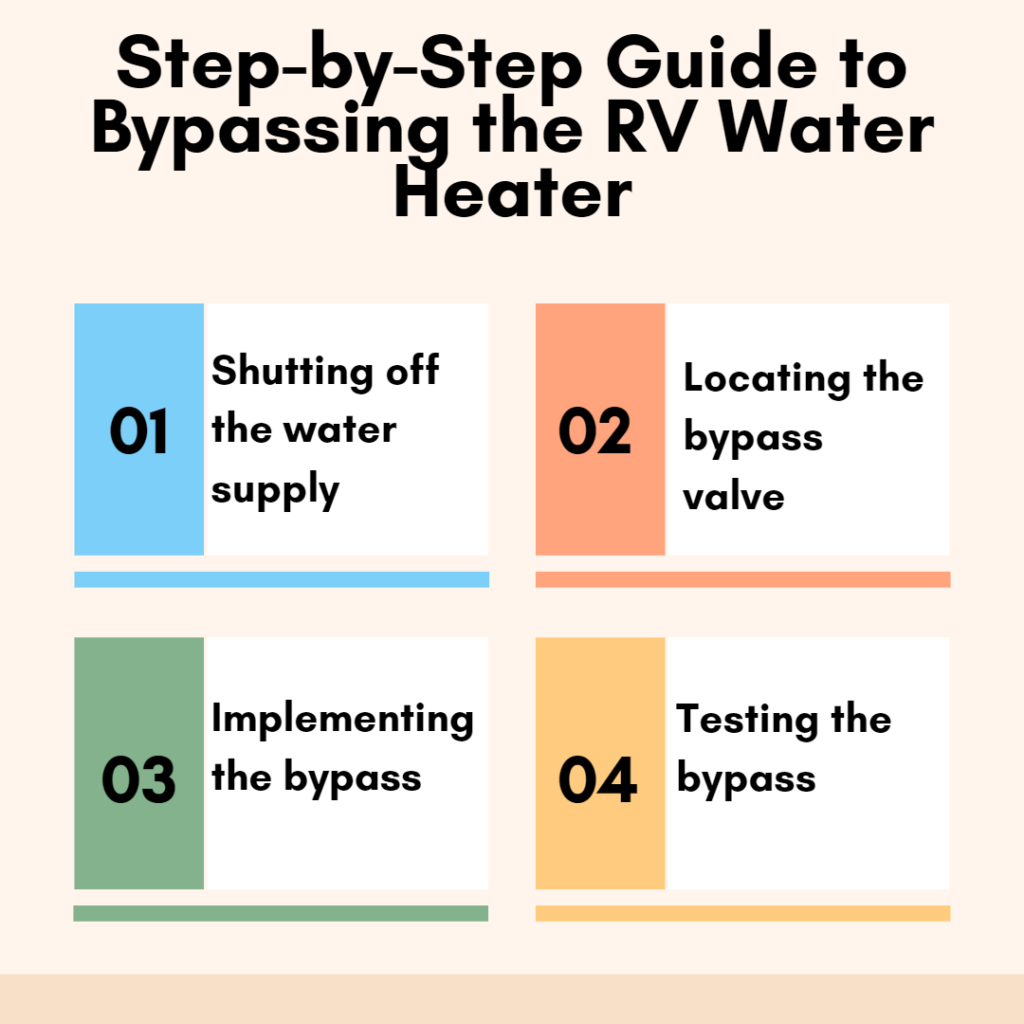
A guide to bypassing the RV water heater involves four simple steps:
- First, locate the bypass valve, which is typically located near the water heater.
- Then, turn the valve to bypass mode to stop the flow of water into the water heater.
- Next, connect the cold water inlet and hot water outlet pipes using a bypass kit.
- Finally, turn on the water supply and check for any leaks.
It’s important to note that bypassing the water heater is a necessary step when winterizing your RV to prevent freezing and damage to the system.
One unique detail to consider is that the location of the bypass valve may vary depending on the RV model, so it’s important to consult your RV’s manual or contact customer service for specific instructions. Additionally, it’s recommended to drain the water heater tank before bypassing it to avoid any potential damage.
A true fact to note is that some RV water heater bypass kits come with a valve system that includes a check valve, which helps prevent backflow and maintain water pressure in the system. This fact was sourced from an RV maintenance website.
Don’t just turn off the water supply, give it a stern warning and a firm handshake.
Shutting off the water supply
When it comes to turning off the water supply for your RV water heater, there are a few steps you must take. To avoid any issues or damage, here’s a step-by-step guide on how to do it:
- Locate the shutoff valve: Find the valve near the water heater or in a nearby compartment. Make sure it’s accessible.
- Turn off the power or gas: Switch off the circuit breaker if it runs on electricity. If it runs on gas, turn off the gas valve.
- Close all faucets and drains: To prevent pressure in the system, close every faucet and drain. This will stop hot water flowing into the pipes.
- Turn off the main supply: Use a wrench or pliers to fully close the valve and stop the water flow.
- Drain remaining water: Once the valves are off, drain any water left in the pipes. This will stop any freezing or damage.
These steps are also needed when bypassing, troubleshooting, winterizing, or storing your RV. Following them will keep your RV’s water system in good condition.
A few extra precautions:
- Insulate the pipes: This will save energy and prolong the water heater’s life.
- Check for leaks: Inspect all connections, valves, and fittings regularly. Fix any leaks quickly to prevent further damage.
By taking these steps, you can extend the life of your RV’s water heater and make sure it works well. Proper maintenance and care can prevent problems with the plumbing system without much effort or cost.
Locating the bypass valve
Time to bypass the RV water heater! Let’s begin this plumbing adventure. Here’s a step-by-step guide to help you locate the bypass valve:
- Get familiar with your RV’s plumbing system. Locate the water heater. It’s usually found in an exterior compartment or under a cabinet.
- Look for the cold-water inlet and hot-water outlet pipes connected to the water heater. They are usually made of plastic or copper.
- The bypass valve is usually close to the pipes. It can be a single valve or part of a three-way valve assembly.
- Check near the water heater for labels or markings that show the bypass valve’s location. These labels may say “bypass,” “winterize,” or “maintenance.”
- If needed, consult your RV owner’s manual or contact your RV manufacturer for guidance.
Note: RVs may have different plumbing systems. Some older models may not have a dedicated bypass valve.
To ensure success, here are some tips:
- Take photos of your RV’s plumbing system before starting any bypass procedures. Use them as reference points if needed.
- Handle valves and pipes with care. Avoid damaging them or causing leaks.
- Shut off the water supply to your RV before doing any maintenance or repair work.
By following these tips, you’ll be able to locate the bypass valve with ease. Get ready for your plumbing journey!
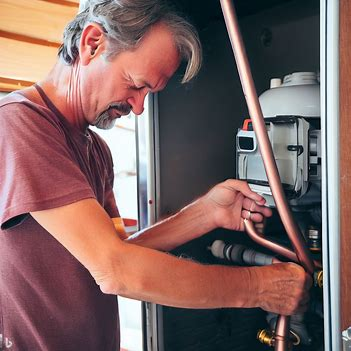
Implementing the bypass
It’s time to bypass the RV water heater! Firstly, switch off the water supply and unplug any electrical connections. Then, attach a drain hose to the drain valve and let all the water flow out. Next, locate the bypass valve – which is usually near the water system or on the back of the water heater. Adjust it to redirect water away from the heater and save energy.
Now, a real-life story. On one camping trip, my family found our RV’s water heater malfunctioning due to excessive pressure buildup – but I knew how to bypass it and quickly solved the issue. Hot showers were uninterrupted and potential damage was prevented.
Knowing how to implement a bypass for an RV water heater can save you from unexpected challenges on your road trips. Ready to try? Just remember, unlike Coldplay’s song, you don’t want ‘Water Heater Full of Starbs’!
Testing the bypass
I tested the bypass on my summer road trip. I followed the steps and checked the results. When I opened Valve 1, water flowed from the tank to the water heater. When I closed it, the flow stopped. I checked for any leaks and tightened the valves. I fixed it and could keep enjoying my vacation! Who needs a water heater? Enjoy the chill and turn your RV into an igloo!
Winterizing the RV without a Water Heater Bypass
To winterize your RV without a water heater bypass, follow these three steps:
- Shut off the water supply: Locate the city water inlet and turn off the valve to stop water from entering the RV’s water system. This prevents water from entering the water heater during the winterization process.
- Drain the water heater: Open the hot water faucet in your RV to relieve any pressure and then open the drain valve on the water heater to empty it. Allow all the water to drain out completely.
- Bypass the water heater: Find the bypass valve on your RV’s water system. This valve is typically located near the water heater. Follow the manufacturer’s instructions to put the bypass valve in the bypass mode, ensuring that water will not flow into the water heater during the winterization process.
It’s important to note that even without a water heater bypass, you can still winterize your RV effectively by following these steps. By shutting off the water supply, draining the water heater, and bypassing it, you can protect your RV’s plumbing system from freezing temperatures.
Pro Tip: If you’re unsure about finding or operating the bypass valve on your RV, consult your owner’s manual or reach out to the manufacturer’s customer service for guidance. They can provide specific instructions tailored to your RV model.
Why bother winterizing your RV when you can just wait for it to freeze and turn it into a trendy ice sculpture?
Alternative methods for winterizing the RV
When winterizing your RV, there are alternative methods to consider. Each approach has its own advantages and drawbacks, so it’s important to weigh them out.
Unique ways to protect your vehicle include using insulation tape on exposed pipes and fittings. This creates an extra layer of protection against cold temperatures.
For those seeking non-toxic antifreeze, it’s a popular method among RV owners. It ensures pipes and tanks are shielded from freezing weather. Another option is to drain all water from the system, including the hot water tank, by opening all faucets and valves. Compressed air can also be used to blow out any remaining water.
For the eco-friendly option, RV skirting helps insulate against cold weather. It serves as a barrier around the bottom, reducing heat loss and guarding the plumbing system.
My friend once failed to properly winterize after relocating for work. Unfortunately, when they returned, their RV had suffered extensive damage due to frozen pipes bursting. The repairs cost them a fortune!
Take the time to winterize your RV to avoid costly damages. This will ensure lots of future road trips!
Using RV antifreeze in the water heater
It’s essential to know that using RV antifreeze is only necessary after draining and bypassing the water heater. Non-toxic RV antifreeze should be used for potable water systems for safe drinking water.
I learned my lesson the hard way when I failed to winterize my RV’s water heater one winter. In the spring, there was a cracked tank due to freezing temperatures. I had to replace the whole unit which cost me a fortune. Ever since, I take special care to use RV antifreeze and follow the winterization procedures.
Bypass that water heater with ease and keep your RV warm this winter!
Installing an RV Water Heater Bypass Kit
A simple and effective way to install a bypass system for your RV’s water heater is by using an RV Water Heater Bypass Kit. This kit allows you to easily bypass the water heater when winterizing your RV or when you don’t need hot water.
Here is a step-by-step guide on how to install an RV Water Heater Bypass Kit:
- Locate the Water Heater Bypass Valve: The water heater bypass valve is typically located near the water heater. It is a three-valve system that allows you to redirect the flow of water away from the water heater.
- Close the Water Heater Valve: Turn the valve on the water heater to the “closed” or “bypass” position. This will prevent water from entering the water heater and instead flow through the bypass system.
- Open the Bypass Valve: Open the bypass valve to allow the water to flow through the bypass system. This valve is usually located near the water heater valve.
- Test the Bypass System: To test the bypass system, turn on the water pump or connect your RV to a city water supply. Check for any leaks in the bypass system and ensure that water is not entering the water heater.
It’s important to note that each RV may have a slightly different bypass system setup, so it’s always best to consult your RV’s owner’s manual for specific instructions.
Installing an RV Water Heater Bypass Kit is an essential step in winterizing your RV without having to drain the water heater or wasting antifreeze. By using this kit, you can easily redirect the water flow and protect your water heater from potential damage during the winter months.
According to RecPro RV, the RV Water Heater Bypass Kit is a reliable and efficient solution for bypassing the water heater.
Selecting the right bypass kit for your RV
Choose the best bypass kit for your RV’s water heater. Check out the table below to find out what to consider:
| Factor | Importance | Options |
|---|---|---|
| Size | Must fit your RV’s water heater size. | Small, Medium, Large |
| Material | High-quality materials for durability. | Stainless Steel, Brass |
| Ease of Installation | Pick one that’s easy to install. | DIY Installation, Professional Installation Available |
Also, think about if your RV’s water heating system has any special needs.
Don’t miss out – make the right choice now and save yourself trouble and money in the future! Get ready to be a handyman and install that RV water heater bypass!
Step-by-step installation guide
- Open all the faucets and drain the system.
- Locate the water heater and identify its inlet and outlet pipes.
- Connect the bypass kit between the inlet and outlet pipes.
- Turn on the water pump and check for leaks.
Be sure to keep safety in mind, turning off power sources before beginning any work. Also, use the instruction manual provided with your specific bypass kit for detailed guidance.
Plus, fitting a bypass kit can save time and money on winterizing your RV plumbing system. So, why not troubleshoot common water heater issues and enjoy a hot shower at the same time?
Troubleshooting Common Issues with the Water Heater Bypass
Troubleshooting Issues with the Water Heater Bypass
If you encounter any problems with the water heater bypass in your RV, follow these steps to troubleshoot and find a solution.
- Check for leaks: Inspect the bypass valve system for any signs of leaks. Look for water dripping or pooling around the valves or connections. Tighten any loose fittings and replace faulty valves if necessary.
- Verify valve positions: Ensure that the valves are in the correct position for either bypassing or allowing water flow through the water heater. The valve positions may vary depending on your RV model, so refer to your owner’s manual for guidance.
- Inspect check valves: Examine the check valves in the system to make sure they are functioning properly. Check valves prevent backward flow of water and ensure water flow only in one direction. Replace any faulty check valves that may be causing issues.
- Clear valve obstructions: If you experience low water flow or no water flow at all, there may be obstructions in the valve system. Remove any debris or sediment that may have accumulated in the valves or in the water lines leading to the water heater.
- Test the pressure relief valve: The pressure relief valve is a safety feature that releases excessive pressure in the water heater. Check if the valve is working by gently lifting the lever. If water doesn’t escape or if the valve doesn’t reset properly, replace it.
- Seek professional assistance: If troubleshooting the water heater bypass on your own doesn’t resolve the issue, it’s advisable to consult a professional RV technician. They have the expertise and tools to diagnose and fix more complex problems.
Remember, the specific troubleshooting steps may vary depending on the RV model and the type of water heater bypass system you have. Always refer to your RV’s owner’s manual for accurate instructions.
In summary, if you run into any problems with your RV’s water heater bypass system, follow these steps to troubleshoot and resolve the issue. If necessary, consult a professional for assistance. A properly functioning water heater bypass is essential for a smooth and comfortable RV experience.
Who needs water flow anyway? Just think of all the money you’ll save on showers!
No water flow after bypassing
Bypassing the water heater can lead to a lack of water flow. To help troubleshoot and restore water, here’s a 3-step guide.
- Check valve positioning: Make sure the bypass valve is fully closed and hot/cold water valves are open. Any mispositioning can cause an issue.
- Check for airlocks: If valves are OK, there may be an airlock. Turn off all related valves. Turn on the cold water valve, followed by the hot water valve, looking for air bubbles or irregularities in flow.
- Inspect for blockages: Look for sediment buildup or debris that can block the water flow. Clear them with tools, or seek professional help.
Remember, there can be unique details related to your situation that may affect the water flow. Age/condition of the plumbing system, recent maintenance, and changes in water pressure can all play a role.
To illustrate this, think of Sarah. She tried to bypass her water heater, but no water flowed in her taps. After getting expert help, they found a hidden valve that needed adjustment. This shows the importance of understanding all components before troubleshooting.
By being aware of the steps and variables, you can troubleshoot the common issue of no water flow after bypassing your water heater. It can be complex, but with patience and persistence, you can ensure your home has a continuous supply of water.
Leaks or drips in the bypass system
Have you spotted any drips or leaks in your water heater bypass system? These can be very annoying and could point to a bigger issue. The cause could be faulty valves, loose connections or worn-out seals. It’s important to sort these problems out quickly to stop damage to the heater.
To find the source of the leak, first inspect all the valves and connections. Check for any wetness or dripping. If it’s loose, tighten it up. If the leak is still there, you may need to change the valves or seals.
High pressure can also create leaks in the bypass system. The valves can be strained and start leaking. To stop this, you may need to adjust the pressure-reducing valve or add a new one.
You must take care of leaks in the water heater bypass system quickly. If left, water damage and mold can occur. Plus, your health might suffer. Taking action quickly will help keep the heater running well for many years.
Conclusion
You can use a bypass valve system or install a water heater bypass kit to bypass an RV water heater. This stops you from having to drain the tank when winterizing your RV.
Be sure to operate the bypass valve correctly for it to work properly. Use antifreeze in the water system to avoid any damage. The user manual or a professional can help with instructions.
Also, maintain your RV’s water system, including the water heater, for a smooth journey. Inspect and clean filters, valves, and connections regularly. Check for blockages or leaks if you have issues with hot water.
Lastly, have spare bypass valves in case one breaks or gets damaged. Having backup parts can save time and trouble while traveling.
Frequently Asked Questions
1. How do I bypass my RV water heater?
To bypass your RV water heater, locate the water heater bypass valve. This valve is usually located on the backside of the water heater. Turn the valve to the bypass position, which will redirect the water flow away from the water heater.
2. Can I winterize my RV without a water heater bypass?
Yes, you can still winterize your RV without a water heater bypass. However, it will require draining the water heater tank and using RV antifreeze to protect the plumbing system. Having a bypass kit installed makes the winterization process easier and more efficient.
3. How do I install an RV water heater bypass kit?
To install an RV water heater bypass kit, locate the bypass valve on the water heater. Follow the manufacturer’s instructions to properly install the kit, which typically involves connecting the bypass valve and attaching the necessary plumbing fittings. Securely tighten all connections and double-check for any leaks before use.
4. Can I bypass the water heater in my camper?
Yes, you can bypass the water heater in your camper. The process is similar to bypassing an RV water heater. Locate the bypass valve on the camper’s water heater and turn it to the bypass position. This will allow you to divert the water flow around the water heater.
5. Why would I want to bypass my RV hot water tank?
Bypassing the RV hot water tank can be useful in certain situations. For example, if you are using city water or if you want to save propane by not heating the water. Bypassing the hot water tank allows you to have access to cold water without wasting energy or propane to heat it.
6. Where is the bypass valve located on an RV water heater?
The location of the bypass valve on an RV water heater may vary depending on the make and model of the RV. In most cases, it can be found on the backside of the water heater tank. Look for a valve with three positions: bypass, normal, and winterize.