
Table of Contents
Introduction to furnace flame sensors
A furnace flame sensor is important for gas furnaces and heating systems. To check if it’s working, follow a few steps. A flame rod or sensor is near the base of the burner flames. It probes the flame and signals to the gas valve if there’s a flame. If the sensor is dirty or faulty, the unit won’t work properly.
To test for a bad sensor, turn off the power and locate the sensor. It has a porcelain base with one wire. Remove it and look for corrosion or soot. Clean the part with emery cloth or sandpaper, without damaging it. Reinsert it and restart the unit. See if the pilot light stays lit. If not, professional help might be needed.
Pro Tip: Regularly check all furnace parts to save on repair costs and ensure good health at home! Your furnace can’t talk, but it can tell when its flame sensor is off.
Signs that indicate a bad furnace flame sensor
When a furnace flame sensor is faulty, it can cause lots of problems, from inefficient heating to a complete shut-down. Here are some signs of a malfunctioning furnace flame sensor and what to do:
| Step | Description |
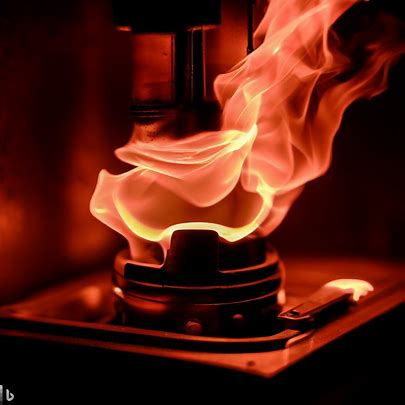
| Burner Flames are Yellow | Usually, burner flames in a gas furnace should be blue with a little yellow on the tips. If they are all yellow, it could suggest your furnace is burning incorrectly or suffering from bad combustion, and the flame sensor may need replacing. |
| Won’t Start Up: | If your heater won’t ignite after several attempts or needs frequent restarts, it could be due to an incorrect flame sensor |
| Pilot light wont stay on | Your pilot light could go out continuously or refuse to stay lit if there is something wrong with your flame sensor. This is because the pilot light goes hand-in-hand with the operation of your furnace’s main burner. |
| Heat Cycling | If your heating system cycles regularly between ON and OFF status without reaching the desired temperature, your faulty Flame Sensor might be interfering |
It’s worth noting that several other home problems can show similar signs as a bad Flame Sensor in gas furnaces. However, if you’ve experienced these problems and tried all other troubleshooting steps, calling a professional like contractors suggested by Famous Supply or ProDuct Solutions would ensure minimal service costs.
Cleaning the flame sensor with emery cloth or 400-grit sandpaper could work instead of replacing it completely. Locate it by checking inside the burner assembly for a metal rod in the flames’ heart. Once you find it and disconnect from power and unit cover, carefully detach the single wire metal rod using the porcelain base without causing any damage or bending at a zero-degree angle. Then wipe away any debris off the metal using dry emery cloth before carefully reinstalling the porcelain base into contact with everything before restarting operations.
It’s necessary to check your furnace flame sensor, just like you check your ex’s social media – it can lead to some unpleasant surprises!
Steps to check furnace flame sensor
To check your furnace flame sensor with the steps outlined in this article, you’ll need to start by turning off the furnace and finding the flame sensor. Once you have located it, you can proceed with removing and cleaning it carefully using emery cloth. Finally, you will need to re-attach the flame sensor and turn on the furnace to test its operation. This section is divided into three sub-sections: turning off the furnace and locating the flame sensor, removing and cleaning the flame sensor with emery cloth, and re-attaching the flame sensor and turning on the furnace.

Turning off furnace and locating the flame sensor
Prior to beginning the hunt for the flame sensor, it is essential to turn off your furnace for safety reasons. Now that’s done, let us move onto finding it! Here is a 5-step guide to help you locate the flame sensor:
- Find the control board on your furnace. It’s usually found close to the bottom of the furnace system.
- Spot the flame sensor; it looks like a thin metal protrusion into the burner assembly.
- Carefully remove the flame sensor from its mount using a wrench. Unplug any wires connected to it.
- Clean the sensor with an emery cloth or fine-grit sandpaper. Make sure there is no debris left on it.
- Attach the wires and put them back on their mounts after cleaning.
Keep in mind that some furnaces may have their control panels hidden behind doors or shutters. Check your manual first.
Pro Tip: If you’re still facing problems with your furnace, call professionals for help. They can identify hidden issues.
Time to give your furnace some love with an emery cloth and some elbow grease!
Removing and cleaning the flame sensor with emery cloth
To keep your furnace efficient, cleaning the flame sensor with emery cloth is key. This will ensure it works at its best, making the system run well. Here’s how to do it:
- Start by turning off the power – crucial before doing anything with electricals. Use the breaker switch or manual shutoff valve.
- Unscrew and remove flame sensor – usually near burner assembly. Unscrew and pull out carefully.
- Clean using emery cloth – gently scrub away dirt and grime on both sides. Put back together once done.
It’s essential to check manufacturer’s cleaning instructions for your furnace, as they vary. Don’t forget to clean air filters too – cleaning just the flame sensor won’t do much. Air filters impact furnace performance, so clean them every 3 months to prevent dust build-up.
Regular maintenance like this can keep your furnace efficient and avoid expensive repairs or replacements. Let’s hope the flame sensor sticks around this time!
Re-attaching the flame sensor and turning on the furnace
Reattach the flame sensor and turn on the furnace for optimal functioning. Steps:
| Step | Instructions |
| 1 | Turn off the power supply. |
| 2 | Find the flame sensor near the pilot light or burner assembly. |
| 3 | Detach the flame sensor without damaging any wires |
| 4 | Clean the surface using emery cloth or sandpaper. Do not use water or soa |
| 5 | Reattach the flame sensor by tightening the screws |
Switch on the furnace’s power supply and ignite its burners following manufacturer’s instructions.
Clean or change the flame sensor annually or periodically for optimal performance and long life of your heating system. Otherwise, incorrect readings and damage to other furnace components will occur.
Testing the furnace flame sensor
To test the furnace flame sensor and ensure your heating system is functioning well throughout the winter, you can use a multimeter to check the flame sensor’s functioning and test the power supply and gas valve operation. In this section, we’ll cover the two sub-sections that detail everything you need to know about carrying out these tests. By the end of this section, you will have a good idea of whether your furnace’s flame sensor is the cause of a faulty system and what steps to take next.
Using a multimeter to test the flame sensor’s functioning
Testing the furnace flame sensor with a multimeter needs careful steps. Here’s a guide to check if it works.
- Find the flame sensor. It is usually near the burner assembly. Shut off the power before locating it.
- Remove the flame sensor with a screwdriver, but handle it carefully.
- Set up your multimeter. Turn it on and measure DC millivolts (mV).
- Measure the voltage. Connect one lead of your meter to the spade connector. Connect your other meter lead to any ground of the furnace body. If there’s 1-3 volts AC when you light a trial fire, all is okay. Otherwise, replace or repair it.
Note: The flame sensor may not only malfunction, but also get clogged up with dirt, debris or rust.
Flame sensors are essential in HVAC systems as they help reduce energy costs from inefficient fuel use. A technician once found out that his customer’s flame sensor was blocked by soot, causing intermittent operation. Why bother testing power supply and gas valve when you can just light a match and see?
Testing the power supply and gas valve operation
When it comes to furnace maintenance, one must pay attention to the power supply and gas valve. To avoid any hazardous situation, here’s a 5-step guide on how to test them:
| Step | Instructions |
| 1 | Shut down the furnace circuit breaker at the electrical panel. |
| 2 | Turn off the gas supply valve |
| 3 | Wait a few minutes to eliminate gaseous remnants from the furnace |
| 4 | Restart the power supply; replace the burned-out fuse or activate the tripped circuit breakers if needed. |
| 5 | Listen for a clicking sound indicating the gas valve opens when starting up |
Apart from checking for air duct leaks, keep in mind any irregularities in operating sequences or noises from either component. Usually, these steps will resolve most furnace problems. However, some situations require professional help.
For consistent comfort indoors during cold weather, get a yearly tune-up from certified technicians. They’ll ensure your equipment runs according to manufacturer recommendations. So, let’s light up your furnace like a Christmas tree!
Replacing the faulty flame sensor
To replace the faulty furnace flame sensor with the correct part for your unit’s model, follow these steps: Turn off the furnace, locate the faulty sensor, and remove it from the burner assembly. After ordering the correct replacement part, install it in place of the old sensor and re-assemble the furnace. In this section, we will guide you through the process of changing the faulty flame sensor, with sub-sections on the order for the correct part, removing the faulty part, and installing the new sensor.
Ordering the correct part for the furnace model
To get the right part for your furnace model, read the manufacturer’s directions or manual. Follow the manufacturer’s exact rules for replacing the faulty flame sensor.
For ordering the correct part for your furnace, follow the below 6 steps:
- Get the make and model number of your furnace from the unit or documents.
- Check if there are special demands for your furnace, e.g. compatible brand or type of part.
- Contact the manufacturer or a certified dealer to locate the part you need. You can find contact details in manuals, online databases, or on firm websites.
- Send all applicable details about your furnace and current part to guarantee accuracy. This may incorporate serial numbers, features, dimensions, and any other necessary info.
- Confirm availability and cost with the supplier before buying and arrange for delivery if needed.
- Confirm that you got the correct part before installation. Compare it with your old part and ensure it fulfills all specs required for safe operation of your furnace.
Remember, not all furnaces are same, so double-check compatibility when ordering replacement parts.
If you’re not sure how to replace parts in your furnace, talking to a licensed HVAC technician might be helpful. They can offer suitable advice and support throughout this process.
By applying these steps, you can efficiently order and replace parts in your furnace, reducing downtime due to an incorrect order. Taking out the faulty flame sensor is similar to extracting a bad tooth – painful but essential for a secure system.
Turning off the furnace and removing the faulty flame sensor
Shut off the furnace and get ready to replace the faulty flame sensor! Here’s a guide to help:
- Flip off the power switch or breaker.
- Carefully remove the cover of the furnace (refer to manual).
- Locate the flame sensor (check manual).
- Disconnect wiring from outdated sensor and insert new one.
Plus, make sure you have the right tools. Also, give your furnace regular maintenance checks.
Pro Tip: Vacuum around the newly installed sensor for best results. Now let’s get that flame sensor in and heat up this furnace!
Installing the new flame sensor and re-assembling the furnace
For a successful furnace repair, it’s key to install the new flame sensor and reassemble the furnace in a professional manner. To do this, take these steps:
- Unscrew and take off the front panel of the furnace. Put it aside carefully.
- Locate the old flame sensor and pull it out of its socket. Clean the socket area with a cloth.
- Put the new flame sensor into its socket with gentle pressure. Make sure it is secured.
- Put back the front panel on the furnace, making sure to screw it properly.
- Finally, run the system to check that everything is working well.
It’s important to take your time when carrying out these steps as incorrect installation can lead to bigger problems in your heating system. For safety, turn off the power supply before starting the installation. Also, for big repairs, seek professional advice or look in the user manual – don’t risk burning down your house just to save a few bucks!
Hiring a professional contractor for furnace flame sensor repair
To find a solution for hiring a professional contractor to repair your furnace flame sensor, the first thing you need to do is understand the associated costs. This section delves into the two sub-sections that will help you make an informed decision about hiring a professional contractor for your furnace flame sensor repair: the cost of hiring a professional for furnace repairs and finding a reputable contractor for furnace flame sensor repair. With these insights, you’ll end up with a better idea of what to look for in a contractor to ensure your furnace is functioning correctly.
Cost of hiring a professional for furnace repairs
When it comes to furnace repair, costs can vary. Complexity and difficulty of the repair can affect pricing. Get quotes from multiple contractors and compare them. Look out for special deals or promotions which could reduce costs. Research potential contractors before hiring to make sure they’re qualified and reputable.
Also, check if the furnace is still under warranty. If so, repair costs may be covered or partially covered by the manufacturer, reducing your expenses.
To keep repair costs low, regular maintenance and cleaning of your furnace are important. Routine inspections can help identify issues before they become major, saving money. And don’t forget – flame sensors may be small, but they need a contractor who knows their stuff!
Finding a reputable contractor for furnace flame sensor repair
When fixing a furnace flame sensor, it’s key to get a dependable contractor. Here are some tips on how to do this:
- Ask people you know who have had the same repair.
- Contact an HVAC supplier or home improvement store for suggested contractors.
- Search online directories for contractor reviews.
- Check licenses and insurance with local authorities or organizations.
- Get quotes from three contractors for comparison.
Also, consider their experience, rep, and availability. Plus, make sure they have experience with this type of repair.
A customer faced multiple failed attempts by other repair companies but eventually found an expert who fixed the issue. Don’t risk being left in the cold; a simple flame sensor repair can keep you comfy!
Conclusion
Maintaining the furnace flame sensor is key for your heating system to work well. To make sure your furnace runs efficiently, it’s important to regularly check and clean the flame sensor. A faulty furnace flame sensor can cause lots of issues, for example, pilot light failure and gas leaks. Taking care of this small part of your heating system can save money in the long run.
To check your furnace flame sensor, do this: Turn off the power and remove the cover to reveal the burner assembly. Find the flame sensor – it’s usually a metal rod that reaches into the flames. Clean it with emery cloth or grit paper to remove any corrosion or soot. Once it’s clean, put all the parts back, turn the power on and test it.
If you don’t feel comfortable doing these checks, ask a professional contractor for help. Missing even one small issue can damage your unit, costing more than a service fee.
Here’s a tip: Always keep an eye out for odd burner flames or sudden lack of heat. This could mean there’s something wrong with your furnace flame sensor or another part of your heating system! Act quickly!