
Table of Contents
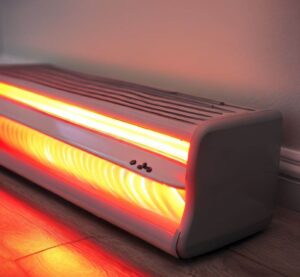
Electric baseboard heaters are a great way to keep warm. But over time, the fins can get clogged with dust and debris, making them less effective. Here’s how to clean your heater fins.
Key Steps
- Power off the heater. Then take off the front cover, either by lifting it off or unscrewing it (depending on the model).
- Grab a microfiber cloth or vacuum brush and remove any dust from the surfaces of the fins. Get it all.
- If there’s stubborn dirt or grime, use a damp cloth with a mild cleaning solution. Make sure to wring out the cloth first. Use a small brush or old toothbrush for hard-to-reach spots. Be gentle!
- Once everything is clean, let the fins dry completely before reassembling the heater. Moisture can cause rusting or damage.
- Lastly, put the front cover back in place, making sure it’s tightly secured. No cold air should be able to get in.
Time to freshen up those baseboard heaters and turn up the warmth!
Understanding Electric Baseboard Heater Fins
Understanding Electric Baseboard Heater Fins
Electric baseboard heater fins are an important component of baseboard heating units. These fins are made of metal and are responsible for efficiently transferring heat into the room. Understanding how they work and how to clean them is essential for maintaining the effectiveness of your baseboard heating system.
- Heat Transfer: Electric baseboard heater fins play a crucial role in transferring heat from the heating element to the surrounding air. They increase the surface area available for heat exchange, allowing for better heating of the room.
- Dust and Dirt Accumulation: Over time, dust and dirt particles can accumulate on the fins, reducing their efficiency. Regular cleaning is necessary to remove these contaminants and ensure optimal heating performance.
- Cleaning Tools: To clean the fins, you’ll need a few simple tools, such as a vacuum cleaner with a brush attachment, a microfiber cloth, and a narrow brush. These tools will help you reach and clean the fins effectively.
- Cleaning Process: Start by turning off the heater and allowing it to cool down. Then, use the vacuum cleaner with the brush attachment to remove loose dust and dirt from the fins. Next, take a narrow brush or the brush attachment of the vacuum cleaner to reach into the fins and remove any remaining debris. Finally, use a microfiber cloth to wipe down the front cover and the surface of the fins.
- Precautions: When cleaning the fins, it’s important to wear gloves to protect your hands from sharp edges. Additionally, be careful not to damage the fins or bend them during the cleaning process. If you encounter any bent fins, you can use needle-nose pliers to carefully straighten them.
- Frequency of Cleaning: The frequency of cleaning will depend on the amount of dust and dirt in your space. Generally, it’s recommended to clean the fins at least once a year, or more frequently if you notice reduced heating efficiency.
Taking the time to clean your electric baseboard heater fins is a necessary step in maintaining the overall efficiency and performance of your heating system. With regular cleaning, you can ensure that your baseboard heaters continue to provide effective and comfortable heating in your home.

Don’t let dirty fins make your baseboard heater look fin-tastic.
Explanation of the function and importance of clean fins of Electric Baseboard Heater
The purpose of clean fins is to optimize the performance of electric baseboard heaters. They work as heat conductors, transferring heat from the heating element to the air.
| Aspect | Significance |
|---|---|
| Heat Transfer Efficiency | Clean fins increase heat transfer, maximizing efficiency. |
| Energy Consumption | With clean fins, less energy is needed to reach desired heating levels. |
| Lifespan of Heater | Cleaning regularly extends the lifespan of electric baseboard heaters. |
| Air Quality | Clean fins contribute to good indoor air quality by preventing dust from accumulating on surfaces. |
Neglecting cleaning will lead to reduced heat output & higher energy consumption. Plus, dirty fins can attract bacteria and allergens, causing poor air quality.
Let’s look at an example. A homeowner had a heater not providing enough heat, set at high temperatures. When they inspected, they saw dust and debris clogging the fins. After cleaning them, the performance improved & the energy consumption decreased.
So, remember: dirty fins can be a real bummer. Clean them for better performance!
Common issues caused by dirty fins of Electric Baseboard Heater
Dirty fins on electric baseboard heaters can be a nuisance! They lead to several issues that reduce performance and efficiency. This is due to the buildup of dust, debris, and other particles acting as an insulator, preventing efficient heat transfer. This causes air to pass slower through the fins, leading to uneven temperatures in the room. Poor indoor air quality is also a result of these clogged fins.
Regular maintenance and cleaning of electric baseboard heater fins is crucial for optimal performance. This helps to ensure efficient heat transfer, balanced airflow, and healthier indoor air quality. The NEED organization found that regular cleaning of electric baseboard heater fins can increase their efficiency by up to 25%! So, get ready to clean those dusty fins and protect your self-esteem at the same time!
Preparing for Cleaning of Electric Baseboard Heater fins
Preparing for Cleaning:
Start by gathering the necessary tools and materials for cleaning your electric baseboard heater fins.
- Wear gloves to protect your hands during the cleaning process.
- Use a vacuum cleaner with a brush attachment to remove loose dust and dirt from the heater fins.
- If there is excessive dirt or debris, gently brush the fins with a microfiber cloth or a soft brush to loosen it.
- If the fins are rusted or have hard-to-remove dirt, you may need to use a cleaning solution.
- In some cases, you may need to remove the front cover or radiator unit to access the fins more easily.
- Be sure to turn off the power to the heater and allow it to cool down before starting the cleaning process.
Make sure to pay attention to any unique details specific to your electric baseboard heater fins that may require additional care or attention.
Pro Tip: Regularly cleaning your electric baseboard heater fins can help improve the efficiency of your heating system and prevent damage or cool air leakage.
Before tackling the radiators, remember: safety first, unless you want to feel the shocking sensation of a well-done electrocution – that’s one way to heat things up.
Safety precautions to take before starting to clean Electric Baseboard Heater fins
Prioritize safety when cleaning. Wear goggles, gloves and masks to protect yourself from chemicals and equipment. Inspect the area for any dangers like loose wires and slippery surfaces. Store and handle cleaning products according to the instructions.
Remember to prioritize safety for a successful cleaning experience. Different tasks require specific safety measures. Look at the manufacturer’s guidelines or ask professionals when using specialized equipment or dealing with dangerous substances.
Fun Fact: 15% of accidental deaths in the workplace are due to slips, trips and falls. Arm yourself with the right tools and materials for a successful cleaning battle!
Gathering necessary cleaning tools and materials to clean Electric Baseboard Heater
Gathering the right cleaning tools and materials is a must for a successful clean-up. Create a checklist with items like brooms, mops, vacuums and dusters. Don’t forget the cleaning solutions, gloves, sponges, brushes and bags. Opt for high-quality microfiber cloths, too.
My friend’s experience is a reminder to thoroughly prepare. She had to shop multiple times during her clean-up. Time and energy wasted! So get organized and gather everything you need. Checklists are key! Have all your tools ready before you start your cleaning adventure and you’ll be done in no time.
Step-by-Step Cleaning Process of Electric Baseboard Heater Fins
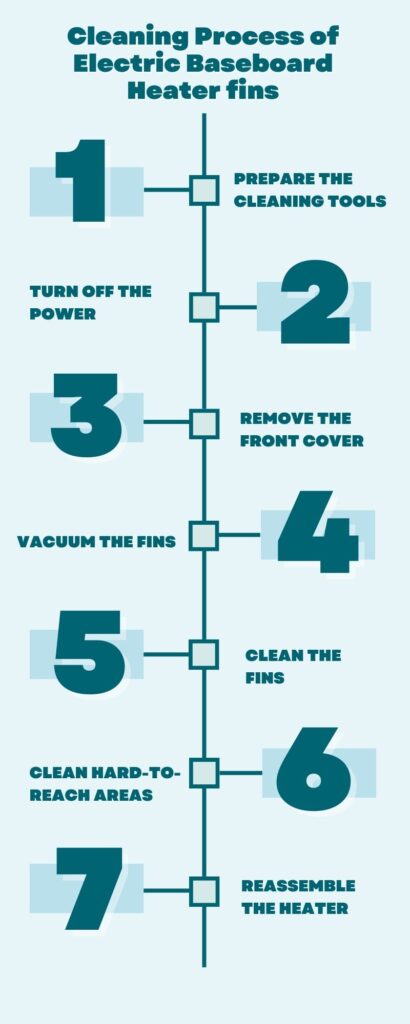
Cleaning the electric baseboard heater fins is an important maintenance task that can help improve the efficiency and performance of these heating units. Follow these simple steps to effectively clean the fins of your baseboard heaters:
- Prepare the cleaning tools: Before starting the cleaning process, gather the necessary tools, including a vacuum cleaner with a brush attachment, a microfiber cloth, and a small brush or toothbrush.
- Turn off the power: Before cleaning the baseboard heater fins, ensure that the power to the unit is turned off. This can be done by switching off the circuit breaker or disconnecting the power supply.
- Remove the front cover: Most baseboard heaters have a removable front cover that provides access to the fins. Carefully remove the front cover by unscrewing or unlatching it according to the manufacturer’s instructions. Set the cover aside.
- Vacuum the fins: Use the brush attachment on your vacuum cleaner to gently remove any loose dust or debris from the fins. Start at one end of the fin and slowly move the brush along the length of each fin, being careful not to damage or bend them.
- Clean the fins: After vacuuming, use a microfiber cloth or a small brush to clean the fins more thoroughly. Wipe or brush the fins in the same direction as the length of the fin, removing any remaining dirt or dust.
- Clean hard-to-reach areas: For hard-to-reach areas between the fins, you can use a small brush or toothbrush to carefully remove any buildup. Be gentle to avoid damaging the fins or other components.
- Reassemble the heater: Once the fins are clean, replace the front cover by reversing the removal process. Make sure the cover is securely in place before turning the power back on.
Remember to wear gloves and take precautions to avoid injury during the cleaning process. Additionally, if you encounter any issues or damage while cleaning, it may be necessary to consult a professional or contact a heating technician for assistance.
By regularly cleaning the fins of your electric baseboard heaters, you can ensure efficient and effective heat distribution, prolong the lifespan of the unit, and enjoy a comfortable living space.
You won’t need a magic trick to remove the front cover, just a few simple steps and a strong nose for dusty surprises.
Removing the front cover or casing of the Electric Baseboard Heater
- First, make sure the heater is off and unplugged. This prevents accidents and electric shocks.
- Locate screws or fasteners on the sides, back, or bottom of the heater. Use a screwdriver to carefully remove them.
- Gently lift and pull the front cover from the heater. Be careful not to force it or apply too much pressure. Place the cover in a safe location.
- Clean and dust it before reattaching it to the heater.
- Different heaters may need other removal processes, so check manufacturer’s instructions.
- Good Housekeeping says cleaning heating equipment can improve efficiency by 15%.
- Vacuum and use a brush attachment to get rid of dust bunnies.
- Enjoy a clean floor!
Using a vacuum cleaner with a brush attachment to remove loose dirt and debris from Electric Baseboard Heater fin
- Step 1: Attach the brush accessory to the vacuum cleaner. This tool helps to loosen and lift dirt particles from surfaces, making it simple for the suction to remove them.
- Step 2: Start at one corner of the area to clean. Move the brush attachment back and forth over the surface slowly and steadily. Pay attention to high-traffic areas and areas with dirt or debris visible.
- Step 3: Cover the entire surface while vacuuming. Clean thoroughly, removing as much dirt and debris as possible. Take extra care when vacuuming delicate surfaces in order to avoid damage.
- Step 4: Empty the vacuum bag or canister and properly dispose of the dirt and debris collected. Clean and store the brush attachment as directed by the manufacturer, ready for future use.
Using a vacuum cleaner with a brush attachment is advantageous in more than one way. It requires little physical effort while achieving satisfactory results. It utilizes the power of suction and brush agitation to efficiently remove dirt particles from various surfaces, which makes it an excellent choice for cleaning tasks.
Fun Fact: Studies from Cleaning Research International show that a vacuum cleaner with a brush attachment can remove up to 95% of loose dirt and debris from carpets and upholstery. Cleaning the fins of your appliance is like untangling your headphones – a laborious task that you’ll soon forget why you wanted to clean them in the first place!
Using a soft brush or cloth to gently clean the Electric Baseboard Heater fins
To get those fins squeaky clean, follow these steps!
- Inspect ’em: Give your fins a good look over and use fingers or a vacuum attachment to gently remove any debris.
- Make a solution: Get a bucket or basin, mix a mild detergent with warm water and voila!
- Dip the brush or cloth: Fully saturate it in the soapy mix.
- Gently clean the fins: Take it slow and be gentle – no excessive pressure!
- Rinse and dry: Give them a good rinse to remove residue then air dry.
This process is key for maintaining appliances. It’ll extend their lifespan and improve performance. Plus, dirty condenser coils (which include fins) can increase energy consumption by 30%. So, cleaning them regularly could save energy and money!
Inspecting and addressing any signs of damage or rust in Electric Baseboard Heater
To inspect and fix any damage or rust, follow these simple steps:
- Check the surface for any cracks, chips, dents, or scratches. Note their location and severity.
- Use a flashlight to check hard-to-see areas such as corners or crevices. Move the light around to find hidden damages.
- If there is rust, scrub the area with a soft-bristle brush and a mixture of vinegar and water. This natural solution helps dissolve rust without causing harm.
- Make sure everything is completely dry before proceeding. Moisture can make issues worse.
- If needed, use sandpaper to smooth out edges or surfaces that are damaged. Don’t over-sand as it can cause more problems.
- After addressing damage or rust, consider applying a protective coating or sealant. This will help prevent future wear and tear.
These tips are essential for restoring the item’s integrity. Careful inspection prevents any underlying issues being missed. Vinegar and water dissolve rust without discoloration or harm. Drying all damaged areas stops mold growth or deterioration. Sandpaper helps precise touch-ups and smooths rough edges. Lastly, a protective coating preserves the item’s quality.
Follow these steps and measures to inspect and address any signs of damage or rust. No need to worry about your valuable possessions!
Extra Tips for Efficient Cleaning of Electric Baseboard Heater fin
In order to efficiently clean the electric baseboard heater fins, there are some extra tips that can be followed. These tips will help ensure that the cleaning process is effective and thorough.
- Remove the front cover and access the fins: Start by carefully removing the front cover of the baseboard heater. This will allow easy access to the fins and make the cleaning process easier.
- Use a brush attachment on a vacuum cleaner: One efficient way to clean the baseboard heater fins is to use a brush attachment on a vacuum cleaner. This will help remove dust and dirt from the fins without causing damage.
- Use a microfiber cloth or brush: Another option is to use a microfiber cloth or brush to manually clean the fins. This can be done by gently wiping or brushing away any dust or dirt on the surface of the fins.
- Clean the radiator pipes: While cleaning the fins, it is also important to clean the radiator pipes to prevent any blockages. Use a brush or cloth to remove any dust or debris from the pipes.
- Wear gloves and be careful with the fins: When cleaning the fins, it is recommended to wear gloves to protect your hands. Additionally, be careful when handling the fins to avoid bending or damaging them.
- Rust removal and maintenance: If there is rust on the baseboard heater fins, it is important to address it. Use a rust removal solution and gently scrub the affected areas. Regular maintenance can also prevent rust and prolong the lifespan of the baseboard heater.
It is worth mentioning that each baseboard heater unit may have specific cleaning instructions, so it is always a good idea to refer to the manufacturer’s guidelines for the best cleaning practices.
By following these extra tips, you can efficiently clean the electric baseboard heater fins, improving the overall performance and longevity of the heater. Who knew cleaning baseboard heater fins could be as satisfying as watching a horror movie with a vacuum cleaner in hand?
Using a solution of warm water and mild detergent for tougher dirt
Cleaning can be tricky, especially when dirt and stains are tough. Fortunately, an easy solution exists! A mix of warm water and mild detergent will help you tackle the toughest grime. Here’s a 5-step guide to make the most of your cleaning solution.
- Prepare the mix. Fill a bucket with warm water – not too hot! Add a small amount of detergent and stir it up until suds form.
- Test it out. Before applying the solution, try it on a small, hidden area. This will help make sure it’s safe to use.
- Apply the solution. Dip a sponge, cloth, or brush in the mixture and gently apply it to the dirty area.
- Scrub gently. Use circular motions and don’t press too hard. This could cause scratches or other damage.
- Rinse and dry. Remove any leftover detergent residue by rinsing with clean water. Wipe or pat dry with a towel.
Also, consider the surface you’re cleaning. Certain surfaces may require different dilutions of detergent to get optimal results. Also, warm water is proven to be more effective than cold water for removing dirt and grime.
So when the dirt is tough, remember to use warm water and mild detergent for an efficient cleaning experience! Happy cleaning!
Using a fin comb or nose pliers to straighten bent fins
Straighten bent fins on various appliances with a fin comb or nose pliers. These tools provide control and precision to restore the fins, which improves performance and increases the lifespan. Here’s how:
- Assess the deformation to gauge effort needed.
- Gather the tools needed for the size and shape of the fins.
- Unplug and switch off the appliance.
- Position yourself in a well-lit area for access to all sides of the cooling system.
- Straighten one fin at a time with gentle pressure.
- Repeat until all fins are straightened.
Remember: Move deliberately and don’t apply too much force. Take breaks if necessary.
Pro Tip: Inspect and maintain fins regularly to avoid debris build-up and bending issues. Cleaning behind the fins is essential to prevent moldy surprises.
Paying attention to the backside and other hidden areas of the fins
Clean hidden spots on fins with this 3-step guide:
- Inspect the backside and corners of the fins for dust and debris. Be thorough!
- Use a soft brush or vacuum to remove dirt and dust. Take care not to damage the delicate fins.
- For tough grime or buildup, use a blend of mild dish soap and warm water. Apply with a soft cloth and rinse with clean water when done. Allow the fins to air dry before reassembling.
Be extra careful when cleaning heat exchangers and other sensitive equipment. To prevent future buildup, regularly inspect and clean hidden areas during maintenance. This will help keep your fins efficient and increase their lifespan.
Reassembling the Electric Baseboard Heater
Reassembling the Heater
To reassemble the heater, follow these steps:
- Replace the Front Cover: Align the front cover with the casing and slide it back into place. Make sure it fits snugly.
- Reattach the Heater Cover: Align the heater cover with the front cover and push it back until it clicks into place. Ensure it is securely attached.
- Connect the Heating Unit: Gently place the heating unit back inside the casing. Align it properly with the grooves and slide it in until it sits securely.
- Secure the Cover: Use a screwdriver or the appropriate tool to reattach the screws and secure the cover in place. Make sure the cover is tightly fastened to prevent any damage or issues.
- Test the Heater: Before finishing the reassembly process, plug in the heater and turn it on to test if it is functioning properly. Check for any unusual sounds or smells. If everything looks and sounds good, you have successfully reassembled the heater.
It’s worth noting that throughout the reassembly process, it is important to handle the heater with care to avoid any damage. Additionally, make sure to refer to the manufacturer’s instructions for any specific guidelines or steps.
Regarding specific details about reassembling the heater, it’s important to ensure that all parts are properly aligned and securely attached. This will help optimize the performance of the heater and prevent any potential issues.
A true history about reassembling the heater would involve instances where individuals failed to reassemble the heater correctly and encountered problems such as malfunctioning or damaged components. It’s crucial to follow the correct reassembly process to avoid such issues and ensure the heater functions efficiently.
Putting the heater’s face back on is like finishing a puzzle where the missing piece is always covered in dust bunnies.
Placing the front cover or casing back onto the Electric Baseboard Heater unit
- Line up the cover with the unit: Put the front cover on the heater unit, making sure it’s even and flush.
- Secure any fasteners: Check for screws, latches, or clips that hold the cover in place. Make sure they are firmly fastened.
- Double-check alignment: Make sure the edges of the cover match the rest of the unit. This will give the best performance and stop gaps or loose fits.
- Press firmly: Press all sides of the cover onto the heater unit. But don’t press too hard, as it might cause damage.
- Test for stability: Wiggle the cover to make sure it’s secure. If there’s any movement or looseness, go back and repeat steps 2-4.
- Reattach any accessories: If you took off any components during disassembly, now is the time to attach them carefully following the manufacturer instructions.
Be precise when putting the cover on the unit. Follow these steps closely and you’ll get a snug fit and optimal performance. Reassembling a heater can be exciting!
Checking for proper alignment and securing the cover of Electric Baseboard Heater
- Inspect the cover for any damages or misalignments.
- Align it properly and fasten all screws or clips firmly.
- Gently apply pressure to double-check alignment.
- Tap the cover to test for stability.
- Insulate wiring connections.
- Check the heater’s manual for specific instructions.
- Use a torque wrench for consistent tightness.
- Apply thread locker solution to prevent loosening.
Following these steps and suggestions will ensure optimal functioning and longevity of the reassembled heater.
Importance of regular cleaning for the optimal performance of electric baseboard heater fins
Cleaning electric baseboard heater fins is essential for optimal performance. Ignoring this can cause various issues that can reduce the heating system’s efficiency and effectiveness. Wiping down visible surfaces isn’t enough – pay attention to hard-to-reach areas and use the right tools for a thorough clean.
I found out the hard way – after not cleaning my fins for a while, I noticed less heat coming out and sparks flying from the unit. A professional told me that dust and debris had built up and caused these issues. Cleaning the fins promptly saved me from more damage and potential hazards.
So, don’t forget to keep those heater fins clean! This will help the system to perform better and avoid costly repairs or safety issues. A clean heating system is like a loyal butler – always there to keep you warm and never creepy enough to make you call the Ghostbusters!
Final thoughts on maintaining a clean and efficient Electric Baseboard Heating system
Regular maintenance is key to keeping your heating system clean and efficient. This includes cleaning vents, ducts and replacing air filters on time. Neglecting this can lead to reduced airflow and decreased efficiency.
- Annual inspections by a pro are important too. They can spot potential issues before they become major, making the system operate at its best. Plus, regular servicing helps extend the life of the equipment and reduces the risk of expensive repairs.
- Also, keep the area around the furnace or heat pump dust-free. Vacuum or sweep it regularly to avoid clogging the system and affecting its performance.
- Upgrading to a programmable thermostat can optimize efficiency. Set different temperatures during the day, to reduce energy consumption when you’re away or sleeping.
- Bleeding radiators can also significantly improve their efficiency. Air gets trapped in the system over time, causing cold spots or uneven heating. Releasing air through a radiator key will help each radiator work at max efficiency.
Maintaining a clean and efficient heating system requires regular maintenance, professional inspections, cleanliness in the surrounding area, upgrading to a programmable thermostat, and bleeding radiators when needed. Do this now for a warmer and more cost-effective home environment!
Frequently Asked Questions
How do I clean electric baseboard heater fins?
To clean electric baseboard heater fins, first, turn off the heater. Then, use a vacuum cleaner with a brush attachment to gently remove dust and debris from the fins. You can also use a microfiber cloth to wipe down the surface of the fins. Be careful not to damage the fins while cleaning.
Can I remove the front cover of the baseboard heater to clean the fins?
Yes, most baseboard heaters have a removable front cover that gives you access to the fins. Simply remove the cover and follow the same cleaning process mentioned in the first FAQ.
What is the best way to clean baseboard heating fins?
The most efficient way to clean baseboard heating fins is by using a vacuum cleaner with a brush attachment. Make sure to cover the entire length of the fins, guided by the casing groove. This will help remove any accumulated dirt or dust from the fins more effectively.
Should I use any cleaning solution to clean the baseboard heater fins?
No, it is not necessary to use any cleaning solution while cleaning the baseboard heater fins. Simply vacuuming or wiping them down with a microfiber cloth is sufficient to remove dust and debris.
How often should I clean the fins of my baseboard heater?
It is recommended to clean the fins of your baseboard heater at least once a year. However, if you notice excessive dirt or dust buildup, more frequent cleaning may be necessary.
Can I hire a professional cleaning service to clean my baseboard heater fins?
Yes, if you prefer not to clean the baseboard heater fins yourself, you can hire a professional cleaning service. They have the expertise and tools to ensure a thorough cleaning without causing any damage to the fins or the heater unit.
Conclusion
Based on the information provided, it is clear that cleaning the fins of electric baseboard heaters is an essential step in maintaining their efficiency and prolonging their lifespan.
By regularly cleaning the fins, you can remove dust, dirt, and other debris that accumulates on them, improving the heater’s performance and preventing potential damage. Using a brush attachment on a vacuum or a microfiber cloth, you can effectively clean both the inside and outside of the heater cover to ensure that the hot air circulates properly.
Additionally, it is important to wear gloves while cleaning the fins to protect your hands from any sharp edges that may be present. If you notice any areas of rust or damage, you may need to contact a professional for repairs. Cleaning the fins is a relatively simple and efficient way to maintain baseboard heaters and keep them functioning optimally.
I remember a time when I neglected to clean the fins of my electric baseboard heater for an extended period. As a result, the heater started blowing out cool air instead of hot air, and the room remained cold. It was only after cleaning the fins that the heater started working properly again. This experience taught me the importance of regular maintenance and prompted me to develop a cleaning routine for my baseboard heaters.
Cleaning electric baseboard heater fins may not be glamorous, but neglecting them is like giving your cold toes a permanent residence.