
Connecting an air source heat pump to a submeter can be a complex process, but with the right guidance, it can be a manageable DIY project. This comprehensive guide will walk you through the step-by-step process, providing detailed technical specifications and expert-level insights to ensure a successful installation.
Preparing for the Installation
1. Understand the Requirements
Before you begin the installation process, it’s crucial to ensure that your heating equipment meets the requirements for a discounted rate. The equipment must be permanently installed, have a minimum of 8000 watts, and be a heat pump system. Additionally, the discount rate for electric heating is $0.056 per kilowatt-hour, and qualified equipment includes boilers, geothermal heat pumps, air source heat pumps, and electric baseboards heaters.
2. Notify the Utility Company
Contact your utility company before installing the heat pump or any other type of electric heating equipment. This will allow them to verify that their transformer and main electrical equipment are sized appropriately. The utility company may also provide guidance on the specific requirements and procedures for connecting a submeter to your air source heat pump.
Installing the Air Source Heat Pump
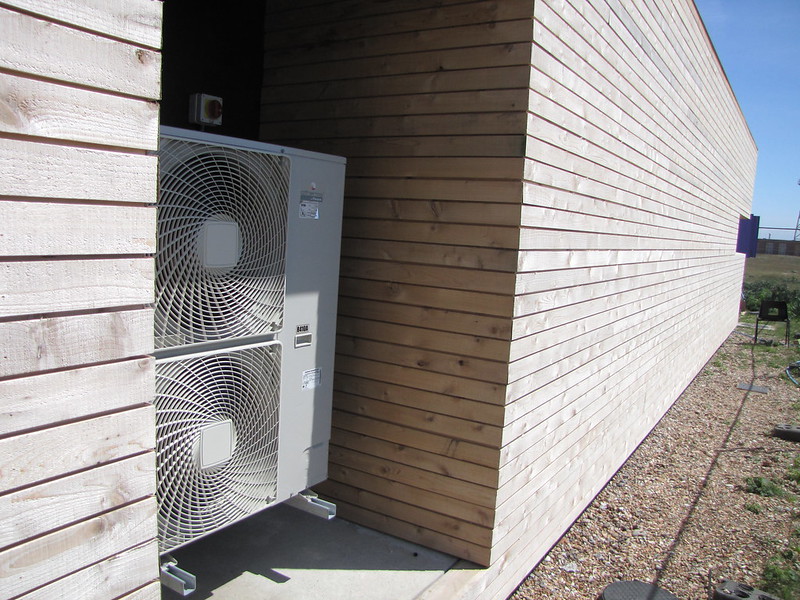
1. Choose the Appropriate Heat Pump
When selecting an air source heat pump, it’s essential to choose a model that is properly sized for your home or building. Factors such as the square footage, insulation levels, and climate conditions should be considered to ensure optimal performance and energy efficiency. Consult with a professional HVAC contractor or the heat pump manufacturer to determine the right size and model for your needs.
2. Follow the Manufacturer’s Instructions
Carefully follow the manufacturer’s instructions for installing the air source heat pump. This includes properly positioning the outdoor unit, connecting the refrigerant lines, and wiring the electrical components. Pay close attention to the recommended clearances, airflow requirements, and any specific installation guidelines provided by the manufacturer.
3. Ensure Proper Sizing and Installation
Proper sizing and installation of the air source heat pump are crucial for its performance and efficiency. Oversizing or undersizing the unit can lead to issues such as short-cycling, uneven heating or cooling, and increased energy consumption. Consult with a professional HVAC contractor or the manufacturer’s technical support team to ensure that the heat pump is properly sized and installed for your specific application.
Connecting the Submeter
1. Select the Appropriate Submeter
When choosing a submeter for your air source heat pump, consider options that can accurately measure the exact energy usage per unit. BTU/Flow meters, such as the Istec 4440, are commonly used for this purpose. These meters are designed to measure the flow rate and temperature difference of the heating or cooling fluid, allowing for precise energy consumption tracking.
2. Install the Submeter
Install the submeter on the supply and return lines for each heating zone. This will effectively measure the energy usage for each individual zone, providing valuable data for monitoring and billing purposes. Follow the manufacturer’s instructions for the proper installation and wiring of the submeter.
3. Integrate with Monitoring Software
Many submeter manufacturers offer software platforms that can be integrated with the installed meters. These platforms allow you to monitor the energy usage, track performance, and generate reports for billing or energy management purposes. Familiarize yourself with the software’s features and capabilities to maximize the benefits of the submeter installation.
Verifying the Installation
1. Contact the Utility Company
After installing the heat pump and submeter, contact the utility company to schedule the submeter installation. This will ensure that the utility company is aware of the new equipment and can properly configure their systems to accommodate the submeter.
2. Verify the Submeter Installation
Make sure that the breaker to the submeter is turned on and that the meter is properly reading the energy usage. Consult the submeter manufacturer’s documentation or the utility company’s guidance to ensure that the installation is correct and the meter is functioning as intended.
Ongoing Maintenance and Monitoring
1. Regular Performance Checks
Regularly monitor the performance of the heat pump and submeter. Check for any issues or faults, such as decreased efficiency, unusual energy consumption patterns, or error messages. Promptly address any problems and contact the utility company or a professional HVAC technician if necessary.
2. Maintenance and Calibration
Follow the manufacturer’s recommended maintenance schedule for the air source heat pump and submeter. This may include tasks such as cleaning the filters, checking refrigerant levels, and calibrating the submeter to ensure accurate energy usage readings.
By following this comprehensive guide, you can successfully connect your air source heat pump to a submeter, ensuring accurate energy usage tracking and potential cost savings through the discounted electric heating rate. Remember to always prioritize safety, consult with professionals when necessary, and adhere to local codes and regulations throughout the installation process.