
Table of Contents
To ensure the optimal performance of your Noritz tankless water heater, it is crucial to understand how to properly flush and maintain it. In this introduction, we will provide a brief explanation of a Noritz tankless water heater and emphasize the importance of regular flushing and maintenance. By following the correct procedures, you can prevent potential issues and extend the lifespan of your water heater.
Key Takeaways
- Regularly flushing your Noritz tankless water heater is important to maintain its efficiency and prolong its lifespan.
- Flushing the heater helps remove mineral deposits and sediment that can build up over time and affect its performance.
- Before flushing, make sure to turn off the power and gas supply to the heater to avoid any accidents.
- Connect a hose to the cold water inlet and drain valve of the heater to allow the water to flow out.
- Open the drain valve and let the water flow for about 2030 minutes to ensure all the sediment is flushed out.
- Close the drain valve and remove the hose once the water runs clear.
- Turn on the cold water supply and let it run for a few minutes to flush out any remaining debris.
- Finally, turn on the power and gas supply to the heater and check for any leaks.
- It is recommended to flush the Noritz tankless water heater at least once a year or more frequently if you have hard water.
- Following these steps will help maintain the efficiency and performance of your Noritz tankless water heater.
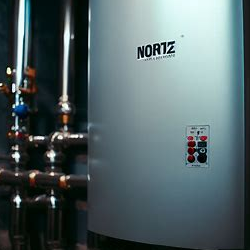
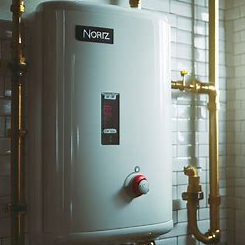
Brief explanation of a Noritz Tankless Water Heater
A Noritz Tankless Water Heater is the perfect choice for those who want hot water on demand. It’ll save you space and energy too. Plus, it’s small enough to be wall-mounted. So, if your home is short on space, this is the appliance for you.
You can also control the temperature with a Noritz Tankless Water Heater. Set it to whatever suits you best and enjoy the convenience of perfect warmth every time you shower.
Safety is a priority with a Noritz Tankless Water Heater. It has built-in sensors that detect any issues, like overheating or gas leaks. If something’s wrong, it’ll automatically shut off, giving you peace of mind.
Keep your heater happy and your plumber out of pocket by regularly flushing and maintaining it.
Importance of flushing and maintaining the heater
Flush and maintain your heater! It’s essential to ensure optimal performance and longevity. Not doing so can lead to problems like inefficient heating, more energy needed, and safety hazards.
Flushing removes sediment and mineral buildup which can reduce the heater’s efficiency and even corrode parts. Flushing can prevent these issues and keep it efficient.
Also, inspect and replace worn-out parts like valves or thermostats. They regulate temperature and pressure, and ignoring them can cause erratic heating or system breakdowns.
Neglecting maintenance can have serious consequences. Poorly maintained heaters can emit carbon monoxide, which is odorless and deadly in large amounts. Maintenance checks by professionals can identify potential leaks or malfunctions and keep you safe.
Schedule regular heater maintenance with qualified technicians who understand why flushing and maintaining it is important. Doing so extends its lifespan and gives you warm homey vibes! A little effort today means a warm home tomorrow.
Materials Needed
To ensure a successful flushing process for your Noritz Tankless Water Heater, gather the necessary materials. This includes a list of materials required for the flushing process. Each material serves a specific purpose to effectively flush your water heater. Let’s dive into the details of these materials and their functions.
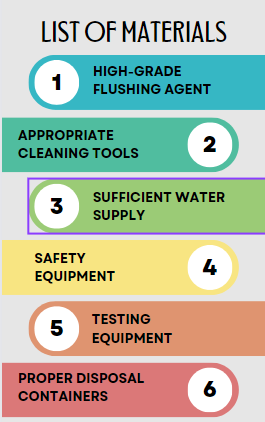
List of materials required for the flushing process
To execute a successful flushing process, there are several materials needed. These materials are critical for effective and efficient results. Here’s a list of the key materials required:
- High-grade flushing agent: This is the main material used to clear out any contaminants or impurities from the system.
- Appropriate cleaning tools: Brushes, sponges, etc. are necessary for removing debris or buildup.
- Sufficient water supply: Water is essential for diluting the flushing agent and rinsing out the system.
- Safety equipment: Safety goggles, gloves, and protective clothing should be worn during the process for safety.
- Testing equipment: Pressure gauges, thermometers, etc. are needed to assess the performance before and after flushing.
- Proper disposal containers: Appropriate containers are needed to dispose of any waste generated during the process.
Keep in mind that certain systems may need additional materials or equipment due to their unique characteristics. Consult manuals or experts to determine these specialized requirements.
Now, let me tell you a captivating story related to flushing processes. At a manufacturing plant, a faulty machine was causing problems with production. After multiple attempts at troubleshooting, the team realized that a thorough flush of the machine’s hydraulic system would resolve the issue. The necessary materials were quickly gathered and the flushing process was executed. To everyone’s delight, the problem was fixed, and the overall performance and productivity of the plant improved.
Explanation of each material’s purpose
Emily’s parents had the perfect materials for her science project. Aluminum foil to wrap and protect, duct tape for quick repairs, scissors for precise cutting, velcro strips for attaching and detaching, rubber bands for elasticity and tension, super glue for high strength adhesion, and a stapler for joining sheets of paper. Plus pins, clips, and magnets to hold everything together!
One evening, Emily was working on her project when she realized she needed aluminum foil. She called her mom, who was just back from work. Emily received the foil, used scissors to wrap it around the apparatus, and Voila! The experiment went perfectly with the right materials.
Preparation Steps
To prepare for flushing your Noritz tankless water heater, start by turning off the power supply to the heater and closing off the hot and cold water valves. These two crucial steps lay the foundation for a successful flushing process. By cutting off the power and isolating the water supply, you can proceed with confidence and ensure that the heater is safe and ready for the flushing procedure.
Turning off the power supply to the heater
Find the circuit breaker panel. It’s usually in the basement, garage, or utility room. It’s a metal box with switches or fuses labeled with different parts of the house.
Identify the heater circuit. Check the labels for the heater switch or “HVAC.” Test it by turning off each breaker and see if it affects the heater. Then, turn off the breaker. Be careful to make sure it’s the right one.
Wait a few minutes before maintenance. For safety, use a voltage tester before touching anything. Pro Tip: Breaking up with your plumbing by turning off the water valves is a must.
Closing off the hot and cold water valves
To close hot and cold water valves, follow four steps:
- Locate them. Near plumbing fixtures like sinks, showers or toilets, look for metal handles or levers.
- Turn off the hot water valve. Rotate the handle/lever clockwise until it’s fully closed.
- Turn off the cold water valve. Do the same as with the hot water valve.
- Verify they are closed. Ensure that they cannot be turned further clockwise.
Plus, after closing off the valves, open a faucet/drain to release pressure.
Label them clearly with colors, so you’ll recognize them quickly in an emergency.
And, if you’re feeling brave, try the Flushing Process.
Flushing Process
To ensure proper functioning and increase the lifespan of your Noritz Tankless Water Heater, follow these step-by-step instructions for flushing. This process helps remove any mineral deposits or debris that may hinder its performance. By following this solution, you’ll be able to maintain your water heater effectively and keep it running smoothly for longer.
Step-by-step instructions on how to flush the Noritz Tankless Water Heater
Maintaining your Noritz Tankless Water Heater is essential, and flushing the unit is one way to do it. Here’s a step-by-step guide on how:
- Preparation:
- Switch off the power supply by flipping the circuit breaker or unplugging it.
- Spot the two isolation valves, one for cold and one for hot water, and close them both.
- Connecting the Flushing Kit:
- Attach a submersible pump with a hose to one of the service valves at the bottom of the water heater.
- Securely fasten a garden hose to the other service valve.
- Flushing Process:
- Open both service valves fully.
- Turn on the submersible pump and let it run for 45 minutes.
- Watch out for debris or discoloration in the water running through the garden hose.
Don’t worry if you hear noise or feel vibration. This is normal during increased water flow. Check your specific model’s manufacturer instructions for further steps or recommendations. Flushing your Noritz Tankless Water Heater will keep it efficient and avoid potential issues.
Pro Tip: Flush your Noritz Tankless Water Heater yearly, or as recommended by the manufacturer. This will boost performance and increase its lifespan.
Follow these steps to flush your Noritz Tankless Water Heater and enjoy endless hot water when you need it most.
Detaching the drain caps and connecting the hoses
Detaching drain caps and connecting hoses is key to the flushing process. Here’s a guide to help you:
- Locate the drain caps at the bottom of the unit.
- Detach the caps using a wrench or pliers.
- Check for damage or buildup before reattaching.
- Identify the hoses and their openings.
- Connect the hoses to their respective openings.
- Check for any leaks or loose connections.
Note: Refer to the system manual for instructions and safety precautions.
Unique details about detaching drain caps and connecting hoses:
- Match the diameter of hoses with openings for a proper fit.
- Apply lubricant to stubborn drain caps.
- Have additional tools or adapters ready.
It’s been centuries since ancient civilizations used clay pipes for water channeling. Nowadays, it’s essential to maintain plumbing systems for optimal performance and prevention of issues.
Turning on the cold water drain valve and flushing the system
To make sure your water flows smoothly, turn on the cold water drain valve and flush the system. Here’s how:
- Find the drain valve – usually near the bottom of the plumbing.
- Turn off all faucets, showers, and appliances that use water.
- Open the valve slowly, letting the cold water flow out and remove sediment.
- Let the water run for a few minutes until it’s clear and clean.
- Close the valve firmly to prevent leaks.
For better performance and to extend the life of your plumbing system, remember these tips:
- Flush your system at least once a year.
- Open and close the valve slowly.
If you follow these suggestions, your heater won’t go down the drain – no matter if it’s vinegar or tears of regret!
Adding vinegar to descale the heater if necessary
Vinegar can be an effective way to descale your heater. Follow this 5-step guide:
- Turn off and unplug the heater.
- Mix equal parts of vinegar and water.
- Pour the solution into the heater.
- Let it sit for an hour.
- Drain and flush with clean water.
Descaling your heater can make it last longer. Be sure to check instructions from your manufacturer or get professional advice if needed.
Pro Tip: A water softener or filtered water can help reduce mineral buildup and extend the life of your heating system.
Flushing the system with clean water
Flushing the system with clean water is necessary for performance and optimization. To do this, use water that is free from impurities. Here’s a guide:
- Close valves to prevent contamination.
- Open the drain valve at the lowest point to remove stagnant and dirty water.
- Open high-point vents or bleed valves to release air.
- Connect a hose or pipe to a clean water source and introduce it into the system via an accessible point.
- Slowly open the fill valve and other valves starting from the lowest point.
Monitor the flush for discoloration or debris. Flush until clear water is achieved.
Flushing helps remove scale buildup, sediment, and contaminants. It also improves water quality and prevents corrosion. According to an industry report, regular flushing can extend the lifespan of a plumbing system by reducing sediment accumulation.
Humor alert: Put the pieces back together and ensure everything is in working order, just like Humpty Dumpty – but hopefully without the same tragic ending!
Reassembly and Testing
To complete the reassembly and testing of your Noritz tankless water heater, follow these steps with the provided sub-sections as a solution briefly. Attach the drain caps back onto the heater, then open the hot and cold water valves. Next, turn on the power supply. Finally, check for any error codes and troubleshoot if needed.
Attaching the drain caps back onto the heater
- Identify the drain caps on your heater.
- Clean the area around them to remove debris.
- Check for any damage or wear and tear. Replace if needed.
- Gently align each drain cap with its opening.
- Apply pressure and twist clockwise to secure.
- Double-check for a snug fit.
Take action and attach the drain caps! This prevents water leakage and increases the heater’s lifespan. Don’t miss out – neglecting can lead to costly repairs. Get ready for a flood of excitement as you twist those valves! Enjoy the spectacle of hot and cold water!
Opening the hot and cold water valves
Want to succeed at opening hot and cold water valves? Follow these five easy steps!
- Find the valves: Look near the appliance or fixture that needs water. Label or color-code them for easy recognition.
- Close the main water supply: To prevent any leaks or accidents, turn off the main water supply.
- Turn on the hot water valve slowly: Do this in a clockwise direction for a controlled release of hot water.
- Gradually open the cold water valve: Turn the cold water valve in a clockwise direction for a balanced flow of hot and cold water.
- Check for leaks and proper flow: Inspect for leaks or drips around the connections. Make sure enough water is flowing through the system.
Different systems may have specific requirements. Get professional help if needed.
Take these steps seriously to avoid any complications or delays. For a safe and efficient system, don’t skip out on proper care.
Now is the time! Open those hot and cold water valves with confidence. See your hard work pay off. Start today and witness the amazing results.
Turning on the power supply
Powering up an electrical device is essential. Here’s a 3-step guide to successfully do it:
- Plug in the Power. Locate the power cord. Connect it to the power outlet and device. Check the connections are secure. Then proceed.
- Switch On. Find the power switch. Commonly at the back or front of the device. Flip it to turn on the power supply. Look for indicator lights or indicators. Wait for a few seconds for the power supply to stabilize.
- Confirm Functionality. See if the device has powered on. Check for any visual or sound signs. If not, recheck all connections. Still no luck? Contact technical support for help.
Following these steps will ensure a smooth running device. In 1879, Thomas Edison powered his first electric lamp using his direct current (DC) system. It was a big moment in history, transforming industries and providing lighting solutions to the world.
Checking for any error codes and troubleshooting if needed
- Check for error codes. Use a diagnostic tool or software to scan the system. Identify any codes that appear. They give info about potential issues.
- Troubleshoot the errors. Find the root cause of the problem. Implement fixes and repairs.
- Test the system again. Make sure all components are working. Make sure there are no more problems.
- Some tips to enhance your troubleshooting process:
- Research common issues. Before troubleshooting, research any usual problems. This gives insights into solutions.
- Document your findings. Keep a record of error codes, troubleshooting and outcomes. This helps if you need assistance.
- Seek expert advice. If you encounter complex issues, ask professionals for help. They can help navigate difficult situations.
- Follow these suggestions. Check for errors before reassembly and testing. This ensures a smooth process and minimizes risks. Maintenance is like going to the dentist – don’t neglect it or you’ll face expensive disaster.
Maintenance and Prevention
To ensure optimal performance of your Noritz Tankless Water Heater, maintenance and prevention are key. Follow these simple steps for regular maintenance: Tips for regular maintenance of the Noritz Tankless Water Heater. Additionally, take preventive measures to avoid future issues. This includes implementing strategies to prolong the lifespan of your water heater and minimize potential problems.
Tips for regular maintenance of the Noritz Tankless Water Heater
Keeping your Noritz Tankless Water Heater in good working order is essential. Try these tips to help you maintain it:
- Check water pressure often. If it’s low, adjust it.
- Flush out sediment in the heat exchanger.
- Clean the inlet filter regularly.
- Inspect and clean the burner.
- Look for gas leaks.
- Ensure ventilation is clear.
Extra steps to take:
- Insulate hot water pipes.
- Install a water softener.
- Schedule professional inspections.
Maintaining your Noritz Tankless Water Heater is key. It’ll extend its life, maximize energy efficiency and save you money. Don’t forget to give it the attention it needs!
Preventive measures to avoid future issues
Preventative measures are key for avoiding future troubles. Here are some easy steps to protect against potential problems:
- Consistent Maintenance: Keep up with tasks like cleaning, checking, and mending, on a frequent basis.
- Up-to-date Upgrades: Stay up-to-date with the newest technologies and make sure to keep equipment and systems current.
- Employee Education: Provide comprehensive training programs to employees to grow their knowledge and abilities, decreasing mistakes and accidents.
- Written Guidelines: Develop standardized procedures for tasks and activities to maintain uniformity and dodge disarray.
Furthermore, it is essential to do regular risk assessments and stay alert while running operations. By executing these preventive measures, you can efficiently lessen potential risks and ensure smooth functioning of processes.
Pro Tip: Record all maintenance activities and compose a detailed log of any unforeseen incidents for future review.
To sum it up, remember that maintenance and prevention are like the best doctors – they may not be fun to visit often, but they sure save you from bigger health scares!
Frequently Asked Questions
Q: How to flush Noritz tankless water heater?
To flush a Noritz tankless water heater, you will need to follow these steps:
- Turn off the power supply to the unit.
- Attach a garden hose to the cold water drain valve on the bottom of the heater.
- Place the other end of the hose in a large bucket or drain.
- Open the cold water drain valve and let the water flow out.
- Close the drain valve once the water turns clear.
- Remove the hose and turn on the cold water supply to the heater.
Q: How do you back flush a Noritz tankless water heater?
Back flushing a Noritz tankless water heater requires the following steps:
- Turn off the power supply to the unit.
- Close the hot water side isolation valve and open the cold water side isolation valve.
- Connect a submersible pump to the hot water service valve.
- Fill a bucket with descaling solution (such as vinegar) and place the pump’s intake hose into it.
- Turn on the pump and let the descaling solution circulate through the water heater for about an hour.
- After the back flushing process, remove the pump, close the cold water side isolation valve, and open the hot water side isolation valve.
Q: How to reset a Noritz tankless water heater?
To reset a Noritz tankless water heater, you can follow these steps:
- Ensure the unit is receiving power.
- Locate the red reset button on the front panel.
- Press and hold the reset button for 3 seconds.
- Release the button and wait for the unit to reset and restart.
- Check for any error codes on the display. If there are any, refer to the product manual for further troubleshooting.
Q: How often should I descale my Noritz tankless water heater?
It is recommended to descale your Noritz tankless water heater every 12 to 18 months. However, this can vary depending on the water quality in your area. If you notice a decrease in water flow or if the heater is not performing as efficiently as before, it may be time to descale it.
Q: How to clean the burner on a Noritz tankless water heater?
Cleaning the burner on a Noritz tankless water heater involves the following steps:
- Turn off the gas supply to the unit.
- Remove the front panel to access the burner assembly.
- Use a soft brush or compressed air to gently clean any dust, debris, or buildup on the burner.
- Inspect the burner for any damaged or corroded parts and replace if necessary.
- Once the cleaning is complete, reassemble the front panel and turn on the gas supply.
Q: Can I perform the maintenance of a Noritz tankless water heater myself, or should I hire a professional?
While you can perform basic maintenance tasks such as flushing and cleaning on your Noritz tankless water heater, it is recommended to hire a professional for more complex issues or if you are unsure about the process. They have the expertise and tools to ensure proper maintenance and avoid any potential damage to the unit.
Conclusion
To ensure the longevity of your Noritz tankless water heater, regular flushing and maintenance are crucial. By flushing the heater periodically, you can prevent sediment buildup, improve efficiency, and avoid potential issues in the long run. Remember, proper maintenance is the key to maximizing the lifespan of your water heater.
Importance of regular flushing and maintenance for the longevity of the heater
Flushing and maintenance are key for your heater’s longevity. Skipping these tasks can cause reduced efficiency, higher energy use, and even early failure.
If you don’t flush regularly, sediment and minerals can build up inside the tank. This blocks heat transfer and makes your heater work harder. That leads to more energy and bigger bills.
Neglecting maintenance checks and replacements can make things worse. Faulty valves and pipes waste water and damage parts. Inspections let you spot issues before they cause costly breakdowns.
Also, regular flushing and maintenance remove sediments and bacteria that may damage your water supply. Especially if you have hard water. That way, you can be sure your water is clean and safe.
Pro Tip: To make your heater last longer, install a drain valve at the bottom of the tank. That way, you can partially drain it without a full flush. Get a pro to help with installation.