
Table of Contents
Key Takeaways
- 1. Start by turning off the water supply and draining the old water heater to avoid any accidents or leaks during the installation process.
- 2. Measure the dimensions of the new water heater and ensure it will fit in the designated space in your RV.
- 3. Remove the old water heater by disconnecting the water lines, gas or electrical connections, and any mounting brackets.
- 4. Install the new water heater by following the manufacturer’s instructions and connecting the water lines, gas or electrical connections, and mounting brackets.
- 5. Test the new water heater by turning on the water supply and checking for any leaks or issues.
- 6. Once the installation is complete and the water heater is functioning properly, make sure to properly dispose of the old water heater according to local regulations.
- 7. Regularly maintain and inspect your RV water heater to ensure it continues to function efficiently and safely.
When it comes to installing an RV water heater, it’s essential for a comfortable and convenient experience on the road. To get it right, choose the right type of water heater for your needs. Tankless water heaters are increasingly popular due to their energy efficiency and small size.
Gather what you need for installation. You’ll require a wrench, Teflon tape, butyl tape, plus the manufacturer’s instructions. Then, turn off any power sources and drain the old water heater.
Next, remove the old water heater from its mounting location. Clean the area before installing the new water heater. If it’s a tankless one, consider proper ventilation and clearances as per manufacturer guidelines. Securely mount it with screws or bolts and connect any necessary electrical or gas lines.
Do a leak test by turning on your RV’s hot water faucet and check for any dripping or moisture around the connections. If all is good, you can enjoy endless hot showers.
Regular maintenance such as draining the water heater and checking the anode rod can extend the lifespan of your RV water heater. Follow the manufacturer’s recommendations for maintenance intervals to keep it in optimal condition. With these steps and proper care, you can ensure a reliable hot water supply wherever you go! Happy camping.
Understanding RV Water Heaters
RV water heaters are essential for any recreational vehicle, providing hot water for showers, washing dishes, and other daily activities. Knowing how they work and how to maintain them is key for a comfy camping experience.
Types of RV water heaters include tankless and storage. Tankless heaters heat water on-demand without a storage tank. Storage types use a tank to store and heat water.
Fuel sources for RV water heaters are gas (propane) and electric. Gas models tend to be more efficient & faster, while electric ones are popular for their quietness.
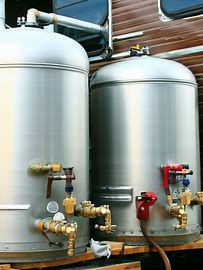
Size options are usually 6 to 10 gallon tanks. Installation requires connecting to a propane tank or electrical source. It’s important to check all connections for safety.
For maintenance, inspect the pilot light/ignition system, drain the tank once a year, check the anode rod (replace annually), install a bypass kit for winterization, and consider a tankless model for energy savings & hot water.
Follow these tips for a longer life of your RV water heater & an unforgettable camping experience. Don’t forget to read the manufacturer’s instructions.
Preparing for Installation
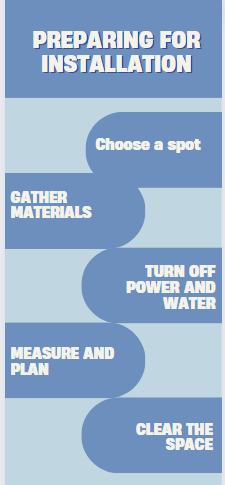
- Choose a spot: Pick a suitable area in your RV for the water heater. Think about factors like accessibility, air flow, and the availability of utilities.
- Gather materials: Gather all necessary tools and equipment before you start. This includes wrenches, screwdrivers, pipe cutters, Teflon tape, propane gas supply, and safety goggles.
- Turn off power and water: Before you install, make sure to turn off the power and water. This will prevent accidents or damage.
- Measure and plan: Take accurate measurements of the spot chosen. Plan out how you’ll connect the water heater to your RV’s plumbing system. Make sure all connections are available.
- Clear the space: Get rid of anything around the installation area for easy access to the water heater.
Before you start, read the manufacturer’s instructions for your specific RV water heater model. Also, pay attention to important details that can help make the installation easier. Remember, each RV may have different specs due to variations in plumbing setups and available space.
Install a water heater in your RV, no more cold showers.
Step-by-Step Installation Guide
Ready to install a new RV water heater? Here’s a simple guide to help you get started on your DIY project.
Gather up the necessary tools and materials, including the new water heater, Teflon tape, wrenches, screwdrivers, and anything else specified in the instructions.
Be sure to turn off all sources of power before installation. This could involve disconnecting wires or shutting off gas. Then, open the drain valve located at the bottom of the unit and let all the water out.
Remove any access panels and disconnect the old water heater from any electrical or gas connections. Follow all safety precautions outlined in the instructions.
Install the new water heater using the manufacturer’s specific instructions. This might include attaching brackets, connecting gas or electrical lines, and securing components like anode rods or control panels.
Once it’s all set up, don’t forget to test the water heater before you hit the road. Every RV is unique and may require different installation processes. Make sure to read your RV manual or contact a professional if you have any questions.
You’re all set! Enjoy hot showers and a happy camping trip with your newly installed RV water heater. Just remember, regular maintenance is the key to a long-lasting shower experience.
Maintenance and Safety Tips
Regular maintenance and safety guidelines are key to keep your RV water heater in good shape. Here are some tips:
- Check the pressure relief valve – it should not be leaking or malfunctioning. Replace it if needed.
- Flush the tank once a year to remove sediment.
- Inspect the anode rod and replace if necessary.
- Test the TPR valve – it should open smoothly when the lever is lifted.
- Winterize the water heater before storing in cold months.
- Gas powered heaters should be handled with caution. Install carbon monoxide detectors.
Also, check for any leaks around connections and fittings. Take care of them quickly as they can lead to costly repairs. A cautionary tale: one RV’er experienced a burst tank due to lack of maintenance. So, don’t forget to take good care of your water heater!
Frequently Asked Questions
How do I install an RV water heater?
To install an RV water heater, first, turn off the power and water supplies. Remove the old water heater if necessary and prepare the installation area. Install the new unit, connect the water lines, and secure it properly. Finally, turn on the water supply, check for leaks, and test the heater.
Can I install a tankless water heater in my RV?
Yes, it is possible to install a tankless water heater in an RV. However, it requires specific models designed for RV use. Ensure proper ventilation, adequate power supply, and follow the manufacturer’s instructions for installation and maintenance.
How do I install an anode rod in my RV water heater?
To install an anode rod in an RV water heater, drain the tank and locate the anode rod’s location. Remove the existing rod and inspect it for corrosion. Clean the tank and threads before inserting the new anode rod. Tighten it securely and refill the tank with water.
What is the cost of installing a tankless water heater in an RV?
The cost of installing a tankless water heater in an RV can vary depending on the brand, model, and additional installation requirements. On average, it may cost between $500 and $1,500, including the unit and any necessary accessories or modifications.
How do I replace an RV water heater?
To replace an RV water heater, start by disconnecting the power and water supplies. Remove the old unit and prepare the installation area. Install the new heater, reconnect the water lines, and secure it properly. Finally, turn on the power and water supplies, check for leaks, and test the heater.
How do I change the RV water heater element?
To change an RV water heater element, turn off the power and water supplies. Drain the tank and locate the element’s access panel. Remove the old element using a wrench or socket, and install the new one in its place. Reconnect the wires, fill the tank with water, and check for leaks before restoring power.
Conclusion
We’ve talked about RV water heater installation. This includes the types of heaters, like tankless and tank-style. Draining the heater, replacing rods, and setting the temperature are important steps.
Tips for maintenance: Winterize it to prevent freezing and check for leaks. Proactive maintenance avoids costly repairs.
For successful installation and optimal performance, follow manufacturer’s instructions. Prioritize safety by turning off power sources. Invest in proper installation and maintenance for hot water on your travels.
Extra help? Here are some resources to avoid YouTube tutorials: Additional Resources and Recommendations.
Additional Resources and Recommendations
Confused about installing an RV water heater? No need to worry! Start by visiting the manufacturer’s website for installation info and videos. Also, join online RV forums for tips from experienced owners. Get help from a professional technician if needed. Read reviews and ratings on different water heaters to make an informed decision. Visit RV supply stores or browse online retailers for selection and guidance.
Lastly, make sure you have the right tools and materials: pipe wrenches, Teflon tape, electrical connectors, propane tank, butyl tape, and hose clamps. Follow safety guidelines and manufacturer instructions while installing. Now you can confidently complete the installation without any hassle.