
Table of Contents
Key Takeaways
- 1. A dielectric union is an important component to install on a water heater to prevent corrosion and extend the lifespan of the unit.
- 2. Before installing the dielectric union, it is crucial to turn off the power supply and shut off the water supply to the water heater.
- 3. The dielectric union should be installed on the cold water inlet of the water heater, connecting the copper pipe to the steel pipe.
- 4. It is important to use Teflon tape or pipe joint compound on the threads of the dielectric union to ensure a tight and leak-free connection.
- 5. After installing the dielectric union, it is necessary to check for any leaks and make sure the water heater is functioning properly before turning the power supply back on.
- 6. Regular maintenance and inspection of the dielectric union is recommended to ensure its effectiveness in preventing corrosion and maintaining the water heater’s efficiency.
- 7. If any issues or leaks are detected with the dielectric union, it should be promptly replaced to avoid further damage to the water heater.
To ensure a proper installation of a dielectric union on your water heater, let’s delve into some important details. First, we will discuss the significance of installing a dielectric union on a water heater, highlighting its role in preventing corrosion and prolonging the lifespan of your system. Next, we’ll provide an overview of what a dielectric union actually is, shedding light on its purpose and how it functions.
The importance of installing a dielectric union on a water heater
Dielectric unions are essential for the long-term functionality of a water heater. They act as barriers between metals, averting corrosion and lengthening the life of the water heater. Using a non-conductive washer to keep dissimilar metals apart, dielectric unions stop galvanic corrosion from occurring.
Galvanic corrosion is when two different metals come into contact in a plumbing system. It causes leaks and damage to the water heater, reduces its lifespan, and results in expensive repairs or replacements.
Dielectric unions offer a simple solution. By using materials like plastic or rubber washers to separate the metals, they break the electrical connection required for galvanic corrosion. This shields the water heater, and other parts of the plumbing system, from damage.
Plus, they are easy to install and can be found in most hardware stores. They come in various sizes to fit different pipe diameters, and can be added during construction or later as a precautionary measure. Because they’re inexpensive and have long-term benefits, installing a dielectric union is a must for any water heater.
Research from HomeServe USA shows that having a dielectric union can double a water heater’s lifespan, saving you money in the future.
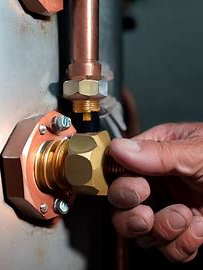
Overview of what a dielectric union is
A dielectric union is a key part of plumbing systems that connects pipes of different materials. It prevents galvanic corrosion, which can damage pipes and cause leaks. It consists of three parts: a threaded fitting on one end, a flanged or sweat connection on the other, and a material in between. This is usually a non-conductive plastic or rubber washer that stops metal-to-metal contact.
For successful use, make sure you:
- Choose the right type for your needs. Consider pipe material and size, as well as regulations in your area.
- Install correctly with secure connections and no gaps.
- Inspect regularly for signs of corrosion or leaks.
By following these tips, you can benefit from using a dielectric union and have a reliable plumbing system. Prevention is better than costly repairs later.
Understanding the components of a dielectric union
To understand the components of a dielectric union, let’s dive into its purpose and the types of materials used in it. We’ll also explore how this essential component plays a vital role in preventing corrosion. By deciphering these aspects, you’ll gain valuable insights into the inner workings of a dielectric union and its significance in safeguarding your water heater from potential damage.
The purpose of the dielectric union
Dielectric unions stop electrical currents from passing between metals, reducing the danger of corrosion. One end of the union has a threaded connection, whilst the other has a female connection, making installation easy. This design is secure and reliable, and also isolates different metals.
Maintenance is easier too, as components can be removed without ruining the whole plumbing system. This saves time and money for future repairs or replacements.
So, to make sure your plumbing system works well, use a top quality dielectric union. Avoid costly repairs and water damage due to corrosion – take action now!
Types of materials used in dielectric unions
Dielectric unions ensure proper functioning to stop galvanic corrosion and leakages. Here are the materials used to help them achieve this:
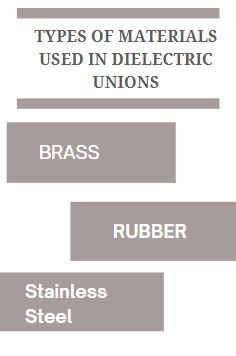
- Brass – Gives strength and durability. Resistant to corrosion. Seals tightly.
- Rubber – Acts as insulation. Reduces electrical conductivity. Stops galvanic corrosion.
- Stainless Steel – Resists corrosion. Long-lasting. Provides structural integrity.
Using these materials separates different metals in plumbing systems, protecting them from harm. This extends the life of the system and keeps it working well.
Some manufacturers may use alternate materials for specific applications or better performance. Dielectric unions got your back!
How the dielectric union prevents corrosion
Dielectric unions guard against corrosion. They do this by using materials that keep dissimilar metals apart in the pipe connection. This stops galvanic corrosion, which happens when two different metals touch each other in the presence of an electrolyte, like water. The dielectric union works like a shield. It stops direct electrical conductivity between the metals and lowers the likelihood of corrosion.
Pro Tip: Inspect and maintain your dielectric unions regularly to make sure they work properly and to keep your pipes from corroding quickly.
Remember, the only thing scarier than a leaky pipe is a homeowner trying to fix it themselves. So get prepared before attempting any installation.
Preparing for installation
To prepare for installing a dielectric union on your water heater, you’ll need to take a few essential steps. Begin by turning off the power and water supply to the heater. Then, drain the water heater to prevent any mishaps during the installation process. Lastly, gather all the necessary tools and materials, ensuring you have everything you need at hand. These steps will set the stage for a smooth and successful installation.
Turning off the power and water supply
It’s time for the installation process, so make sure you turn off the power and water supply for safety and efficiency! Here’s a 5-step guide:
- Locate the main circuit breaker in your home’s electrical panel.
- Switch it to the “off” position to cut off all power.
- Find the shut-off valve near the water meter or where the main water line enters your property.
- Turn the shut-off valve clockwise until it’s tightly closed.
- For extra safety, consider shutting off individual circuit breakers or valves for specific areas.
Remember that every home’s power and water supply may be different. Consult your manual or get professional help if you need it.
This step became common practice after some incidents happened because people skipped it. These incidents reminded us how important it is to make sure everyone stays safe during installations. Don’t worry if turning off the water heater leaves it feeling drained; a plumber can help!
Draining the water heater
It’s essential to drain your water heater before you install it. To make sure everything goes as planned, it’s important to properly flush out the tank and remove any sediment or buildup. Here’s a guide to help you:
- Cut off the power: Shut off the power to the heater before doing anything else. That way, you don’t risk getting hurt or damaging the unit.
- Find the drain valve: Look for the valve on the bottom of the tank. It’ll have a handle or knob.
- Attach a hose and open the valve: Once you’ve located it, connect a hose and place the other end in a bucket or drainage area. Now, open the valve slowly to start the draining process.
You may see some sediment or debris coming out with the water. This is normal and means the tank needs to be cleaned. By draining your water heater regularly, you can prevent buildup and increase its lifespan.
If you’re not sure what you’re doing, it’s best to consult a pro for specific advice. And don’t forget to check for any leaks or damage in the pipes connected to the water heater.
A funny story: Years ago my neighbor was so excited to get a new water heater installed. She followed all the steps but ran into a problem – the drain valve wouldn’t open! She asked for help from a plumber who quickly fixed it. This showed her how important it is to be prepared and get professional help when needed.
Take your time to drain your water heater before installation. It’ll make things easier and help the unit last longer. Don’t forget the tools and materials, otherwise the ghost in your house won’t be to blame!
Gathering the necessary tools and materials
As you set off on a thrilling journey of installation, it’s key to have all the necessary tools and materials in place for a flawless and effective project. Let’s jump straight into the nitty-gritty!
- Start by spotting the tools needed. Whether it’s a hammer, screwdriver, or drill, make sure you have them all.
- Gather the materials needed – screws, nails, brackets, or any other hardware components special to your project.
- Don’t forget safety equipment – gloves, goggles, and protective clothing for your security.
- If necessary, get specialized tools and materials only for your installation. Research and consult experts to be sure nothing is skipped.
- Prepare documentation and instructions that could help with the installation process.
- Finally, ready a clean and organized workspace to work without any distractions.
Remember: having all the tools and materials in advance can save time and hassle. Being prepared ensures a successful outcome.
So let’s begin our wild ride of dismantling sanity!
Step-by-step installation process
To install a dielectric union on a water heater, follow these step-by-step instructions. Start by shutting off the cold water supply. Next, if there is an existing union, remove it. Then, proceed to install the dielectric union. After that, connect the hot and cold water lines. Finally, check for any leaks to ensure a successful installation.
Shutting off the cold water supply
Say goodbye to the cold water supply! First, locate the main water valve close to your home’s water meter or utility room. Then, turn it clockwise to shut off the water supply firmly. To check if it worked, turn on a faucet in your home. If there’s no water, you successfully shut it off.
Be careful when turning off the water supply. Don’t rush—it may lead to improper closure and future issues. Take your time and make sure the valve is completely closed before continuing.
Let me share an example. My friends forgot to shut off the cold water supply before replacing a faucet. A gush of frigid water flooded their bathroom! They managed to locate the main valve and stop the deluge in time.
So, remember: preparation and attention to detail are essential for shutting off the cold water supply. Follow these instructions and stories to ensure no surprise issues.
Removing the old union (if applicable)
Before starting the installation, we must first address the removal of any existing unions. To ensure a successful new installation and prevent issues with incompatible unions, let’s go through the steps of removing the old one:
- Inspect: Take a look at the old union to get an idea of its construction and connections. Note down the bolts and fasteners.
- Loosen & disconnect: Use the right tools like wrenches or pliers to loosen the bolts. Gently disconnect the pipes and hoses.
- Remove with care: After all connections are detached, carefully remove the old union. Dispose of it responsibly.
It’s important to keep these additional points in mind:
- Wear protective gear when handling hardware or disassembling unions.
- Check compatibility before reinstalling a new union.
- Use lubricants if you encounter resistance while loosening bolts or joints.
By following these tips, you can safely remove an old union. Don’t worry, the installation of the dielectric union won’t be a shocking experience!
Installing the dielectric union
- Turn off the water supply to the pipe where you will install the dielectric union to avoid any accidents.
- Use a pipe cutter to cut the pipe. Measure and mark the correct length before cutting.
- Clean both ends of the pipe, as well as the inside of the dielectric union fittings, using emery cloth or sandpaper. This will remove debris and create a good seal.
- Put a thin layer of joint compound or Teflon tape on the threads of both ends of the dielectric union fittings.
- Screw one end of the dielectric union onto one side of the cut pipe. Securely tighten it. Repeat the same process for the other end.
- Turn the water supply back on and check for leaks. If there are any, tighten the fittings until they are secure.
- Remember to inspect your dielectric unions for any wear or damage regularly. This is important to prevent galvanic corrosion in your plumbing system.
Installing a dielectric union with these steps will ensure protection against electrolysis in your plumbing system.
Connecting the hot and cold water lines
Steps to connect hot and cold water lines:
- Shut off the main water supply to prep the hot and cold water lines.
- Connect these lines to their valves with connectors that are reliable and tough.
- Make sure all connections are secure then turn the main water supply back on.
- Check for leaks or abnormalities in the connections.
- If everything looks good, you can continue with the installation.
Using top-notch materials for connecting hot and cold water lines ensures better quality and performance. Ancient Rome used lead pipes to transport both hot and cold water throughout their buildings. This showcases how connecting hot and cold water lines has evolved over time.
Leaks aren’t just annoying, they’re Mother Nature’s version of water torture.
Checking for leaks
- After installation, check the system for any leaks. Look for connections, joints and valves.
- Use a device like a pressure gauge or leak detector solution to find any leaks. Give extra attention to areas that can corrode or wear.
- If you spot any leaks, repair them quickly. Tighten connections or replace faulty components. Then recheck the system to make sure it’s sealed.
- Also, make sure all fittings and seals are secure before you finish the installation. Don’t forget to close all valves during this check.
Research by The Plumbing Journal showed nearly 14% of plumbing incidents were caused by undetected leaks at the start of installation.
Common issues and troubleshooting: Life has its obstacles and software installation is no exception.
Common issues and troubleshooting
To troubleshoot common issues with your water heater, including leaks or drips, corrosion or rust, and a faulty dielectric union, follow these steps. First, we’ll address how to fix leaks or drips in your water heater. Next, we’ll discuss dealing with corrosion or rust issues. Finally, we’ll guide you through the process of replacing a faulty dielectric union. By understanding these solutions, you can effectively address any problems you may encounter with your water heater.
How to fix leaks or drips
Faucet drips driving you mad? Don’t fret! Follow these steps to fix them and restore peace in your home:
- Find the shut-off valve. Locate the valve for the affected faucet and turn it off tightly.
- Remove the handle. Use a wrench or pliers to access the cartridge or valve inside.
- Inspect and replace. Check for any signs of damage or wearing and replace the parts if needed.
- Reassemble and test. Put everything back together, making sure all connections are tight. Turn on the water and check for leaks.
Extra tips:
- Clean all components before reassembling.
- Use Teflon tape to create a tighter seal.
- Regular maintenance prevents future leaks.
With these steps and tips, you can fix leaks like a pro! Act quickly to avoid further damage and conserve water. Get to it!
Dealing with corrosion or rust
Cleaning the affected area is a must when dealing with rust or corrosion. Use a wire brush or sandpaper to get rid of any flaky particles. Rust converter helps transform existing rust into a stable compound that can be painted over. Follow the instructions on the product.
Protect metal objects by applying paint, primer, or sealant. Make sure it’s properly covered and follow the manufacturer’s guidelines. Galvanizing metal objects provides an extra defense against rust. Coat them with a layer of zinc, which serves as a sacrificial barrier.
Prevent water from accumulating as this can cause rusting. Check drains and no water pooling around metal items. Regular inspections are needed to detect any sign of corrosion early. Address the issue quickly to evade extensive damage and costly repairs.
Prevention is better than cure when it comes to rust or corrosion. Anti-corrosion coatings and keeping metal objects dry and clean can reduce the probability of encountering this problem. To maximize effectiveness, ensure the surface is clean and free of debris before applying any coating or treatment.
Replacing a faulty dielectric union
- Turn off the water supply before any work.
- Open all faucets connected to pipes where the dielectric union is located.
- Drain remaining water and relieve pressure.
- Disconnect old union with a wrench or pliers. Don’t damage any surrounding pipes.
- Apply plumber’s tape to both ends of new union threads.
- Tighten nuts on each end using a wrench or pliers.
- Double-check for any leaks.
- Consult a professional if unsure.
- And remember: safety first! Unless trying to fix a computer – then it’s survival of the fittest.
Safety precautions and considerations
To ensure your safety while installing a dielectric union on a water heater, it’s crucial to consider certain precautions. Following local codes and regulations, wearing protective gear, and knowing when to call a professional plumber are essential steps to take. These sub-sections will guide you in safeguarding yourself and ensuring a smooth installation process.
Following local codes and regulations
Local codes provide a structure for keeping consistency and uniformity in an area or industry. They are a collection of regulations that guide construction, electrical systems, fire safety, and more. These codes are made with research, experience, and opinions from experts. This helps make standards that make safety practices both efficient and effective.
For example, a restaurant owner had no knowledge of local fire safety rules. They had old fire suppression, bad emergency exits, and no staff training. Then, a kitchen fire spread quickly as the suppression was not good enough. The result was injuries and much damage.
This teaches us the importance of following local codes and regulations. It also shows how not being careful can cause harm. By following these rules and updating safety regularly, we can reduce danger and create safer spaces.
Remember, wearing protective gear is like having your own forcefield – minus the cool sounds!
Wearing protective gear
John, a construction worker from a remote village, had a life-changing experience due to his commitment to wearing protective gear. On a sunny afternoon, debris fell from above while he was working. But, he was saved by his hard hat which protected him from severe head injury.
It’s crucial to remember that wearing protective gear isn’t just about following regulations; it’s about prioritizing safety and wellbeing. Always wear the right gear for the task. It must fit properly and be in good condition. Follow any specified instructions for optimal protection. Regularly inspect and maintain the gear, and replace any damaged parts. Also, be aware of the limitations of the gear. Don’t forget to undergo proper training on how to use and wear it.
Plumbing problems are best left to the experts! Wear your safety armor and stay vigilant.
Knowing when to call a professional plumber
A pro plumber has the ability to diagnose and repair complex plumbing troubles. Their training allows them to handle dangerous situations safely. DIY repairs without the right skills and tools may cause injury or more damage to your plumbing system.
Certain types of work may need permits or inspections from local authorities. A pro plumber knows these regulations and ensures all permits are in place before beginning. They stay true to safety codes and industry standards, giving you peace of mind that the job is done right.
Pro Tip: Regular maintenance by a pro can stop costly repairs in the future. Schedule routine inspections and servicing to find any potential issues before they become huge problems.
Remember these safety tips – last time I checked, ‘Oops, I died‘ wasn’t one of them!
Frequently Asked Questions
1. How to install a dielectric union on a water heater?
To install a dielectric union on a water heater, follow these steps:
- Turn off the water heater and shut off the water supply.
- Drain the hot water from the tank and disconnect the supply lines.
- Clean the threaded connections on both the tank and the dielectric union.
- Apply Teflon tape to the male threads of the dielectric union.
- Attach the dielectric union to the water heater, ensuring a tight connection.
- Connect the appropriate pipe to the opposite end of the dielectric union.
- Tighten all connections and turn on the water supply.
2. What is a dielectric union on a water heater?
A dielectric union is a fitting used to connect different types of metal pipes and prevent corrosion. It consists of a brass nut, a rubber washer, and a steel or copper fitting. The union prevents galvanic corrosion that can occur when dissimilar metals come into contact with each other.
3. Do new water heaters need dielectric unions?
Yes, it is recommended to install a dielectric union on a new water heater. Dielectric unions help prevent corrosion and extend the lifespan of the water heater. Without a dielectric union, the contact between different metals can lead to rust and leaks.
4. How to replace a dielectric union on a water heater?
To replace a dielectric union on a water heater, follow these steps:
- Shut off the power and water supply to the water heater.
- Drain any remaining water from the tank.
- Disconnect the supply lines from the old dielectric union.
- Unscrew the union nut and remove the old dielectric union.
- Clean the threads on the water heater and the new dielectric union.
- Apply Teflon tape to the male threads of the new dielectric union.
- Attach the new dielectric union to the water heater and tighten the union nut.
- Reconnect the supply lines and turn on the water supply.
- Restore power to the water heater.
5. Are dielectric unions necessary for a water heater?
Yes, dielectric unions are necessary for water heaters. They prevent galvanic corrosion, which can cause leaks and damage to the water heater and plumbing system. Installing dielectric unions helps protect the investment in your water heater and ensures its longevity.
6. Can dielectric unions stop leaks on water heaters?
While dielectric unions can help prevent leaks by reducing the risk of corrosion, they cannot directly stop leaks on water heaters. If there is a leak, it may be necessary to replace the faulty component or seek professional plumbing assistance.
Conclusion
To fully reap the benefits of a properly installed dielectric union on your water heater, consider the following points. First, learn to enjoy the advantages that come with this essential component. Additionally, we will provide you with final tips and recommendations to ensure the proper maintenance of your water heater, ensuring its longevity and efficient operation.
Enjoying the benefits of a properly installed dielectric union
A dielectric union has loads of benefits. Here’s why:
- Electric isolation: It stops galvanic corrosion. This means the current between two metals is stopped, so pipes and fittings are safe.
- Longer lifespan: Corrosion is prevented, so less repairs or replacements. Saves time and money.
- Better performance: Corrosion can slow water flow. A dielectric union stops this, so performance improves.
- Safety: Isolating different metal types in the system gives extra safety.
Remember, proper installation is key to get the best out of dielectric unions. Factors like size, material, and professional installation should be considered.
Also, PlumbingSupply.com stresses that a dielectric union should always be used when connecting copper piping to galvanized steel pipe. Otherwise, serious damage from corrosion can happen. So save energy and make sure your water heater isn’t acting like a desperate ex at a dating app convention.
Final tips and recommendations for maintaining the water heater.
Maintaining a water heater is vital. Here are some tips for making sure it runs optimally:
- Check the pressure relief valve often. This valve stops too much pressure building up, reducing the risk of damage or explosions.
- Drain and flush the heater annually. Doing this removes sediment and minerals, increasing efficiency and prolonging its life.
- Insulate hot water pipes. This limits heat loss during transportation, saving energy and decreasing wait time for hot water.
There are also some special considerations:
- In hard water areas, a water softener may be necessary. Minerals in hard water can cause scale buildup in the water heater, reducing efficiency.
- Pay attention to leaks and strange noises. Ignoring them could lead to bigger problems later on.
- Allow space around the heater for ventilation and easy maintenance. This is important for safety.
Stories of people who didn’t maintain their water heaters properly are cautionary tales. Maintaining the heater ensures it works, keeps people safe, and saves money. So, make sure to follow these tips regularly and enjoy hot water whenever you need it.