
Table of Contents
In this guide, we will show you how to replace a thermocouple on a furnace. The thermocouple is a critical safety device that detects the pilot flame and prevents gas leaks.
We’ll provide step-by-step instructions for this straightforward process, emphasizing safety precautions throughout. By following our guide, you’ll be able to maintain your furnace’s efficiency and keep your home warm without any issues.
Thermocouples and Its Importance in a Furnace
The thermocouple is a critical part of a furnace. It keeps the gas valve open when there is a pilot flame. Without it, the furnace won’t work! If it’s faulty, you need to replace it.
Turn off the gas supply and wait for it to dissipate. Take off the access panel and disconnect the old thermocouple from the control valve. Note its length.
Put in the new thermocouple. Align it with the brackets and secure it with screws. Reattach it to the control valve and adjust its length. Cover it all up and turn on the gas. See if it works!
Not all furnaces use standing pilots or thermocouples. Newer ones use electronic ignition methods such as hot surface igniters or spark ignitors. If you need help, call a professional.
Thermocouples have been around for hundreds of years, used in scientific research. Later, they became essential for furnace operation. Their long life makes them better than other flame sensors like mercury switches or photocells.
Signs of a Bad Thermocouple and When to Replace it
When your furnace thermometer starts to malfunction, it is important to spot signs of a malfunctioning thermocouple. This must be done quickly to prevent potential damage or harm.
- If the pilot light won’t stay lit, it may indicate that the thermocouple needs replacing. For the gas valve to remain open, the thermocouple must create enough heat-induced voltage.
- Visible damage like cracks or broken connections also points to the need for replacement. Even if you can light the pilot, these damages can cause leaks which can be dangerous.
- If your furnace or water heater is 10+ years old and thermocouples have not been replaced for some time, this may be a reason for replacement. The average thermocouple lifespan is 10-15 years.
Different models may have their own details affecting thermocouple maintenance. It’s best to contact professionals before attempting any DIY repair if you don’t feel confident about it. Be prepared to take on your handyman duties and get the essential tools for replacing a thermocouple on your furnace.
Necessary Tools for Replacing a Thermocouple
For replacing a faulty thermocouple on a furnace, you’ll need a set of tools: an end wrench, a nut driver, pliers, both flathead and Phillips head screwdrivers, a multimeter or voltage tester, and a new thermocouple replacement part.
It’s key to take precautions when dealing with gas and furnace components. Turn off the gas supply and shut off the main gas valve before starting repair work.
Ensure the pilot light is out and the burner assembly is cool before disconnecting the old thermocouple from its bracket position. Follow the instructions for installing the new thermocouple.
Replacing a damaged thermocouple is vital for safe furnace operation and preventing gas leaks. Homeowners often forget to check for signs of wear and damage in their heating system. Be watchful, and take action right away if you find a bad thermocouple – this can have a major impact on your furnace over time.
Replace the thermocouple carefully – it’s less risky than trying to fix a marriage!
Steps for Replacing a Thermocouple on a Furnace

Replacing a Thermocouple on a Furnace is an important task that should be handled professionally. This is how you can replace a faulty thermocouple on your furnace:
- Turn off the gas supply and wait for the furnace to cool down. Remove the access panel to expose the burner chamber.
- Detach the old thermocouple from the control valve and pilot assembly using a wrench. Remove the bracket holding the thermocouple in place.
- Install the new thermocouple by positioning it in the same place as the old one. Reattach the bracket and connect it to the control valve and pilot assembly using a wrench.
- Reinstall the access panel and turn on the gas supply. Relight the pilot following the manufacturer’s instructions.
- Test the new thermocouple by checking the pilot flame. If it is strong and stable, the replacement is successful.
It is important to note that before attempting to replace the thermocouple, it is essential to turn off the gas supply and wait for the furnace to cool down. Additionally, checking the pilot flame after the replacement is necessary to ensure the proper operation of the furnace.
It is recommended to use a nut driver rather than pliers when making connections to prevent damage to the thermocouple. Moreover, regular inspections and replacements of thermocouples every few years can prevent problems and ensure safe furnace operation.
Before tinkering with your furnace, remember: a little gas goes a long way in causing a big BOOM. So turn off that gas supply and let’s get started.
Turn off the Gas Supply and Allow the Furnace to Cool Down
Ensure safety measures are taken before replacing a thermocouple. Working in a hot furnace can cause physical harm or even explosions. Follow these 3 steps to turn off the gas supply and let the furnace cool:
- Locate the shut-off valve on the gas supply line of the furnace.
- Turn the valve clockwise to shut off any incoming gas.
- Leave the furnace alone for at least one hour to cool down.
Carbon monoxide is often released from furnaces. Ensure ventilation when dealing with furnaces and replace thermocouples in well-ventilated areas.
Have all necessary tools and equipment ready. Follow manufacturer instructions during each step of replacing the thermocouple.
My friend once changed out a thermocouple without turning off the gas supply first. We warned him of potential dangers and advised him against doing it again. Removing a thermocouple from a pilot assembly is easy if you can locate and remove a splinter.
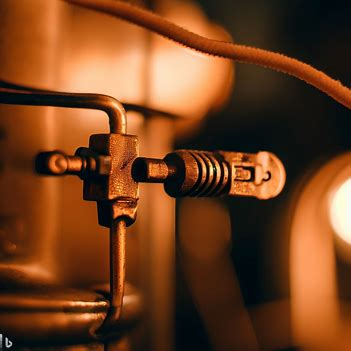
Access the Thermocouple and Remove it from the Pilot Assembly
To replace a thermocouple, it must be removed from the pilot assembly. This requires caution and technical expertise. Shut down the furnace, locate the pilot assembly, and using a wrench carefully unscrew the thermocouple nut. Gently remove the thermocouple.
Also, ensure all connections are secure, and no potential gas leaks remain after replacement. Check the owner’s manual before replacement to avoid voiding any warranty. If uncertain or lacking technical knowledge, hire a professional technician for safety reasons.
They can help confirm if there is another underlying issue. Don’t forget, buying a thermocouple is essential – just as important as buying a new phone!
Measure and Purchase a Replacement Thermocouple
When your furnace’s thermocouple malfunctions, it’s time to replace it! You’ll need to measure the old one and buy a new one that fits your furnace system. Here’s how:
- Turn off the gas valve and electrical power to the furnace.
- Unscrew the old thermocouple counterclockwise.
- Measure it to make sure the replacement matches.
- Buy a new one similar to the one measured from a local store or online.
Note: modern furnaces may need a different-sized thermocouple than older models, for safety and efficiency.
Don’t let a faulty thermocouple cause bigger problems down the road. Check your heating system regularly to prevent winter breakdowns.
Install the New Thermocouple in Place of the Old One
If you need to replace a thermocouple on your furnace, here’s what to do:
- Turn off the gas supply and let the furnace cool down.
- Unscrew the nut that holds the old thermocouple to the gas valve.
- Remove any clips or clamps keeping the old thermocouple in place. Take it out of the pilot assembly.
- Slide the new thermocouple into position, securing it with clips or clamps as needed.
- Screw the nut of the gas supply back onto the new thermocouple and tighten it.
Be very careful when dealing with gas appliances. Wear protective gear and ask a professional for help if you’re uncertain.
Check your thermocouples regularly. This will ensure your furnace runs properly and safely. When finished, you’ll be feeling nice and toasty!
Reassemble the Furnace and Perform the Necessary Tests
Time to get the furnace back together! Reassembly and tests must be done properly. Here are five steps to do this:
- Replace insulation.
- Reinstall the burner cover.
- Turn on the gas and ignition system.
- Perform a leak test around replaced components.
- Test the system for 10 minutes.
After these steps, inspect all connections and components. Safety is key – turn off electricity and gas when working on certain parts.
Be careful – a homeowner once tried this himself and broke a gas line! He smelled a gas odor and had to call a plumber. DIY work should only be attempted by experts. So if you’re up for a challenge, try troubleshooting your furnace.
Troubleshooting Tips
As you work through the process of fixing your furnace thermocouple, you may encounter some challenges along the way. Here are some Troubleshooting Pointers to help you solve the problems.
- CHECK THE GAS SUPPLY – If your furnace isn’t putting out heat, the first step is to check the gas supply. Make sure that the valve knob is in the “on” position and the pilot light is lit. If neither of these is the problem, try checking the gas tube and pilot assembly.
- TEST THE THERMOCOUPLE – If the flame sensors on your furnace aren’t working properly, you may need to replace the thermocouple. To test the thermocouple, remove the access cover and locate the sensor rod. Use a nut driver to loosen the connection, then use a multimeter to test the resistance. If the reading is zero, the thermocouple is bad and needs to be replaced.
- CHECK THE BURNER – If the burner assembly is damaged or not positioned correctly, it can prevent your furnace from working properly. Check the burner assembly for any damage, and make sure it’s in the correct position. If necessary, use a wire brush to clean it.
- RELIGHT THE PILOT – If your pilot light won’t stay lit, you may need to relight it. Turn off the gas supply, wait a few minutes, then turn the gas supply back on and light the pilot. If the pilot light doesn’t stay lit, you may need to clean the pilot tube.
It’s important to note that these are just a few Troubleshooting Pointers, and your individual furnace may have unique issues. For more detailed instructions on furnace thermocouple replacement and repair, refer to the manufacturer’s guide or call a professional.
According to Home Hacks, a bad thermocouple is a common problem that can occur in furnaces and water heaters.
Finding a gas leak is like a game of hide and seek, except the consequences are much less fun.
Checking for Gas Leaks and Proper Pilot Light Ignition
For safety with gas appliances, make sure to check regularly for gas leaks and proper ignition of the pilot light. Here’s a guide to help:
- Turn off all gas appliances and their valves.
- Locate the gas meter and turn off its valve.
- Wait minutes before turning on lights or switches. These may cause an explosion if a leak is present.
- Test for leaks with soapy water or a leak detection solution around joints and valves of gas lines. Bubbles mean a leak.
- If no leak, turn on each appliance one by one to check their pilot lights. The flames should be blue with yellow tips.
- If any pilot light does not ignite or has an orange/yellow flame, call a professional.
Safety should be a top priority with gas appliances. Smoke and carbon monoxide detectors should also be working. Schedule regular maintenance checks with experienced professionals to keep appliances safe and efficient.
Don’t ignore the flame sensors — otherwise, you’ll have a furnace disco party with all the flashing lights!
The Importance of Flame Sensors and How to Clean Them
Flame Sensors are essential for correctly and efficiently running furnaces. It’s advised to clean them up every 6 months to avoid system disruption, unwanted heat loss, and higher energy bills. Here’s a simple guide for cleaning your flame sensors:
- Switch off the power– For safety.
- Locate – Near the burners.
- Remove – Gently unclip.
- Clean – Rub with an abrasive pad like sandpaper.
- Reinstall – Insert correctly and clip back in.
- Test – Switch on the heating and check if working.
Noted: Different models may have different steps. So, consult experts if unsure. Neglecting to clean flame sensors can cause system malfunction, repair costs, and even furnace replacement.
Regular maintenance reduces these risks and extends its lifespan. My friend recently called an engineer for her malfunctioning furnace, only to find out that it needed a flame sensor cleanup.
She was amazed at the simple fix and happy with the warm heat and savings that followed. In case of failure, call in professionals. Just make sure they’re not the same person who installed your computer!
Contacting a Professional for Assistance
Furnace repairs can be dangerous and complex. Hiring a certified professional is the best way to ensure safety and efficiency. They have the certifications and knowledge needed to accurately diagnose and solve the problem. DIY repairs may cause more damage or even result in personal injury if safety is not taken into account.
A technician will inspect all the components related to the issue as well as any other potential problems during the repair. This comprehensive inspection helps detect underlying problems that would have gone unnoticed.
If you need help with your furnace, search online for local professionals who specialize in furnace repair or ask friends and family for recommendations. Make sure to read reviews before deciding who to hire.
It is strongly advised to contact a professional for furnace repairs due to their complexity and danger. Experienced hands are essential for fixing your heating system properly from start to finish.
Don’t take the risk – one wrong move with a thermocouple and you could end up in hot water!
Precautions to Take When Replacing a Thermocouple on a Furnace
When changing your furnace’s thermocouple, it is essential to take precautions for successful and safe operation. Here are some tips:
- Turn off the gas supply and burners. No flame or pilot light should be lit.
- Remove any panel or cover that blocks access to the old thermocouple.
- Unscrew any nuts connecting the thermocouple to the burner assembly or control valve.
- Attach the new thermocouple with pliers or wrenches. Avoid damaging other components. Screw back all connecting nuts.
- Reconnect each connection, and tighten all screws properly.
If you have doubts about doing this, seek expert advice. Repairing correctly helps your furnace work for years without issues. Following these steps makes replacing a bad thermocouple safe and easy.