
Table of Contents
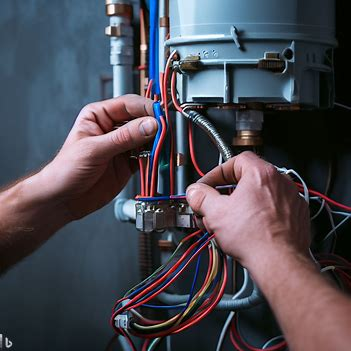
To wire an electric hot water heater correctly, follow these steps:
- Cut power at the circuit breaker.
- Place a junction box near the heater for wiring.
- Connect black and white wires with wire connectors.
- Ground the circuit breaker and heater with a green or copper wire.
- Test voltage with a tester, ensure no power is running.
- Reset the breaker and turn up the heat!
Extra tips to ensure a successful install:
- Label connections for future reference.
- Use electrical tape to secure wires in the junction box.
- Make sure wiring is sized according to codes.
- If unsure, hire a professional electrician.
Remember, safety first when dealing with electricity!
Key Takeaways
- Safety should be the top priority when wiring an electric hot water heater. Make sure to turn off the power supply and follow all safety precautions before starting the wiring process.
- Familiarize yourself with the different components of an electric hot water heater, such as the thermostat, heating elements, and electrical connections. Understanding how these parts work together will make the wiring process easier.
- Before starting the wiring, gather all the necessary tools and materials, including wire connectors, electrical tape, and a voltage tester. Having everything ready beforehand will save time and ensure a smooth installation.
- Follow the manufacturer’s instructions and wiring diagram provided with the hot water heater. Each model may have specific requirements, so it’s important to read and understand the instructions thoroughly.
- Doublecheck all connections and ensure they are secure and properly insulated. Loose or exposed wires can be dangerous and may cause electrical issues or even fires.
- Test the wiring and connections using a voltage tester to ensure there is no power running through the wires before turning on the hot water heater. This step is crucial for safety and to avoid any electrical mishaps.
- Once the wiring is complete and tested, turn on the power supply and monitor the hot water heater for any signs of malfunction or overheating. Regular maintenance and inspections are essential to ensure the safe and efficient operation of the electric hot water heater.
- Remember, if you are unsure about any step or lack the necessary knowledge and experience, it is always best to consult a professional electrician for assistance.
The components of an electric hot water heater
To properly wire an electric hot water heater, it is essential to understand its components. Let’s delve into the key elements you need to familiarize yourself with. First, we have the heating elements, which are responsible for heating the water. Next, we’ll explore the thermostat, which allows you to control the temperature. Lastly, we’ll discuss the circuit breaker that is crucial for ensuring the safety and proper functioning of the heater.
The heating elements
Let’s take a closer look at the heating elements of an electric hot water heater. Two common types are immersion and screw-in. Materials like copper, nickel, and stainless steel are commonly used due to their conductivity and corrosion resistance. Each element has a power rating measured in watts.
This indicates its energy consumption and heat generation capacity. Hot water heaters usually run on either 120 or 240 volts. Size is important for compatibility with specific models. Adjustable thermostats can provide customized temperature settings.
Over time, mineral deposits can accumulate on the element, diminishing efficiency. Regular maintenance helps. Edwin Ruud invented the first hot water heater in 1889. He improved plumbing systems and this paved the way for current efficient heating mechanisms.
Knowing the features of heating elements helps users make informed decisions. Consult professionals or refer to manufacturer guidelines for specifics.
Sadly, thermostats can’t control our arguments!
The thermostat
Thermostats in electric hot water heaters provide precise temperature control. This makes sure users don’t experience sudden changes in temperature.
The thermostat is usually located on the front of the tank and can be adjusted with a dial or buttons. It signals to the heating elements to turn off once the water reaches the set temperature. If the water cools, the thermostat activates the heating elements again.
Some thermostats have additional features such as vacation mode or energy-saving settings. Checking and adjusting the thermostat regularly can optimize performance and maximize energy efficiency.
Plus, the circuit breaker in an electric hot water heater protects you from getting burned!
The circuit breaker
The circuit breaker is essential. Let’s look at the parts:
- Breaker Panel: This is where the breakers are housed. It’s usually near the main electrical panel of a house. It has individual breakers for different areas or appliances.
- Circuit Breaker Switches: These switch on or switch off electricity to specific circuits. When there’s too much current, it trips and cuts off power to avoid overheating and accidents.
- Overcurrent Protection: It senses excessive current flow caused by wiring issues or faulty appliances. It trips and shuts off power to isolate the problem.
- Reset Capability: After it trips, you can manually reset most circuit breakers by flipping their switches back. This lets you fix the issue without replacing components.
- Ampere Rating: Each circuit breaker has an ampere rating. It determines how much current it can handle without tripping. Make sure it matches your hot water heater needs for performance and safety.
The circuit breaker guards against potential hazards by monitoring and regulating electrical currents. It’s based on research by electrical engineers in “Electrical Engineering Handbook” by Richard C. Dorf (CRC Press). Get ready to explore the electrifying world of wiring an electric hot water heater!
Safety precautions before starting the wiring process of electric hot water heater

To ensure a safe wiring process for your electric hot water heater, start by following these precautions. Begin by turning off the power supply to the electrical panel. Then, check the functionality of the voltage tester. These steps will help you create a secure setup before proceeding with the wiring process. Remember, safety should always be your top priority when working with electrical connections.
Turning off the power supply to the electrical panel
Follow these 5 steps to safely switch off power in the electrical panel.
- Locate the main electrical panel in the basement, garage or utility room.
- Identify the main breaker switch. It’s usually the largest and labeled “main” or “main disconnect.”
- Flip the switch to “off” position. This will shut off power to the entire system.
- Check that all lights and appliances have stopped working. If not, go back to step 3.
- Use a non-contact voltage tester near outlets, switches or fixtures to verify power is off.
Remember, even after turning off the power, there may still be some electricity in certain circuits. So, wear appropriate PPE, use insulated tools and plan out your project before starting. Safety is key – always treat wires as live until verified. Remember, safety first!
Checking the voltage tester
Start by examining the voltage tester for any damages or faults. Activate it and ensure the indicator light or LCD display is working properly.
Test the voltage tester on a known power source. Connect one lead to the hot wire, the other to a neutral or ground wire. Check if the tester shows voltage.
Do this test again with different wires, making sure all readings are accurate.
Always obey safety regulations when using the voltage tester to stay safe. Keep focused and be aware of potential risks.
Prior to electrical work, always use a functioning voltage tester. Neglecting this can cause accidents, even fatal ones. Don’t take chances with safety – check your voltage tester thoroughly each time.
Know the dangers of electric hot water heaters, because not knowing might cost you more than just coffee-less shower.
Step-by-step guide to wiring an electric hot water heater
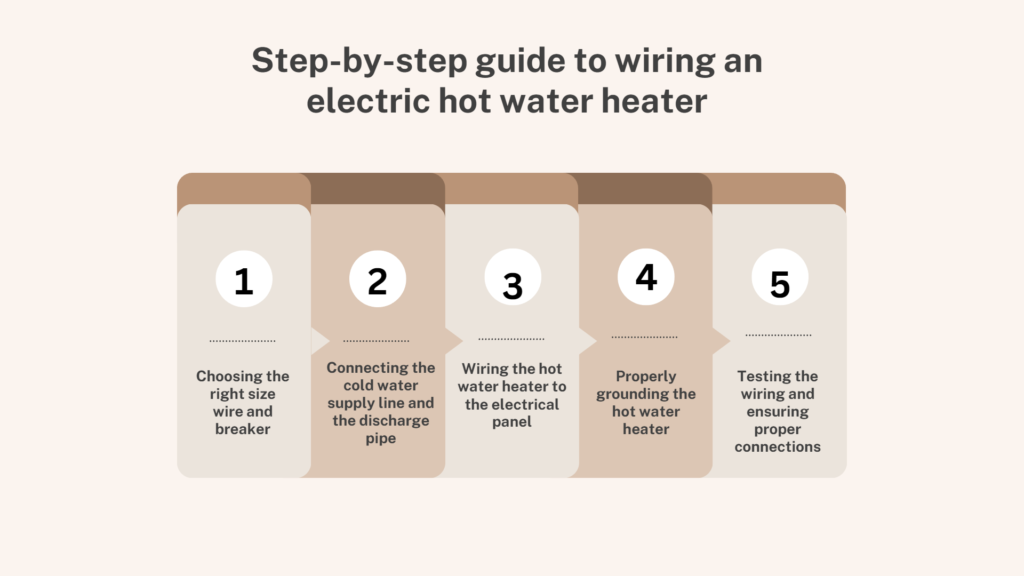
To wire an electric hot water heater, follow this step-by-step guide. Start by choosing the right size wire and breaker. Then, connect the cold water supply line and the discharge pipe. Next, wire the hot water heater to the electrical panel. Properly ground the hot water heater for safety. Finally, test the wiring and ensure all connections are secure.
Choosing the right size wire and breaker
Wire Gauge: Get the correct wire gauge for your water heater. The ampacity requirements must match or exceed the wire size specified by the manufacturer.
Breaker Size: Pick the breaker based on the water heater’s amps. It should provide protection from over currents and turn off power if there’s too much current.
Voltage Compatibility: Check the voltage. Both the wire and breaker must be compatible with the voltage of your water heater. Not matching could lead to inefficiency or damage.
Wiring Method: Follow local electrical codes. This includes selecting the right conduit or cable types, and arranging the wires safely and protectively.
Also, it’s best to get advice from an electrician or look at the manufacturer’s instructions for specific instructions, related to wire sizing and breaker selection.
Fun Fact: The Spruce says, if the wire size is wrong, it can cause overheating, energy waste, and fire risks in electrical systems.
Connecting the cold water supply line and the discharge pipe
- Turn off main water supply. To prevent accidental leaks or spills, shut off the main water supply before beginning any installation work.
- Attach hot water outlet pipe. Take one end of a flexible copper pipe. Connect it to the hot water outlet at the top of the heater. Secure the connection by tightening it with a wrench or pliers.
- Connect cold-water inlet pipe. Attach another flexible copper pipe to the cold-water inlet at the top of the heater. Use a wrench or pliers to ensure a tight connection.
- Install shutoff valves. Install shutoff valves on both the hot and cold-water lines near their respective connections to the heater. This will allow for easy maintenance and repairs in the future.
- Connect discharge pipe. Attach one end of a PVC discharge pipe to the pressure relief valve located on top of the hot water heater. Make sure the fit is secure to prevent any leaks or damage.
Also, use Teflon tape or plumber’s putty when connecting pipes for extra protection against leaks.
It is crucial to understand wiring electric hot water heaters correctly, as this has been a skill since ancient times. Wiring your hot water heater to the electrical panel is not for those faint of heart!
Wiring the hot water heater to the electrical panel
Wiring an electric hot water heater to the electrical panel can seem complex, but with the right guide, it’s easy! Here are the steps:
- Power off: Turn off the power at your home’s electrical panel. Find the circuit breaker for the hot water heater and switch it off for safety.
- Remove cover plate: Locate the cover plate on the front of the heater, and remove it.
- Connect the wires: Inside are three wires – black (hot), white (neutral), and green or bare copper (ground). Connect the correct wiring using wire connectors or screws.
- Grounding: Connect a grounding wire between the heater’s grounding screw and your home’s grounding system or bonding jumper.
- Test and finalize: Double-check all connections and replace the hot water heater’s cover plate.
Exercise caution and follow local codes and regulations when wiring a hot water heater. Enjoy the peace of mind that comes with a safe and efficient electrical installation in your home!
Properly grounding the hot water heater
For safety and optimal functioning, a well-grounded hot water heater is essential. Here’s a guide to grounding it properly:
- Shut off the power. Locate the circuit breaker or fuse that controls the heater and switch it off.
- Find a suitable location. Look for a designated grounding point near the heater. It must comply with local electrical codes.
- Connect the conductor. Attach one end of a copper grounding conductor to the location. Connect the other end to the heater’s metal housing. Ensure the connection is tight.
- Check continuity. Use an ohmmeter or multimeter to verify continuity between the conductor and the metal housing.
- Test the ground. Restore power to the heater and test its function while checking for any electrical issues. If there are none, you have successfully grounded the heater.
To ensure safety, inspect and maintain the grounding system periodically. Professional help may be needed if you’re uncertain how to ground your model. Understand the risks and take precautions for reliable performance and safety.
Testing the wiring and ensuring proper connections
First, turn off your water heater’s power supply at the circuit breaker or fuse box. This will avoid any electrical accidents while testing. Then, use a multimeter to test the voltage of the wires connected to the water heater.
Set it to AC voltage and touch the probes on each wire. The reading should match the voltage (usually 120 or 240 volts). Next, determine the wires connected to the heating elements. Look for labels such as “hot” or “load”.
Make sure these wires are securely connected to their terminals on the water heater and any thermostats or control panels. After that, use a continuity tester or multimeter set to measure resistance (ohms).
Touch one probe to each terminal and check for a low resistance reading, which means good continuity. Lastly, inspect every wiring connection for damage, such as frayed wires, corrosion, or burned spots. Fix any faulty components before using the electric hot water heater.
Additionally, local electrical codes may differ regarding requirements for hot water heater’s wiring installation. Familiarize yourself with these codes and follow them. Lastly, remember to be safe when working with electricity. If you’re uncertain about any part of the process, consult a professional electrician.
Tips and recommendations for a successful installation
To ensure a successful installation of your electric hot water heater, it is important to follow some helpful tips and recommendations. Start by labeling the circuit breaker and junction box for easy identification. Additionally, consider insulating the pipes to optimize energy efficiency. These steps will contribute to a smooth and efficient installation process, providing you with reliable hot water for your needs.
Labeling the circuit breaker and junction box
Label your circuit breaker and junction box for quick identification with a table! Include columns for Circuit Numbers, Corresponding Areas/Devices, and Additional Notes. Examples of this are:
| Circuit Number | Corresponding Areas/Devices | Additional Notes |
| 1 | Kitchen Outlets | |
| 2 | Living Room Lights | This circuit also powers the ceiling fan. |
| 3 | Bathroom GFCI Outlets |
For effective labeling, make sure to use clear, legible labels that are easy to read. Color-coding labels according to different areas or types of devices can also help! This way, you can identify specific circuits quickly and shut off power safely whenever necessary. Wrap those pipes up tight and give your energy bills a fright!
Insulating the pipes for energy efficiency
Are you wanting to make your home more energy-efficient? Insulating your pipes is a great way! It stops heat loss and lowers energy use. Here’s a 3-step guide to help you out:
- Check Your Pipes: Find the ones that need insulation. Usually, hot water pipes in places like basements and crawl spaces require it. Look for any signs of heat loss or damage.
- Pick the Right Insulation: There are lots of types, like foam sleeves or fiberglass wraps. Consider the R-value and select the right one for your pipe diameter and location.
- Install Properly: Start by cleaning the surface of the pipe. Cut the insulation to fit around bends and joints. Secure it with duct tape or zip ties.
Insulating your pipes saves energy, prevents freezing, and reduces the chance of burst pipes. Plus, low-flow fixtures and lower water heater temperatures increase energy efficiency and money savings. Doing this has many benefits, like lower bills, better comfort, and helping the environment. So, get insulating today and start reaping the rewards! Just make sure your installation is correct – you don’t want to meet your plumber again!
Frequently Asked Questions
1. How do you wire an electric hot water heater?
To wire an electric hot water heater, you will need to turn off power at the circuit breaker panel. Then, connect the black wire from the circuit breaker to the black wire of the water heater, the white wire to the white wire, and the bare copper or green wire to the grounding screw of the water heater. Finally, restore power and test the heater.
2. What size wire and breaker do I need for an electric hot water heater?
The wire size and breaker for an electric hot water heater depends on the heater’s wattage and voltage rating. Typically, a 240-volt heater will require 10-gauge wire and a 30-amp breaker. However, always consult the manufacturer’s instructions or a licensed electrician for the specific requirements of your water heater.
3. Can I install an electric hot water heater myself in a mobile home?
It is recommended to hire a professional electrician to install an electric hot water heater in a mobile home. Mobile home electrical systems can be unique, and improper installation can lead to safety hazards. A licensed electrician will ensure that the installation meets all safety codes and regulations.
4. How do I wire an electric hot water heater thermostat?
To wire an electric hot water heater thermostat, turn off power at the circuit breaker panel. Then, connect the wires from the thermostat to the corresponding terminals on the water heater. Typically, the thermostat will have two black wires, which will connect to the black wires of the heater. Finally, turn on power and test the thermostat.
5. How do I install an electric tankless hot water heater?
Installing an electric tankless hot water heater requires professional help. The installation involves proper sizing, electrical connections, and plumbing modifications. A licensed plumber or electrician will ensure the correct installation of the unit to provide efficient and safe operation.
6. What is the purpose of the bonding wire when wiring an electric hot water heater?
The bonding wire is used to ensure continuity of the electrical system and prevent a shock hazard. The bonding wire connects the metal components of the water heater, such as the tank and pipes, to the grounding system. This helps to equalize potential voltage and minimize the risk of electric shock.
Conclusion
Before using your hot water heater, there are a few important checks and considerations to make. To guarantee safety and proper functioning, do these steps:
- Look for any visible damage or leaks. Inspect fittings, pipes, connections for signs of wear or corrosion.
- Make sure the electrical panel has the correct breaker and wire size. This prevents overloading and potential electrical hazards.
- Test the pressure relief valve by lifting the lever. This should release hot water into the discharge pipe. If nothing happens, replace the valve.
- Confirm that all wire connections are secure and insulated. Use a voltage tester to make sure there is no electric current present before working on wiring.
Remember: label circuit breakers and shut-off valves in case of emergencies. And it’s wise to install a drain pan under the unit to catch any potential leaks or drips, preventing water damage.
By following these steps and suggestions, your hot water heater will be safe and efficient, providing you with the hot water you need.
References: