
Table of Contents
To ensure a smooth and efficient water heating system, it’s crucial to understand the intricacies of water heater connections. In this section, we’ll explore an overview of water heater connections and emphasize the importance of proper installation. Proper connections not only prevent leaks and corrosion but also optimize the performance and longevity of your water heater. Now, let’s dive into the details.
Overview of water heater connections
Water heater connections are essential for the right performance and safety of these appliances. Knowing how they work and the components is a must. Let’s take a peek at the summary of water heater connections.
Look below for a comprehensive overview of water heater connections:
| Component | Description |
|---|---|
| Inlet pipe | Pipe for cold water to enter the water heater |
| Outlet pipe | Pipe for hot water to flow out of the water heater |
| Pressure relief valve | A safety device to release excess pressure from the tank |
| Thermostat | Controls and regulates the temperature of the water |
| Heating element | Electrically powered component that heats up the water |
It’s important to note that certain rules and regulations exist for installing and connecting water heaters. Local building codes often decide where and how the connections should be done. Getting advice from an expert plumber or following maker guidelines is suggested to guarantee proper installation and avoid any risks.
One fun fact is that tankless water heaters have gotten more and more popular recently due to their energy efficiency. According to Energy.gov, switching from a storage tank water heater to a tankless model can save up to 50% on energy costs annually.
Say goodbye to cold showers, unless you love shivering like a penguin on holiday!
Importance of proper water heater connections
Correct water heater connections are essential. Not paying attention to them can cause problems that cost a lot and take time to fix.
- The proper connections stop leaks and water damage.
- Connections that fit correctly give you hot water when needed.
- In the right shape, connections help you save energy.
- Secure connections reduce the chance of fires.
- Fitting them right follows building codes.
- Secure, well-done connections make the water heater last longer.
On top of that, it’s important to know what your water heater needs. For example, what size pipes, pressure relief valve, and venting methods? Knowing this makes connecting better.
The U.S. Department of Energy says that if you maintain and connect your water heater right, it can be 10% more efficient. That saves a lot of energy.
Tools and Materials Needed
To ensure successful water heater connections, you’ll need the right tools and materials at your disposal. In this section, I’ll provide you with a list of tools required for water heater connections and a separate list of materials needed. With these comprehensive lists, you’ll be fully equipped to tackle the task efficiently and safely.
List of tools required for water heater connections
Need to install your water heater? Make sure you have the right tools! Here’s a list of must-haves:
- Adjustable wrench: Tighten and loosen fittings during the connection process.
- Pipe cutter: Get perfect sizing for your connections.
- Teflon tape: Create leak-proof seals with this plumber’s favorite.
Plus, don’t forget about other materials like pipe dope and joint compound. These will enhance your connections and prevent leaks.
So, equip yourself with these essential tools! That way, you’ll save time and have a secure, successful connection. Get ready to turn up the heat!
List of materials required for water heater connections
You need specific materials for setting up your water heater connection safely and efficiently. Here is a list:
- Water heater – Electric, gas or solar? Choose one that fits your capacity.
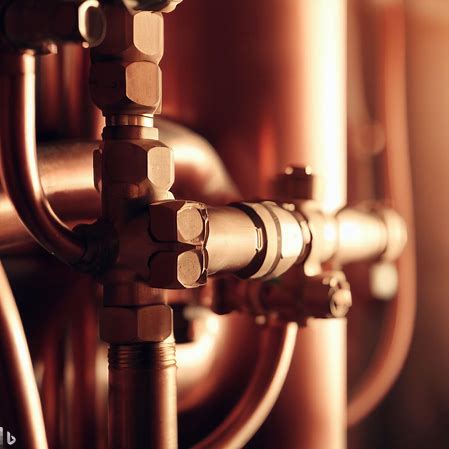
- Pipes – Durable pipes like copper or PEX for hot and cold water supply.
- Fittings – Use elbows, tees and unions to connect pipes securely.
- Valves – Shut-off valves to control water flow, pressure relief valves for safety, and drain valves for maintenance.
- Tankless water heater installation kit – Isolation valves, gas connectors, and venting materials.
- Pipe insulation – To minimize heat loss.
A few key factors to consider:
- Proper sizing of the unit according to your hot water needs.
- Ventilation for gas or propane-powered heaters.
- Consult professional plumber for compliance with local codes and regulations.
Optimize performance of your water heater connections:
- Annual inspections and flushing for sediment removal.
- Appropriate thermostat temperature.
- Insulated blankets to reduce standby heat loss.
- Install water softener if you have hard water.
- Leak detection devices.
- Timely repairs to prevent further damage.
Follow these tips and you’ll have a reliable source of hot water!
Preparing for Installation of water heater connectionsPreparing for Installation
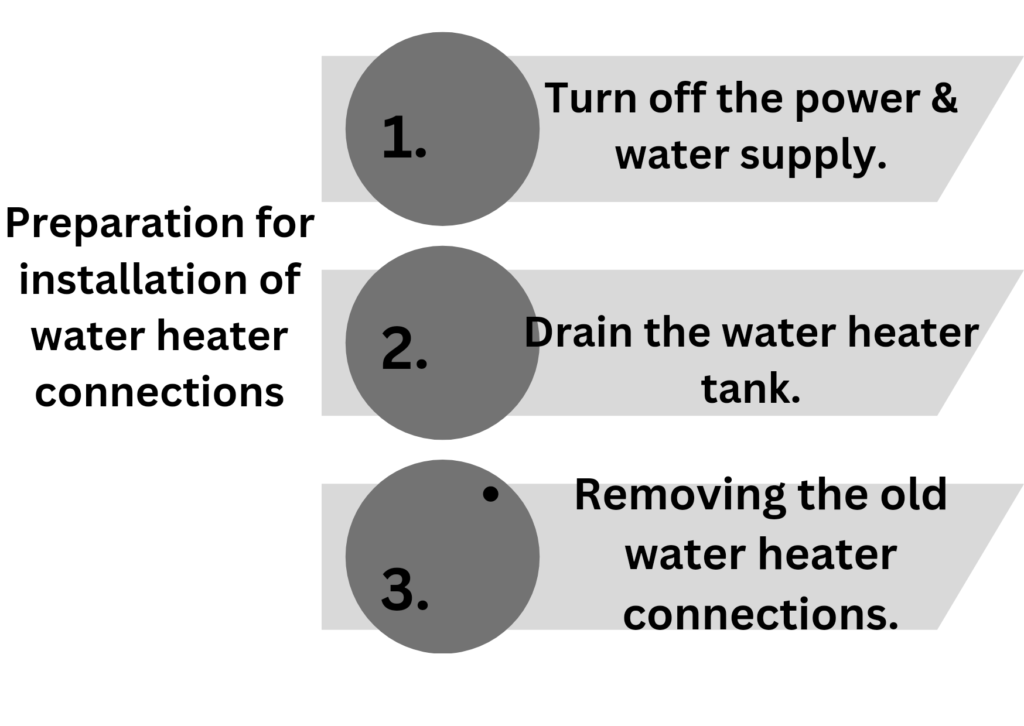
To prepare for the installation of your water heater connections, start by turning off the power and water supply. Next, drain the water heater tank to prevent any spills or leaks. Lastly, remove the old water heater connections to make way for the new installation.
Turning off the power and water supply
When getting ready for installation, it’s vital to switch off the power and water. This ensures the safety of everyone and prevents any unfortunate accidents.
Here’s a 5-step guide to turning off the power and water supply:
| Step | Instructions |
|---|---|
| 1 | Find the main electrical panel in your home. |
| 2 | Flip the main circuit breaker to the “off” position. |
| 3 | As an extra precaution, turn off individual circuit breakers that correspond to areas where installation will take place. |
| 4 | For the water supply, locate the main shut-off valve near the water meter or where the pipe enters your home. |
| 5 | Turn the valve clockwise until it’s fully closed, stopping all water flow. |
Remember these special details before you finish:
- Let the people living in your home know about the planned power and water interruptions.
- Check with local authorities or utility companies for any particular rules for your region.
Fun Fact: According to HomeServe, switching off the power and water supply before installation is key for personal safety and avoiding damage. And draining the water heater tank? It’s like watching someone release their built-up stress!
Draining the water heater tank
- Turn off the power supply. Before draining the water heater tank, cut off the power. This stops any possible accidents or damage to the heating elements.
- Locate the drain valve. Look near the bottom of the tank where you’ll find a hose connection or knob. That’s the drain valve.
- Attach a hose. Once found, connect a garden hose, or drainage pipe, to the valve. Place the end of the hose in a floor drain or outside away from the foundation.
- Open the valve. Carefully open the valve to release pressure and sediment. Let all the water flow out through the hose.
It’s recommended to flush out sediment yearly, to stop build-up and maintain efficiency. A homeowner who neglected draining maintenance had buildup that caused decreased heating efficiency and an early unit failure. To prevent this, maintain regularly for trouble-free operation and a longer water heater lifespan.
Removing the old water heater connections
It is essential to turn off the water and gas/electricity before beginning any work. You can do this by turning the main water valve and gas/electricity at the breaker box off. Attach a garden hose to the drain valve on the bottom of the water heater and drain all remaining hot water. Then, use adjustable pliers or wrenches to disconnect the cold and hot water supply lines from their respective valves. If your water heater is gas-powered, use a wrench to carefully disconnect the gas line. For electric heaters, detach any electrical wiring in accordance with safety procedures.
In ancient Rome, central heating was introduced and water heaters used a network of small bronze pipes to distribute hot water. These systems needed regular maintenance and replacement of worn-out connections. Now, with modern plumbing, you can confidently tackle the task of removing old water heater connections with ease!
Choosing the Right Connectors

To ensure the proper functioning of your water heater connections, it is crucial to choose the right connectors. In this section, we will explore the types of connectors available for water heater connections and discuss the important factors to consider when making your selection. By understanding the options and considerations, you can make informed decisions to ensure secure and reliable connections for your water heater system.
Types of connectors available for water heater connections
Connectors for water heaters come in many types. Let’s have a look at the most popular ones:
- Flexible Stainless Steel Connectors: Durable and corrosion-resistant. Easy to install in tight spaces.
- Copper Connectors: Good heat conductivity and durability. Resistant to corrosion and high temperatures.
- Brass Connectors: Strong and long-lasting. Rust and heat resistant.
Other specialized connectors:
- Dielectric unions: Separates dissimilar metals to prevent corrosion.
- PEX connectors: Flexible and easy to install. Made of cross-linked polyethylene.
When picking a connector, consider its material, compatibility with your plumbing system, and local regulations.
Safety first: Before installation, turn off the power supply or shut off the gas valve.
Factors to consider when choosing connectors
Connectors are important for the top-notch operation of electrical and electronic systems. Making the proper selection is key to success. Here are some things to think about when selecting connectors:
- Electrical specs: Voltage and current ratings, power handling capacity, insulation resistance and contact resistance.
- Environmental conditions: Temperature range, humidity, dust and vibration. Choose connectors with seals or coatings for protection.
- Mechanical compatibility: Size, shape, mounting method and attachment mechanisms.
Reliability, cost-effectiveness, ease of installation and potential scalability should also be taken into consideration.
We once faced an issue with the selection of connectors for our industrial automation systems. Unsealed connectors caused lots of malfunctions and downtime. We switched to more protective connectors and saw a huge improvement in reliability and uptime, resulting in higher productivity and cost savings.
Installing the new water heater connections? Because the wrong choice of connectors can be more scorching than your shower!
Installing the New Water Heater Connections
To ensure smooth installation of your new water heater connections, let’s focus on three key steps: connecting the cold water supply line, the hot water outlet line, and attaching the pressure relief valve. These sub-sections will guide you through the process, ensuring secure and reliable connections for your water heater. By following these steps, you’ll have the necessary knowledge to complete this task with ease and confidence.
Connecting the cold water supply line
- Start by shutting off the main water supply.
- Turn the valve clockwise.
- Then, find the cold water pipe connected to the old water heater.
- Cut the pipe using a copper pipe cutter – at least 6 inches away from the connection.
- Use a deburring tool to file down any rough edges.
- Attach a male threaded adapter to the newly cut pipe end with Teflon tape for a secure fit.
- Screw on the female end of a flexible stainless steel supply hose to the male adapter.
- Make sure it’s tight enough to prevent leaks.
- Take care that pipes are clear and you have adequate space for maneuvering.
- Don’t overtighten any connections – this could cause damage or leaks.
- Place a bucket under the cut pipe before loosening it to catch any excess water.
- Have plumber’s tape for extra reinforcement if needed.
- Do regular leak checks after connecting the supply line.
- Following these steps guarantees successful installation of your new water heater.
- So, let’s embrace the steamy connection between your pipes and the new water heater!
Connecting the hot water outlet line
Let’s get to it – here are the 6 steps for connecting the hot water outlet line:
- Turn off the main water supply to your house.
- Locate the hot water outlet pipe, which should be clearly labeled.
- Attach one end of a flexible hose to the pipe. Tighten it with an adjustable wrench.
- Connect the other end of the hose to the plumbing system. Follow manufacturer instructions.
- Turn on the main water supply and check for leaks.
- Test your hot water outlets by opening faucets and showers.
For a successful connection, consider these tips:
- Check that fittings are compatible with your model.
- Use thread seal tape or pipe joint compound.
- Inspect existing pipes for signs of corrosion.
Following these suggestions will make for a secure and efficient connection and prevent future issues – ensuring a reliable supply of hot water in your home. Letting off some steam never sounded so safe – attache the pressure relief valve and enjoy worry-free hot showers!
Attaching the pressure relief valve
- Position the water heater in a safe place with plenty of space.
- Look for the outlet, usually marked, on top of the heater for the pressure relief valve.
- Check the valve parts – fittings, connectors, adapters, & seals – for cleanliness & no damage.
- Connect the valve with proper tools.
- Test it to make sure it opens & closes without leaking.
- Verify that the installation follows local regulations.
- Use thread seal tape or pipe joint compound for a tight seal.
- Inspect & maintain regularly.
- Consider extra safety measures such as an expansion tank if necessary.
- With these steps, you can attach your pressure relief valve with confidence, avoiding a watery disaster!
Checking for Leaks and Proper Connection
To ensure that your water heater connections are properly installed and leak-free, testing for leaks in the water heater connections and ensuring proper alignment and tightness of connections are essential steps. In this section, we will guide you on how to perform these tasks effectively, giving you peace of mind and confidence in your water heater’s performance.
Testing for leaks in the water heater connections
- Test for leaks in your water heater connections with these five simple steps!
- Examine the pipes and fittings connected to the water heater. Look for any signs of moisture, corrosion, or loose connections.
- As a safety precaution, turn off the power supply or gas valve to the water heater.
- Using a flashlight, inspect all the joints and connections for visible leaks.
- If you spot a leak, tighten the affected connections with an adjustable wrench.
- After tightening or if there were no leaks detected, turn on the power supply or gas valve.
- Monitor the area around the connections for several hours. If no new leaks appear, your water heater connections are secure!
Regular maintenance and proper installation are key to preventing leaks. If you encounter complex issues or need assistance with repairs, contact a professional.
A reminder of why it’s important to test for leaks regularly – a homeowner neglected testing for leaks in their water heater connections. Eventually, a small amount of water pooled near their water heater which caused extensive damage to their basement flooring and walls. The repair costs ended up being much higher than if they had addressed the issue promptly. Don’t let that be you – check out our next section on ensuring proper alignment and tightness of connections.
Ensuring proper alignment and tightness of connections
Align the components properly before any connections are made. Misalignment can cause leaks or bad connections, which worsens performance.
Inspect the parts for any damage or wear. Cracks, rust, or any other flaws can make the connection weak and increase the chances of leaks. Get rid of broken parts if needed.
Clean the connecting surfaces to get rid of dirt, mess, and old sealant that can stop the connection from being tight. Use right cleaning agents and tools for a smooth, clean surface.
Choose an appropriate sealing material according to the application, like gaskets, O-rings, or thread sealant. Cover it evenly for a secure seal.
Use correct tools and techniques to tighten the connection firmly, without overdoing it.
Also, pay attention to details specific to the system requirements. Temperature changes or exposure to chemicals may need extra measures or specialized materials for the best results.
To make the connection more reliable, use torque-limiting techniques to prevent overtightening.
Utilize leak detection methods like pressure testing or visual inspections at regular intervals.
Teach personnel the right installation procedures and best practices to avoid human mistakes.
Monitor the connections for looseness or leaks and take action fast.
With these tips, you can make sure the alignment and tightness of the connections are perfect. Preventive measures reduce the risk of leaks and bad connections.
Don’t forget, looking for leaks is like finding a needle in a haystack…except the haystack is your home and the needle is a plumbing disaster.
Additional Tips and Safety Precautions
To ensure smooth and secure water heater connections, follow these additional tips and safety precautions. Using Teflon tape or joint compound for threaded connections can prevent leaks. Regular maintenance and inspection of water heater connections is essential for maintaining their integrity. Lastly, adhere to safety precautions when working with water heaters to avoid any accidents or mishaps.
Using Teflon tape or joint compound for threaded connections
It’s essential to use Teflon tape or joint compound for secure threaded connections. Here are some points to keep in mind:
- Wrap the tape clockwise on the male threads, to cover them completely. This creates a tight seal and stops leaks.
- Put a thin layer of compound on the male threads before connecting them. This acts as a lubricant and strengthens the seal.
- Be careful when using Teflon tape; avoid excessive wrapping as it can make tightening difficult.
- Choose the right type for your application.
It’s important to note that Teflon tape and joint compound aren’t interchangeable. When wrapping with Teflon tape, wrap it tightly around the male threads. For joint compound, put it on evenly.
To ensure safety and effectiveness, consider these additional tips:
- Clean the threads before applying any tape or compound.
- When tightening, use a wrench or pliers carefully, avoiding excessive force.
- Check for leaks after completing the connection.
By following these guidelines, you can make secure, leak-free threaded connections, and avoid potential issues or accidents. Regular maintenance and inspection of water heater connections is essential for preventing steamy situations.
Regular maintenance and inspection of water heater connections
Be sure to switch off the power and water supply before you start! Safety is key. Then, have a look at all the connections – pipes, valves, and fittings – for signs of leaks or corrosion. Use a wrench to tighten any loose connections, but don’t go too far or you could cause damage.
Check the Temperature Pressure Relief Valve (TPRV) for proper functioning – it’s vital for preventing too much pressure inside the tank. Don’t feel confident? Get a professional plumber to take a look.
Beyond this, you should also be on the lookout for strange noises, sudden changes in hot water temperature, and anything that looks broken or off. Regular inspections and maintenance will keep your system in top shape and save you from major troubles down the road. So, take charge of your home safety today!
Safety precautions when working with water heaters
Safety is key when working with water heaters. Here are some top tips to remember:
- Turn Off Power Supply: Before starting any maintenance or repair, cut the electricity.
- Shut Off Water Flow: Turn off the water flow before doing anything with the water heater.
- Release Pressure: Release any built-up pressure by opening the pressure relief valve.
- Beware of Hot Surfaces: Wear gloves and protective gear when touching hot surfaces.
- Proper Ventilation: Make sure the ventilation system is clear and working correctly.
And don’t forget to check for corrosion or leakage. Addressing issues quickly keeps you safe. In fact, the U.S. Consumer Product Safety Commission found that 5,000 residential fires are caused by faulty water heaters each year. So keep your safety spooktacular with these tips!
Frequently Asked Questions
1. What size are water heater connections?
Answer: The standard size for water heater connections is usually 3/4 inch.
2. Should I use Teflon tape on water heater connections?
Answer: Yes, it is recommended to use Teflon tape on the threads of water heater connections to ensure a tight and leak-free seal.
3. How do I connect a tankless water heater?
Answer: Tankless water heaters require specific connections. It is best to refer to the manufacturer’s instructions or hire a professional to ensure proper installation.
4. What can cause corrosion on water heater connections?
Answer: Corrosion on water heater connections can be caused by factors such as acidic water, high mineral content, or improper installation. Regular maintenance and inspection can help prevent corrosion.
5. How do I connect a hot water heater to PEX pipes?
Answer: To connect a hot water heater to PEX pipes, you can use compression fittings or sharkbite connectors, which provide secure and reliable connections without the need for soldering.
6. How do I connect an RV hot water heater?
Answer: RV hot water heaters usually have specific connections and requirements. It is best to refer to the RV manufacturer’s instructions or consult a professional for proper installation and connections.
Conclusion
When it comes to water heaters, connections must be installed and maintained properly. Corrosion can lead to leaks and damage.
Tankless water heaters are becoming popular. They require specific installation guidelines for safety.
RV hot water heater connections must be compatible with the plumbing system. Rheem connections are known for their durability, but still need proper installation.
PEX hot water heater connections provide flexibility and ease of installation. SharkBite connections offer a convenient push-to-connect feature.
Rinnai tankless water heater instructions should be followed carefully. The diagram is helpful for understanding pipe placement.
You must consider pipe material for water heater connections. Copper pipes are durable, plastic ones are easier to install. Sealing with Teflon tape or compound is essential.
Once, a homeowner had a severe leak due to corroded pipe connectors. This caused damage and expensive repairs. Regular inspection and maintenance of water heater connections can help avoid such situations.