
Table of Contents
Are you struggling with a faulty hot water heater? The culprit might be a problematic lower heating element, an essential component that is responsible for warming your water. This article offers a detailed, easy-to-follow guide on changing the lower heating element in your hot water heater to remedy this issue.
Let’s dive in and get your warm showers flowing again!
Key Takeaways
- The lower heating element in your hot water heater is responsible for heating the water and maintaining a constant supply of hot water throughout your home.
- To change the lower heating element, start by turning off the power and water supply, draining the water heater, removing the cover plates, disconnecting and removing the old heating element, installing and connecting the new heating element, refilling the water heater, and testing it to ensure proper functionality.
- Safety precautions should be followed when working with electricity and hot water heaters. Use appropriate tools, turn off power at the breaker panel or shut off gas supply (if applicable), handle electricity with care to avoid shocks, regularly inspect connections for leaks or damage, and consult manufacturer instructions for specific guidance.
- Regular maintenance of both upper and lower heating elements is important to ensure reliable hot water supply. Consider scheduling periodic inspections and following manufacturer recommendations for care and upkeep.
The Lower Heating Element in Your Hot Water Heater
The lower heating element in your hot water heater is an essential component that plays a crucial role in heating the water.
Importance of the lower heating element
The lower heating element in your hot water heater is a fundamental component in ensuring you have a reliable supply of warm water. As part of an electrically-powered duo, this device generates heat through electrical resistance to increase the temperature of the surrounding water stored inside the tank.
Notably, it typically bears more workload than its upper counterpart as it directly warms the larger volume at the base. Its significance escalates further given that an ineffective lower heating element can trigger prolonged wait times for hot water and higher electricity bills due to energy inefficiency.
That’s why regular inspection and timely replacement when needed can prove beneficial for both your comfort and pocketbook – something underscored by our step-by-step guide for replacing this essential item safely and accurately.
How it functions in heating water
The lower heating element in your hot water heater plays a crucial role in heating the water. When electricity passes through the heating element, it creates heat that is transferred to the surrounding water.
This heat raises the temperature of the water inside the tank, providing you with hot water for various purposes such as showering, washing dishes or doing laundry. The lower heating element is responsible for maintaining a constant supply of hot water by continuously heating up any cold water that enters the tank.
It works together with the upper heating element to ensure an efficient and consistent flow of hot water throughout your home.
One important thing to note is that both elements do not work simultaneously; rather, they take turns to heat up different sections of the tank. The lower heating element gets activated first when you turn on a faucet or appliance that requires hot water.
Step-by-Step Guide to Changing the Lower Heating Element
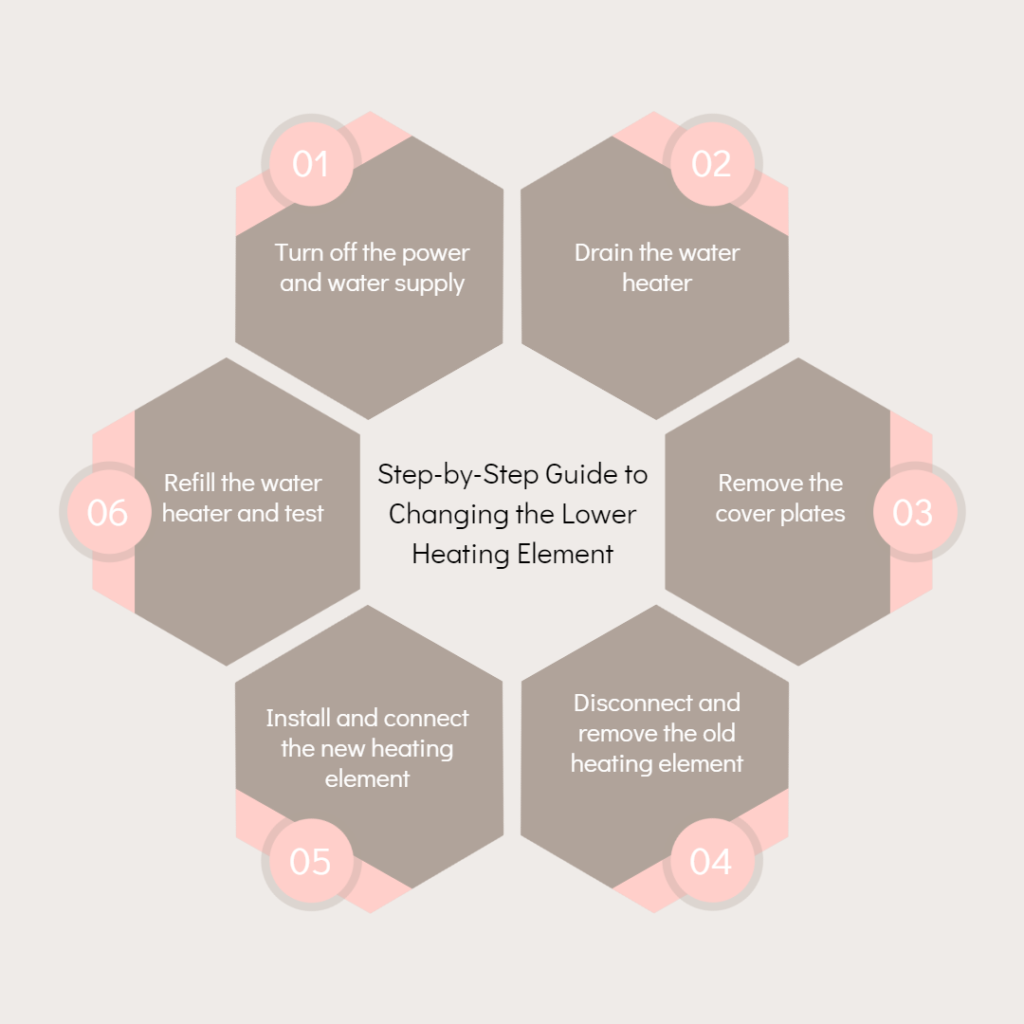
To change the lower heating element in your hot water heater, begin by turning off the power and water supply. Then, drain the water heater and remove the cover plates to access the old heating element.
Disconnect and remove it carefully before installing and connecting the new heating element. Finally, refill the water heater and test it to ensure everything is functioning correctly.
Turn off the power and water supply
To safely change the lower heating element in your hot water heater, it is crucial to start by turning off the power and water supply. This step ensures your safety and prevents any potential accidents or electric shocks.
By cutting off the power, you eliminate the risk of electrical currents while working on the heating element. Additionally, shutting off the water supply prevents any leaks or flooding during the replacement process.
It’s essential to remember that safety should always be a top priority when undertaking any repairs or maintenance on your hot water heater.
Drain the water heater
To begin the process of changing the lower heating element in your hot water heater, it is essential to drain the water heater. Draining the water heater ensures that there is no risk of any residual water coming into contact with electrical components during the replacement process.
To do this, locate the drain valve on your water heater and attach a hose to it. Open the valve and let gravity do its work as the water empties out through the hose. It’s crucial to remember not to touch or attempt any repairs while there is still hot water in the tank – you should wait until after draining before proceeding to remove and replace the heating element.
By following this step, you are ensuring a safe and efficient process for replacing your lower heating element.
Remove the cover plates
To access the lower heating element in your hot water heater, you will need to remove the cover plates. These plates are typically located on the front of the water heater and may be held in place by screws or clips.
Use a screwdriver or pliers to carefully remove any screws or release any clips holding the cover plates in place.
Once the cover plates are removed, you will have clear visibility of the heating element and its connections. It’s important to take note of how these connections are positioned before proceeding with disconnecting them.
This will make it easier when it comes time to install the new heating element.
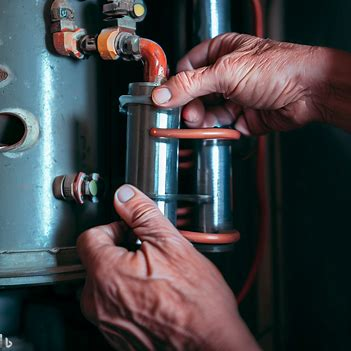
Disconnect and remove the old heating element
To disconnect and remove the old heating element, you will first need to ensure that the power and water supply to the hot water heater are turned off. This step is crucial for your safety throughout the process.
Next, you’ll want to drain the water heater completely in order to access the heating element without any risk of leaks or spills.
Once you have safely addressed those initial steps, it’s time to remove the cover plates from your hot water heater. These cover plates typically provide easy access to both the upper and lower heating elements.
Carefully unscrew or detach these plates according to your specific hot water heater model.
With the cover plates removed, locate and disconnect any wires attached to the old heating element. Make sure you take note or label which wire goes where for easier reconnection later on. Once disconnected, use a wrench designed specifically for removing water heater elements – such as a water heater element wrench – to loosen and extract the old heating element from its housing.
Now that you’ve successfully removed the old heating element, it’s time to install your brand new one! Take caution while inserting it into its designated spot within your hot water heater’s housing unit.
Congratulations! You’ve replaced your lower heating element in your hot water heater like a pro! The final step is simply refilling your newly repaired system with fresh cold-water supply using either a dedicated filling valve or by reopening whatever valves were closed earlier during drainage.
Don’t forget: after restoring power and allowing sufficient time for adequate reheating of stored cold-water reserves, perform some quick tests involving running hot taps around various areas of your home just so you can be sure everything is functioning optimally again!
Install and connect the new heating element
To install and connect the new heating element in your hot water heater, you will first need to ensure that the power and water supply to the heater are turned off. Once this is done, drain the water heater completely by opening the drain valve.
Next, remove the cover plates on your water heater to access the old heating element. Disconnect any wires or connections attached to it before carefully removing it from its position.
Now, take your new heating element and align it properly with the holes in your water heater tank. Securely connect any wires or connections according to manufacturer instructions. It is important to handle the new element with care to avoid damage.
After installing and connecting the new heating element, close all cover plates securely and begin refilling your water heater with cold water until completely full. Finally, turn on both power and gas supply (if applicable) to test if everything is working properly.
Refill the water heater and test
Once you have successfully installed the new lower heating element, it’s time to refill your water heater and test it out. Start by closing the drain valve and removing any caps or plugs that were used during the draining process.
Slowly turn on the cold water supply to allow the tank to fill up again. While refilling, keep an eye on any connections for potential leaks. Once you are confident that there are no leaks, fully open a hot water faucet in your home to release any trapped air from the system.
After refilling the tank, it’s crucial to test if your newly installed heating element is working properly. First, make sure all electrical connections are secure and reapply power to your water heater following manufacturer instructions.
Set your thermostat temperature to a safe level (usually around 120 degrees Fahrenheit) and wait for an hour or two for the water inside the tank to heat up.
To confirm proper functionality, open a hot water faucet in your home and check if hot water is flowing consistently without interruptions or fluctuations in temperature. If everything seems normal, congratulations! You have successfully replaced the lower heating element in your hot water heater.
Safety Precautions and Tips for Changing the Lower Heating Element
To ensure a safe and successful replacement of the lower heating element in your hot water heater, it is crucial to follow these safety precautions and tips: Use appropriate tools and equipment specifically designed for working with electrical connections and water systems.
Take extra precaution when handling electricity by turning off the power supply at the breaker panel or shutting off the gas supply if applicable. Additionally, before starting any work on the water heater, make sure to drain all remaining water from the tank to prevent any potential hazards.
Always refer to the manufacturer’s instructions for specific guidelines on replacing heating elements, as different models may have unique requirements. Lastly, remember that regular maintenance and inspection of your hot water heater can help identify issues early on and prevent costly repairs down the line.
Use the right tools and equipment
To successfully change the lower heating element in your hot water heater, it is crucial to use the right tools and equipment. This ensures a safe and effective replacement process. Some of the essential tools you will need include an OHM meter or multimeter to test for power, a screwdriver to remove cover plates, pliers or wrenches to disconnect and connect wires, and a water heater element wrench for installing the new heating element securely.
Using these appropriate tools helps prevent damage to your hot water heater system and ensures that all connections are properly secured. So be sure to gather all the necessary tools before starting on this DIY project.
Take precautions when working with electricity and water
When working with electricity and water, it is crucial to take the necessary precautions to ensure your safety. Water and electricity are a dangerous combination, so it’s important to be cautious throughout the process of changing the lower heating element in your hot water heater.
Before beginning any work, always make sure to turn off the power supply at the breaker box or fuse panel. This will help prevent electrical shocks or accidents while working on your water heater.
Additionally, it is advisable to wear protective gloves and safety goggles to protect yourself from potential hazards. Remember, even after turning off the power supply, there may still be residual electrical currents present in certain parts of the water heater, so exercise caution when handling any electrical components.
By following these safety measures, you can confidently proceed with replacing the lower heating element in your hot water heater without compromising your well-being.
Follow manufacturer instructions
It is crucial to carefully follow the manufacturer’s instructions when changing the lower heating element in your hot water heater. These instructions are specifically designed for your specific make and model, ensuring that you perform the replacement correctly and safely.
The manufacturer’s guidelines will provide detailed steps on how to disconnect and remove the old heating element, as well as how to install and connect the new one properly. By following these instructions, you can avoid any potential damage or risks associated with improper installation.
Always refer to the manufacturer’s manual for accurate guidance throughout the process of replacing your water heater’s lower heating element.
Regular maintenance and inspection
Regular maintenance and inspection are essential for ensuring the proper functioning of your hot water heater and maximizing its lifespan. By following a few simple steps, you can keep your lower heating element in good working condition.
One important aspect of regular maintenance is checking for any signs of damage or wear on the heating element. Look out for rust, corrosion, or calcium deposits that may affect its performance.
In addition to visual inspections, it’s also recommended to test the lower heating element periodically. You can use an OHM reading to check if there are any irregularities in resistance which would indicate a faulty element.
Regular testing helps identify potential issues early on and allows for prompt repairs or replacements before they lead to complete failure.
Conclusion
In conclusion, replacing the lower heating element in your hot water heater is a task that can be easily accomplished with the right tools and instructions. By following this step-by-step guide, you can ensure that your water heater continues to provide reliable hot water for your household.
Remember to prioritize safety and consult the manufacturer’s instructions throughout the process. With a little DIY know-how, you’ll have a functioning heating element in no time. Enjoy hot showers and peace of mind knowing you can handle this maintenance task yourself!
FAQs
1. Can I change the lower heating element in my hot water heater myself?
Yes, with basic plumbing knowledge and some tools, you can safely change the lower heating element in your hot water heater. However, if you are unsure or uncomfortable doing so, it is recommended to hire a professional plumber.
2. What tools will I need to replace the lower heating element in my hot water heater?
You will typically need a screwdriver, pliers, an adjustable wrench, a voltage tester or multimeter, and possibly a socket wrench set depending on your specific model of hot water heater.
3. How do I know if the lower heating element is faulty and needs to be replaced?
If your hot water is not getting as hot as it used to or takes longer to heat up, there may be an issue with the lower heating element. You can use a multimeter to test for continuity or consult a professional plumber for diagnosis.
4. Are there any safety precautions I should take when replacing the lower heating element?
Before starting any work on your hot water heater, make sure to turn off power at the circuit breaker and shut off the cold-water supply valve. Additionally, always follow manufacturer instructions and guidelines for safe replacement procedures. If you are uncertain about any step of the process, consider consulting a professional plumber for assistance.