
Table of Contents
Hooking up a hose to a water heater? Yes, you can do this for both tankless and traditional hot water heaters. For tasks like filling a container or cleaning with hot water, it’s possible.
You’ll need an adapter or connector from the hardware store. Plus a wrench or pliers to tighten the connection. Make sure the hose is secure – no leaks!
One way is to use the drain valve at the bottom of the unit. Connect the hose and direct the hot or warm water from there.
Alternatively, connect directly to your sink faucet. Warm or hot water can run through the hose without any additional tools or connections. Check compatibility first, though.
Need hot and cold water from different sources? A splitter will do the job.
Safety first! Set the temperature on your water heater to the correct setting. Be careful with hoses that have hot water flowing through them.
Key Takeaways
- 1. Ensure that the water heater is turned off and the power supply is disconnected before attempting to hook up a hose. This will prevent any accidents or damage to the unit.
- 2. Use a hose that is specifically designed for hot water applications. Regular garden hoses may not be able to withstand the high temperatures and could melt or burst.
- 3. Locate the drain valve on the water heater and attach the hose securely to it. Make sure the connection is tight to prevent any leaks.
- 4. Place the other end of the hose in a suitable drainage area, such as a floor drain or outside. Avoid draining the water heater directly onto the ground, as it may cause damage to the surrounding area.
- 5. Open the drain valve slowly to allow the water to flow out gradually. This will help prevent any sudden pressure changes that could damage the water heater or the plumbing system.
- 6. Once the water has completely drained from the water heater, close the drain valve and remove the hose. Ensure that the valve is tightly closed to prevent any leaks.
- 7. Before turning the water heater back on, make sure that the tank is completely filled with water. This can be done by opening a hot water faucet in the house and allowing the water to flow until a steady stream is achieved.
- 8. Finally, turn on the power supply to the water heater and wait for it to heat up the water. Check for any leaks or unusual noises during the heating process and address them promptly if necessary.
- Remember to always follow the manufacturer’s instructions and consult a professional if you are unsure about any step of the process.
Gathering the necessary tools and materials to hook up a hose to water heater
- Gather the supplies. Make sure to get a rubber or reinforced PVC hose that’s long enough to reach the heater and the desired spot. Also, have an adapter or connector that can attach the hose to the heater. And don’t forget a wrench or pliers to secure any connections.
Unique details:
- Warm water? Adjust the temperature on the water heater.
- Flush out any sediment or debris by turning off the power supply and draining the tank using its drain valve.
- Unsure of pressure? Use an aerator or flow restrictor on your faucet attachment.
Storing hoses: After use, disconnect them from the water supply. Neatly coil them in a dry and protected area, like your garage or utility room.
Preparing the water heater
Preparing a Water Heater: A Step-by-Step Guide
To prepare your water heater for use, follow these simple steps:
- Turn off the power supply: Before starting any work on the water heater, make sure to turn off the power supply at the circuit breaker. This ensures your safety during the preparation process.
- Shut off the water supply: Locate the shut-off valve on the water inlet line and turn it off. This stops the flow of water into the heater, allowing you to perform necessary maintenance without any water leaks.
- Attach a garden hose: Locate the drain valve at the bottom of the water heater and attach a garden hose to it. This will allow you to direct any water or sediment that needs to be drained away from the heater.
- Open the drain valve: Open the drain valve and let the water and sediment flow out through the garden hose. Ensure that the other end of the hose is positioned in a suitable drainage area, such as a laundry sink or outside.
- Flush the tank: While the water is draining, you can flush the tank by turning the cold water supply back on for a few minutes. This helps to remove any remaining sediment or debris that may be inside the tank.
- Close the drain valve and refill the tank: Once the tank is flushed and the water drains out completely, close the drain valve and remove the garden hose. Turn the water supply back on and allow the tank to refill.
It’s important to note that each water heater may have slightly different instructions, so it’s essential to consult the manufacturer’s manual for specific guidance.
In addition, regular maintenance and flushing of the water heater can help improve its efficiency and prolong its lifespan.
True Story:
A few summers ago, as a lone wolf living in a cabin, I decided to prepare my water heater for the season. Following the steps mentioned above, I successfully drained the tank, flushing out a surprising amount of sediment. Not only did this improve the performance of my water heater, but it also saved me from potential issues down the line. Taking the time to prepare my water heater gave me peace of mind, knowing that I had hot water ready whenever I needed it.
Why pay for a gym membership when you can get your workout by shutting off the power and gas supply to your water heater?
Shutting off the power and gas supply of water heater
- Follow these 4 steps to safely shut off the power and gas supply for your water heater:
- Locate the electrical panel in your home. This panel has circuit breakers or fuses that control the power to appliances, including the water heater.
- Look for the circuit breaker or fuse that connects to your water heater. It may be labeled “water heater” or have a specific number.
- Switch off the circuit breaker or remove the fuse connected to the water heater. This prevents electrocution while working on the unit.
- Find the main gas valve near your water heater. It’s usually on a pipe leading into the unit.
- Turn the valve clockwise until it’s fully closed. This stops gas flow to the water heater.
- Don’t force any valves or switches if they’re stuck. If you have difficulty, contact a professional plumber for help.
- Also, read the manufacturer instructions for shutting off power and gas supply. Different models may have unique requirements.
- Be very careful when dealing with power and gas. Even a small mistake can cause serious hazards or damage.
Fun fact: Heating water uses up 18% of household energy in the U.S., according to Energy.gov.
Why did the water heater need therapy? Because it was feeling drained.
Draining the water heater
- Turn off power supply.
- Switch off circuit breaker or close gas valve to prevent accidents and damage.
- Connect a hose to the drain valve at the bottom of the water heater.
- Place the other end of the hose near a floor drain or outside.
- Open the valve and let water flow until it runs clear.
- Close the valve and disconnect the hose.
- Turn on the hot water faucet to let air into the tank.
- Turn on the water supply and refill the tank.
- Be cautious when draining hot water! Too much can cause burns or damage.
- Some sediment buildup is natural, but regular draining helps reduce it.
- Regular draining extends water heater lifespan, ensures efficient operation, and lowers energy bills.
- Maintain your water heater today for worry-free tomorrow.
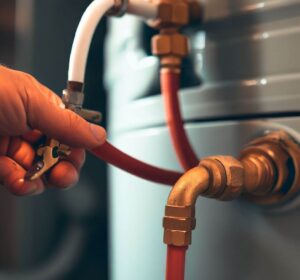
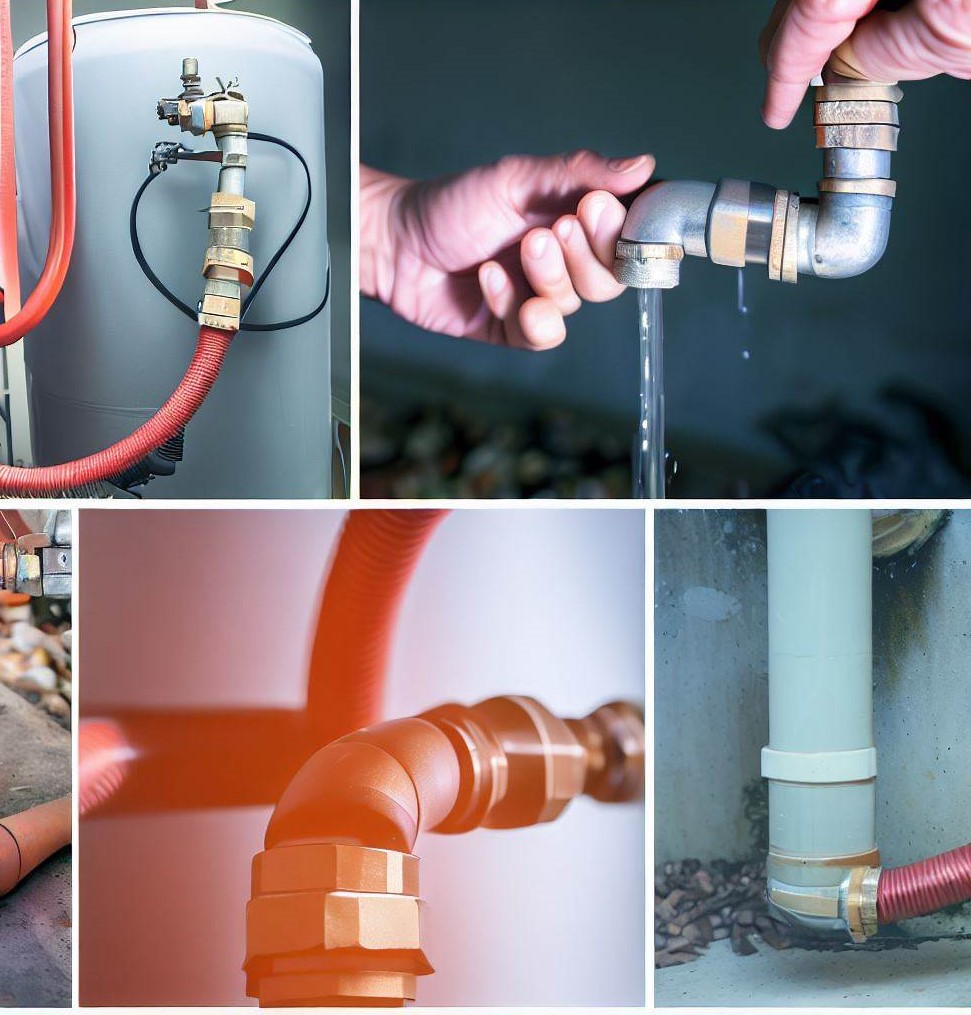
Connecting the hose to the water heater
In order to connect a hose to a water heater, follow these simple steps:
- Turn Off the Water Supply: Before connecting the hose, ensure that the water supply to the water heater is turned off. This will help prevent any water from leaking out during the process.
- Locate the Drain Valve: Locate the drain valve at the bottom of the water heater. This valve is typically made of plastic and is used to drain the water from the tank.
- Attach the Hose: Connect one end of the hose to the drain valve. Make sure the connection is secure to avoid any leaks.
- Position the Other End: Position the other end of the hose in a suitable drain location. This can be a laundry sink, a drain outside, or any other suitable place for draining water.
- Open the Drain Valve: Slowly open the drain valve to begin draining the water from the water heater. Be cautious as the water may be hot.
Additionally, it’s important to note that connecting a hose to a water heater may be necessary for tasks such as flushing out sediment or performing maintenance. However, always refer to the manufacturer’s instructions for specific guidance on your particular water heater model.
When it comes to the history of connecting hoses to water heaters, it is unclear who first came up with this idea. However, it has become a common practice for various tasks like draining the tank or flushing out sediment. This simple solution allows for easy maintenance and upkeep of the water heater without the need for professional help.
Finding the right connection to hook up your hose to a water heater is like playing a game of hide-and-seek with a plumbing twist.
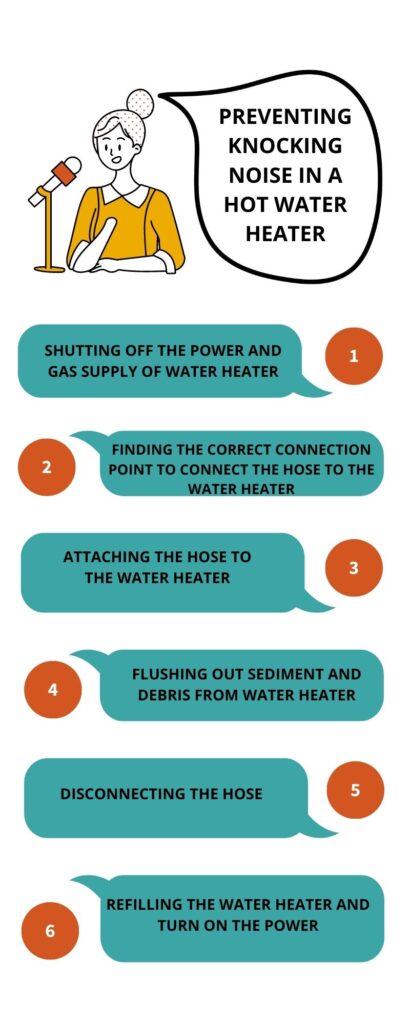
Finding the correct connection point to Connect the hose to the water heater
Connecting the hose to a water heater is crucial. Follow this guide to locate the right spot:
- Find the hot water outlet. This pipe carries hot water from the heater to your faucets, usually located at the top or side of the water heater.
- Turn off the main water supply to prevent accidents.
- Attach a hose bib connector with an adjustable wrench. Tighten it properly for no leaks.
- Connect your hose and screw it onto the connector tightly. Double-check connections before turning on the water.
It’s wise to have someone help you with the connection, and use Teflon tape around threaded connections for extra security.
My friend learned the hard way – he tried to connect his garden hose to a random pipe near his water heater without locating the right outlet. His basement flooded in minutes!
Be careful and take your time. Neglecting proper procedures can lead to unwanted consequences. Stay safe and enjoy hassle-free water connections!
Attaching the hose to the water heater
Connecting the hose to the water heater? It’s easy! Follow these steps for secure attachment and proper functioning.
- Prepare: Shut the power supply and water source off for your safety.
- Locate fittings: Inlet is for cold water while outlet is for hot.
- Attach the hose: Connect one end to the inlet fitting. Tighten with a wrench or pliers, if needed. Check for leaks.
- Connect to water supply: Depending on the setup, you may need an additional hose. Ensure all connections are tight and leak-free.
- Test for functionality: Turn on water and power. Monitor for any leaks or abnormal behavior.
Attaching the hose is quick and easy. And with regular checks for leaks and damages, your water heater will be ready whenever you need it. So don’t hesitate, flush away those sediments now!
Flushing the water heater by connecting a hose
Flushing the Water Heater: A Step-by-Step Guide
To properly maintain your water heater and ensure its optimal performance, it is important to flush the unit regularly. Here is a simple guide on how to flush your water heater effectively.
- Prepare the necessary tools and materials. You will need a garden hose, a bucket or a floor drain, and a sink or hose bib to connect the hose. Make sure the power to the unit is turned off before starting the process.
- Connect the hose to the water heater. Locate the drain valve at the bottom of the unit and attach one end of the hose to it. If necessary, use an adapter or a water heater connector hose to secure the connection properly.
- Drain the water heater. Place the other end of the hose either outside or in a suitable drain location, ensuring that it is positioned lower than the drain valve. Open the drain valve and let the water drain out of the tank completely. Be cautious as the water may be hot, so allow it to cool before handling.
Once the tank is completely drained, you can close the drain valve and remove the hose. It is recommended to repeat this process at least once a year to remove sediment buildup and improve the efficiency of your water heater.
Pro Tip: Flushing your water heater can help prolong its lifespan and maintain its energy efficiency. Consider using this opportunity to inspect the unit for any signs of leaks or damage. If you notice any issues, it is advisable to consult a professional plumber for assistance.
Turning on the water supply is like giving a baptism to your water heater—just pray it doesn’t come back from the dead and start spewing hot water everywhere.
Turning on the water supply of water heater
Turning on the water supply is not difficult, but there are a few details you should keep in mind. Here are 6 steps:
- Find the shut-off valve near the bottom of your water heater.
- Turn the valve counterclockwise to open it and let water flow into the tank.
- Listen for water running. This means the supply is on.
- Check that the valve is fully open if you don’t hear any sound.
- Wait a few minutes for air to flush out of the pipes.
- Look for any leaks around the valve or connections.
Important: If your home has been empty for a long time, run cold water through all faucets before turning on the water supply. This stops debris from entering and clogging the system.
My neighbor had to replace her water heater because it hadn’t been used in years. When she turned on the supply, rusty-colored hot water came out.
So remember, turning on the water is just the beginning. Regular maintenance, like flushing out sediment and debris, will help keep your water heater running smoothly.
Flushing out sediment and debris from water heater
- Turn off power. Before starting, make sure to turn off the power supply to your water heater. If it’s electric, switch off the dedicated circuit breaker. For gas heaters, turn off the gas supply valve.
- Shut off the cold water supply. Find the cold water supply valve attached to your water heater and shut it off. This stops extra water entering the tank during flushing.
- Drain the tank. Connect a garden hose to the drain valve at the bottom of the heater. Place the other end in a draining location, like a floor drain or outside. Open hot water faucets nearby to let air in. Then open the drain valve and let it empty.
- Flush out sediment. Close the drain valve. Flush out the sediment by slowly turning on the cold water supply valve. Do this for a few seconds until clear water flows out of the hose.
- Do this every 6 months to prevent sediment building up and extend the water heater’s life. It’s best to do this when you don’t need hot water so you can clean thoroughly and have enough time to refill the tank.
Finally, disconnecting the hose is easier than dealing with your ex’s emotional baggage.
Disconnecting the hose and restoring the water heater
Disconnecting the Hose and Restoring the Water Heater
Disconnecting the hose and restoring the water heater requires a few simple steps to ensure a smooth transition. Follow these instructions to complete the process successfully:
- Shut off the water supply: Before disconnecting the hose, it is crucial to turn off the water supply to the water heater. Locate the valve near the water heater and turn it clockwise to shut off the water flow.
- Disconnect the hose: Once the water supply is off, carefully disconnect the hose from the water heater. Start by unscrewing the hose from the water heater connection point. Be cautious as the hose might still contain residual water that could spill.
- Restore the water heater: After disconnecting the hose, it is time to restore the water heater. Begin by closing the drain valve on the water heater if it was opened during the hose connection. Then, turn on the water supply to the water heater by rotating the valve counterclockwise. Ensure a secure connection to prevent any leaks.
There you have it! By following these three simple steps, you can successfully disconnect the hose from your water heater and restore it to its normal functioning.
Forgetting or neglecting to disconnect the hose properly can lead to potential damage or leaks in your water heater. Don’t miss out on this essential step to avoid any future complications. Take action now and ensure the proper maintenance of your water heater.
Turning off the water supply is like breaking up with a needy ex – you just want some peace and quiet, without all the drama and leaks.
Turning off the water supply of water heater
To safely disconnect, it’s key to switch off the water supply first. This is essential to stop any leaks or accidents. Follow this guide for a successful shut-off:
- Find the main shut-off valve. It could be in your house, basement, or outside. Note its spot in case you need it again.
- Use a wrench or pliers to close the valve by turning it clockwise. That’ll stop water going to the heater.
- Release any remaining water by opening a tap at a lower level. That’ll reduce pressure and risks during maintenance.
- Check the taps and fixtures to see if there’s still water. If not, you’ve switched off the supply.
Remember, some appliances have their own isolation valves. Make sure to find and close them too.
Pro Tip: Before starting work on the heater, double-check there’s no water left to prevent contact with electrical parts.
Removing the hose from water heater
- Turn off the power supply: Before detaching the hose, it’s essential to cut the electricity to the heater. This avoids any accidents or electric shocks while doing this.
- Shut off the water supply: Locate the valve that manages the water coming into the heater and switch it off. Doing this makes sure no more water enters the system when you disconnect the hose.
- Loosen and remove the hose: Using a wrench or pliers, loosen and detach the clamps or connectors on both ends. After they are loose, carefully take off one end from its connection point on the heater. And then, repeat this on the other end of the hose. Also, keep in mind that hoses can be hot after use, so it’s advised to let them cool before removing.
My neighbor John recently had an issue with his water heater’s hose. He tried to take it off without turning off the power supply and water flow – leading to a small flood in his basement! He then realized his error and shut off everything before proceeding. He learned the importance of following the correct steps when detaching hoses from a water heater.
By following these steps and avoiding mistakes like John’s, you can disconnect hoses from your water heater without any hassle!
Refilling the water heater
Time to restore the water heater. Follow these simple steps:
- Turn off the main water supply.
- Open a hot water faucet to release air.
- Connect a garden hose to the drain valve.
- Open the drain valve, sway/tap the side of the water heater to loosen sediment.
- Close the drain valve and remove the hose.
- Turn on hot and cold water faucets ’til they run smoothly.
Remember: Regular maintenance is essential for optimal performance and longevity! Take care to follow the steps and never overlook this essential task, or else risk a DIY disaster!
Frequently Asked Questions
1. Can you hook up a hose to a tankless water heater?
Yes, you can hook up a hose to a tankless water heater. Most tankless water heaters have inlet and outlet valves that can be connected to a hose for various purposes, such as draining the unit or providing hot water for outdoor use.
2. How do I connect a hose to a water heater?
To connect a hose to a water heater, locate the drain valve at the bottom of the unit. Attach one end of the hose to the drain valve and tighten it securely. Ensure the other end of the hose is positioned where you want the water to drain. Open the drain valve to start the flow of water.
3. Can I connect a hose to my hot water heater to supply warm water for other tasks?
Yes, you can connect a hose to your hot water heater to supply warm water for various tasks like washing your car, cleaning outdoor surfaces, or filling a large container. Simply attach the hose to the hot water outlet valve of the water heater and turn on the faucet.
4. Can I use a garden hose to connect to my hot water heater?
Yes, you can use a garden hose to connect to your hot water heater. However, it’s important to ensure that the hose is made for hot water use and has the appropriate connectors to fit the valves on your water heater.
5. Is it possible to connect a hose to a water heater and use it for laundry or other purposes inside the house?
It is not recommended to connect a hose to a water heater and use it for indoor tasks like laundry or other purposes inside the house. Water heaters are not designed to supply water directly to faucets; they are meant to heat the water that comes into your home. Instead, use the hot water supply from your plumbing system for these tasks.
6. How do I disconnect the hose from the water heater once I’m done?
To disconnect the hose from the water heater, simply close the drain valve or turn off the hot water outlet valve. Allow any remaining water to drain out of the hose, then loosen the connection between the hose and the water heater. Remove the hose and store it properly for future use.
Conclusion
Here’s a guide to hooking up a hose to a water heater. You can use it for a tankless water heater or a traditional one.
- First, turn off the water heater. No hot water should be running. This keeps you safe during installation.
- Locate the drain valve. It’s usually at the bottom and has a handle or looks like a faucet. Attach one end of the hose to this.
- Put the other end of the hose where you want the water to go. It could be a sink, laundry sink or outside.
- Close all other faucets in the house. This makes sure the water goes directly to the right place.
- Turn on the cold water supply. Open the valve slowly and let the water flow. Some sediment or debris may come out – that’s ok.
- For warm or hot water, adjust the temperature at the sink. Mix cold and hot if needed. Be careful, as warm/hot water may take awhile to reach due to distance.
- To disconnect the hose, close the cold water supply valve and detach the hose from the drain valve.