
Table of Contents
Electric water heaters are vital for hot water in our homes. The heating element’s an important part of it. Here’s a guide to replacing it.
Key Takeaways
- Start by turning off the power at the circuit breaker. Test to make sure there’s no current.
- Next, attach a garden hose to the tank’s drain valve and open it. This’ll stop water from leaking out during the replacement.
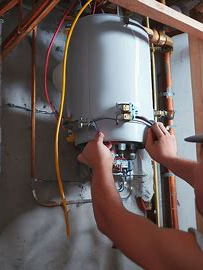
- Locate the access cover panel and remove the screws. Now you can see the heating elements.
- Note how the old element is wired. Electric water heaters can have one or two. Check the manufacturer’s manual or inspectapedia.com for your model’s specifics.
- Unscrew the bolts or screws that hold the old element in place. Carefully pull it out without damaging anything.
- Wrap exposed threads with Teflon tape or use pipe joint compound. Insert the new element into its designated slot and secure it.
- Reconnect any wiring. Check that everything’s tight and insulated. Replace the access cover panel and tighten the screws.
- Turn the power back on at the circuit breaker. Give the water heater time to heat up then test the hot water faucet.
Pro Tip: If you have any issues or think your water heater has faults, seek help from a professional plumber or electrician.
Understanding the Electric Water Heater Element
The electric water heater element is important for heating water in the tank. Knowing how to install it right is vital for a hot water supply.
Here’s a useful table:
| Electric Water Heater Element | |
|---|---|
| Function | Heats water in the tank |
| Wattage | Determines heating capacity |
| Types | HWD & LWD elements |
| Installation | Electrical wiring & insulation |
| Replacement | When old element is faulty or when upgrading |
It’s important to know that usually only one element operates at a time. This saves energy.
To get the power connection right, wire the element correctly. Follow the manufacturer’s instructions. For complex work, hire an electrician.
For colder groundwater temp, use a high watt density element. It has a smaller surface area and shorter length, so heats faster. But be careful – it can cause excessive wear on tank components.
Installing an electric water heater element? You need tools, know-how and a bit of steamy fun!
Tools and Materials Needed
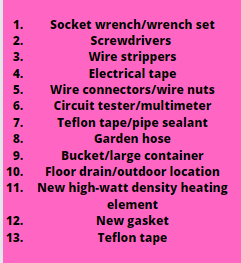
Tools and materials are essential when installing an electric water heater element. The right equipment is needed for a successful installation. Here’s what you’ll need:
| Tool/Material | Description |
|---|---|
| Socket wrench/wrench set | Loosen and remove the heating element screws |
| Screwdrivers (Phillips and flathead) | Remove cover panels and electrical wiring connections |
| Wire strippers | Strip insulation from wires before making new connections |
| Electrical tape | Insulate wire connections for safety |
| Wire connectors/wire nuts | Secure electrical connections |
| Circuit tester/multimeter | Check for continuity or power presence |
| Teflon tape/pipe sealant | Seal threads before installing new heating elements |
| Garden hose | Drain the water heater tank |
| Bucket/large container | Collect any water that may drain out |
| Floor drain/outdoor location | Dispose of drained water |
| New high-watt density heating element | Replacement requirement |
| New gasket | Ensure proper sealing between flange and tank |
| Teflon tape | Seal threads to prevent leaks |
Make sure to follow manufacturer instructions specific to your water heater model. Turn off the power supply before starting any electrical work. Have all tools and materials ready to save time and ensure smooth installation. Don’t skip steps as this could cause potential issues. Be prepared and you can enjoy hot water in no time.
Remember: Installing a water heater element is like playing with electricity, so take safety measures!
Precautions and Safety Measures
Turn off the power before starting any electrical work. Drain the hot water tank to avoid scalding and let it cool down. Use the right tools and inspect for leaks or faulty wiring. Familiarize yourself with the wiring diagram. Test for power usage afterward.
It’s important to follow instructions specific to each water heater model. Buy a new heating element from a reliable retailer. Handle it carefully. Secure all connections when installing. Consider a high watt density element if you run out of hot water often.
Follow these steps and you can safely install a new electric water heater element. Enjoy hot water without any issues – just steer clear of the dark side!
Step 1: Shut Off Power and Water Supply
To start the installation of an electric water heater element, it’s crucial to turn off the power and water supply. This keeps you safe and prevents any accidents or damage. Here’s a step-by-step guide:
- First, locate the electrical circuit breaker panel and switch off the circuit that controls the water heater. This cuts the power supply.
- Locate the main water shutoff valve for your house. This valve is usually where the main water line enters your home. Turn it clockwise to close it off.
- Look for the cold water inlet pipe connected to the top of the tank. There should be a shutoff valve or a lever nearby to close this line.
- Open a hot water faucet in your house to relieve pressure inside the pipes and drain hot water from them.
- Use a contact circuit tester to ensure there is no electrical current flowing before proceeding. This eliminates any potential risk of electric shock.
- Now that you’ve shut off power and water supply, you’re ready to install or replace the heating element.
It’s important to shut off both power and water supply for safety and to prevent damage. My personal experience taught me this lesson: when I was attempting to install a new heating element, I neglected to shut off the power and water supply. This mistake resulted in me getting electrocuted and damaging the heating element.
Step 2: Drain the Water Heater Tank
Draining the water heater tank is an important part of installing a new electric heating element. Here’s how to do it:
- Turn off the power at the circuit breaker or fuse box.
- Attach a garden hose to the drain valve at the bottom of the tank. Place the other end in a drain or outside.
- Turn the valve counterclockwise with a wrench. Let all the water drain out.
Note: Draining the tank clears out any sediment and debris, for optimal performance and longer life.
Here are some tips to keep in mind:
- Before starting, turn off all hot water faucets.
- Hot water will be in the tank, so let it cool first.
- Have a place to drain the water, like a floor drain or outside area.
- If problems arise, get professional help.
By following these steps, you’ll be able to drain the tank and get ready to install the new element. Hunting for the old one? It’s like finding a needle in a hot water heater haystack.
Step 3: Inspect the Old Heating Element
Inspecting the old heating element is key when it comes to installing an electric water heater. This allows you to see if the element needs replacing or if other issues need to be taken care of first. Here’s a quick guide:
- Switch off the power supply at the circuit breaker. It’s best to be safe and make sure there’s no current running through the heater using a circuit tester.
- Take off the access cover panel on the side of the tank. You may need a socket wrench or other tool. Now you’ll be able to clearly see the elements.
- Examine each element for signs of damage or wear. Check for cracks, breaks, or discoloration. All of these signs mean you need to replace the element.
- Check for any sediment or leaks in and around the tank. If you spot any leaks, it’s best to take care of them before putting in a new heating element.
Make sure to inspect the old element before installing a new one! Identifying any issues early on ensures your water heater will last long and work properly. Don’t miss out on having a reliable source of hot water in your home!
Step 4: Purchase a New Heating Element
Identify the issue then turn off the power supply.
Time to move on to Step 4: Purchase a New Heating Element. This is essential for a working electric water heater. Here’s a simplified guide:
- Determine needed element type: Check wattage & voltage, plus watt density of current element. Find this info in the manual or on the label.
- Select a high-quality replacement: Choose one that matches all specs of the original. High watt density for hard/mineral-rich water. Buy from reputable manufacturers.
- Buy from a trustworthy supplier: Visit a home improvement store or search online for a compatible model. Read reviews, compare prices, and pick the best one.
Step 4 completed! Now get your tools & equipment ready for installation. Take care of your electric water heater for efficient performance.
Step 5: Turn off the Circuit Breaker. Don’t get shocked during the installation process. Professional help is recommended if you’re unfamiliar with electrical work.
Step 5: Turn off the Circuit Breaker
I. Always prioritize safety when installing an electric water heater element. Turn off the circuit breaker that powers it. This prevents any accidents or electrical hazards.
II. Follow these steps to turn off the circuit breaker:
- Find the home’s main circuit panel or electrical service panel.
- Open the panel door and look for the circuit breaker labeled for the electric water heater.
- Check labels or refer to the owner’s manual to identify the correct breaker.
- Gently push the switch of the identified breaker until it clicks into the “off” position.
- Test a hot water faucet to confirm that the power is off.
- If in a multi-unit building, only turn off the breaker for the specific water heater.
III. Be careful when working with electricity. By following these steps, you can deactivate the circuit powering the electric water heater.
IV. Remember: always turn off the circuit breaker before installing a new heating element. Otherwise, harmful shocks or damage to wiring systems can occur. So don’t let the old heating element stick around like your ex. It’s time for an upgrade!
Step 6: Remove the Old Heating Element
Before getting started on installing an electric water heater element, it’s essential that the old heating element be removed. Here’s a guide to help you do so:
- Power: Turn off the power supply at the circuit breaker or fuse box. This will ensure your safety.
- Drain: Attach a garden hose to the tank’s drain valve. Open a hot water faucet in the house to let air in. Then open the drain valve and let all hot water out.
- Remove Access Cover: Locate and take away the access cover panel of the water heater. Loosen and remove any screws holding the cover.
After completing these 3 steps, you can start installing the new element. Make sure to check the manufacturer’s manual for model-specific instructions.
One thing to keep in mind is that a faulty or worn-out heating element can reduce performance and energy efficiency of the water heater. Inspect and replace them when needed to extend the lifespan and keep it running smoothly.
Giving your water heater a new heating element is like giving it a warm hug from the inside.
Step 7: Install the New Heating Element
- First, switch off the power at the circuit breaker panel. This is for your safety.
- Find the access cover panel on the side of the tank. Unscrew it using a screwdriver or socket wrench. Then, set aside the cover panel.
- Inside, you’ll see the heating elements and thermostat. Identify the old element that needs replacing. The lower element is usually at the bottom, while the upper one is near the top.
- Unscrew the terminals connected to the faulty element. Mark them for reference.
- Use a wrench to remove the fittings attached to the element.
Step 8: Reconnect and Test the Wiring
It’s time for the crucial step of reconnecting and testing the wiring after a successful installation of the new electric water heater element! Here’s a step-by-step guide:
- Turn off the power to the water heater for safety.
- Check for any loose or frayed wires and fix them if needed.
- Attach each wire to its terminal on the element, matching the colors. Follow the manufacturer’s instructions.
- Tighten any screws with a socket wrench or pliers.
- Turn on the power supply at your circuit breaker or fuse box. Test the circuitry with a contact circuit tester.
It’s important to remember that an electrical fault in the water heater could still cause the heating elements not to work properly even after replacing them. If you’re unsure, it’s best to consult a professional.
Now you can enjoy hot showers once again! Fill the tank and turn your water heater into a hot water extravaganza!
Step 9: Fill the Water Heater Tank
To finish the installation of your electric water heater element, follow this 5-step guide:
- Close the drain valve. This will prevent water from leaking out.
- Open the cold water supply valve. This will let cold water enter the tank.
- Check for leaks. Look around the connections and fittings.
- Fill until full. Check this by opening a nearby hot water faucet.
- Turn on electricity or gas. Follow manufacturer instructions.
Remember, safety first. If you have doubts, seek professional help. Pro Tip: Enhance energy efficiency and prevent sediment buildup with a high watt density element. It has a larger surface area for faster heating. Plug it in and see if it heats up!
Step 10: Turn on Power and Test the Element
To guarantee the good functioning of your new electric water heater element, you must switch on the power and test the element. Follow these steps:
- Double-check that all electrical connections are properly secured and tightened. Scan wiring for any flaws or loose connections.
- After confirming all is in order, find the circuit breaker that controls your hot water heater and turn it on.
- Wait for the tank water to heat up. This may take some time, so be patient.
- When the water is hot enough, open a hot water tap in your home. This will let out any air trapped in the system. Let the hot water run for a few minutes until the flow is smooth and there are no air bubbles.
- While the hot water is running, use a contact circuit tester to check if electricity is flowing through the heating element. Put one end of the tester on one of the element’s terminals. Touch the other end to a nearby metal object (not directly on the terminal). If no electricity is detected, there could be a problem with your wiring or element.
- If you do detect an electrical current, this shows that your new heating element is working properly. Shut off the hot water tap and use your electric water heater normally.
Be sure to keep safety precautions in mind, such as wearing gloves and avoiding moisture on electrical components.
Pro Tip: If you experience any leaks or problems during this process, it is better to contact a professional plumber or electrician for help instead of attempting further repairs.
Tips and Troubleshooting: Here are some electric water heater element tips to keep you out of hot water.
Tips and Troubleshooting
Let’s get started with a professional touch on installing an electric water heater element. Here are some tips and troubleshooting techniques:
- Have all tools and materials ready, such as a socket wrench, new gasket, copper wire, and new element.
- Turn off power supply by flipping the circuit breaker switch.
- Connect a garden hose to drain valve and direct it to a floor drain or outdoor area to drain the tank.
- When buying a new element, make sure it matches the wattage and watt density of the current element.
- Clean sediment or debris in the tank to prevent clogging or reduced efficiency.
- Secure the element by tightening it with a wrench. Not too much!
- Fill the tank with cold water before turning on the power supply again.
If you follow these steps, you can install an electric water heater element with ease! But don’t forget to prioritize safety and get professional help when needed. Now you can sizzle with success!
Frequently Asked Questions
Q: How do I install an electric water heater element?
To install an electric water heater element, start by turning off the power to the heater and draining the tank. Then, remove the access cover panel and insulation to access the old heating element. Disconnect the wiring from the old element and remove it. Next, install the new heating element by connecting the wires to the appropriate terminals and tightening the screw terminals. Replace the insulation and cover panel, and finally, refill the tank and restore power to the heater.
Q: Do electric water heaters have two elements?
Yes, most electric water heaters have two heating elements. The upper element is used to heat the water in the top two-thirds of the tank, while the lower element heats the water in the bottom third of the tank. This design helps maintain a consistent supply of hot water.
Q: Do both elements come on in an electric water heater?
No, only one heating element operates at a time in an electric water heater. The upper element is activated first to heat the top portion of the tank and satisfy the demand for hot water. If more hot water is needed, the lower element will then kick in to heat the remaining water in the tank.
Q: How do I wire a hot water heater element?
Wiring a hot water heater element involves connecting the wiring to the screw terminals on the element itself. Make sure the power is turned off before attempting to wire the element. Follow the manufacturer’s instructions and refer to the wiring diagram for your particular heater. Use a screwdriver to tighten the screw terminals, ensuring a secure connection.
Q: What is watt density in a water heater element?
Watt density refers to the amount of power (wattage) a heating element can generate per square inch of surface area. It is an important factor to consider when choosing a replacement element. High watt density elements have a greater power output and are suitable for high-demand or quick-recovery applications, while low watt density elements are designed for longer heating cycles and may be more energy-efficient.
Q: How often should I replace a water heater element?
The lifespan of a water heater element can vary depending on factors such as usage, water quality, and maintenance. Generally, it is recommended to inspect the heating elements annually for signs of corrosion, scaling, or other damage. If the element appears faulty or is no longer heating efficiently, it should be replaced. Regular maintenance and flushing of the tank can help extend the lifespan of the elements.
Conclusion
Installing an electric water heater element? No sweat! The right instructions make it a breeze. Start off by turning off the power and draining the tank, safety first, always. Then, take off the access cover panel and disconnect the wiring from the old heating element. Make sure to note the wiring before you remove it.
Next, use a socket wrench to unscrew and remove the old element. Inspect for any damage and replace if needed. Use a watt density suitable for your water heater when installing the new one. Connect the wires with wire nuts or screw terminals. Double-check all connections for security. Close up the access cover panel and turn on the power.
Every water heater has its own specifications, so refer to the manual or ask a pro if you get stuck. I replaced the faulty element in my own electric water heater myself – with a bit of research and prep, it was done in two hours! No need for a plumber, and I saved some cash too!
Installing an electric water heater element isn’t so daunting. With the right guidance and caution, you can do it! Just remember: safety comes first. Ask for professional help if needed.