
Table of Contents
Gas control valves are essential for safe and efficient water heater operations. They regulate gas to the main burner so the heater maintains a desired temperature. Here, we’ll look at how to replace a gas control valve.
Be aware, working with gas appliances is dangerous if you don’t know what you’re doing. It’s best to hire a professional plumber if you can. However, those with the knowledge and experience can proceed with caution.
- First, turn off the gas supply to the water heater. Usually, this means locating the shut-off valve on the gas line leading to the heater and turning it off. Don’t forget to switch off the power too, to prevent any potential electrical danger.
- Then, disconnect the gas line from both ends – one from the gas control valve and the other from the main burner assembly. Use an adjustable wrench or pipe wrench to loosen and remove these connections carefully.
- The old gas control valve can now be removed from its position. This may require removing screws or bolts. Different models of water heaters have different configurations for their valves.
- With the new valve in hand, follow the manufacturer’s instructions to install it. Make sure all connections are tight and secure. Then, restore the power and turn the gas back on.
It’s worth bearing in mind that various factors affect the cost of replacing a gas control valve on a water heater. The cost depends on brand, model, location, market conditions, and labor fees if hiring a professional. Do your research and compare prices before making a decision.
Gas Control Valve on a Water Heater
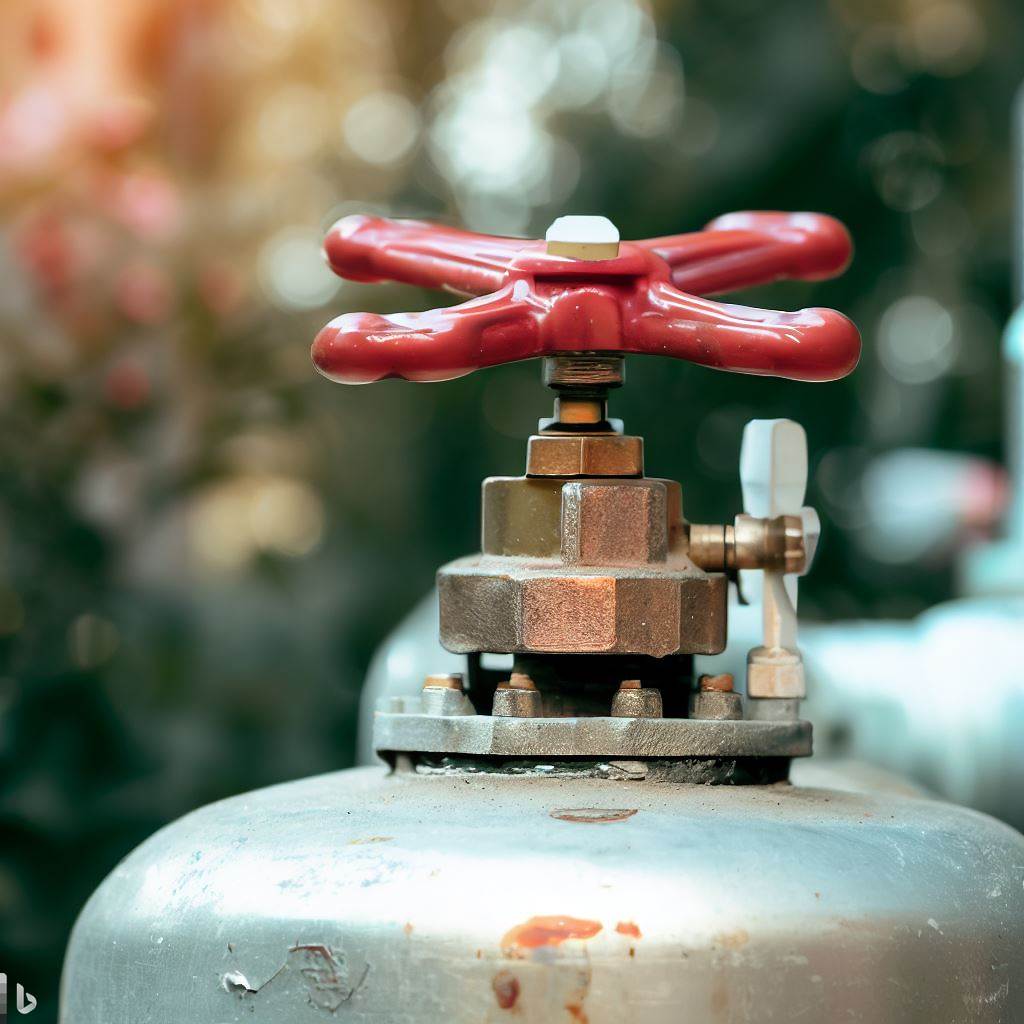
To ensure a smooth operation of your water heater, understanding the gas control valve is crucial. The gas control valve regulates the flow of gas to the burner and controls the water temperature. In this section, we’ll explore the components of the gas control valve and explain the importance of having a properly functioning gas control valve.
Components of the Gas Control Valve
The gas control valve on a water heater is a must-have component. It regulates the flow of gas to the burner. Knowing its parts is essential for maintenance and troubleshooting.
The components include:
- Gas valve
- Thermocouple
- Safety shutoff valve
- Temperature dial
- Pilot light
- Pressure regulator
Some may also feature an electronic control board. Consult the manufacturer’s manual for details specific to your model.
Failure to maintain or repair a faulty gas control valve can be dangerous. According to the U.S. Consumer Product Safety Commission, 11% of residential fires are caused by home heating equipment.
Maintaining a proper gas control valve is almost as important as wearing pants – unless you want to be cold and judged.
Importance of a Properly Functioning Gas Control Valve
A working gas control valve is essential for a functional water heater. It allows the right amount of gas to be released and lets the tank heat up consistently. Without it, the water heater may not heat properly, making for cold showers!
The valve lets gas flow in at the right pressure and rate. But, if it’s clogged or broken, it can stop it from working correctly, resulting in little or no heating.
It also has safety features, such as a thermocouple to detect leaks or pilot light extinguishment. This helps prevent gas leaks and potential hazards.
To keep the valve running well, it needs regular maintenance. Check for debris or blockages, and clean or replace any clogged parts. Test the pilot light too, since a weak or flickering flame indicates an issue with the gas control valve.
Plus, have a professional inspect and service your water heater regularly. They can check all components, including the gas control valve, and make any repairs needed.
In short, a working gas control valve is vital for an efficient and safe water heater. Follow these tips and get professional help when necessary, so your gas control valve works optimally for years to come. Just remember: if you attempt to replace it and things go wrong, you’ll be stuck with a cold shower!
Preparing for the Replacement
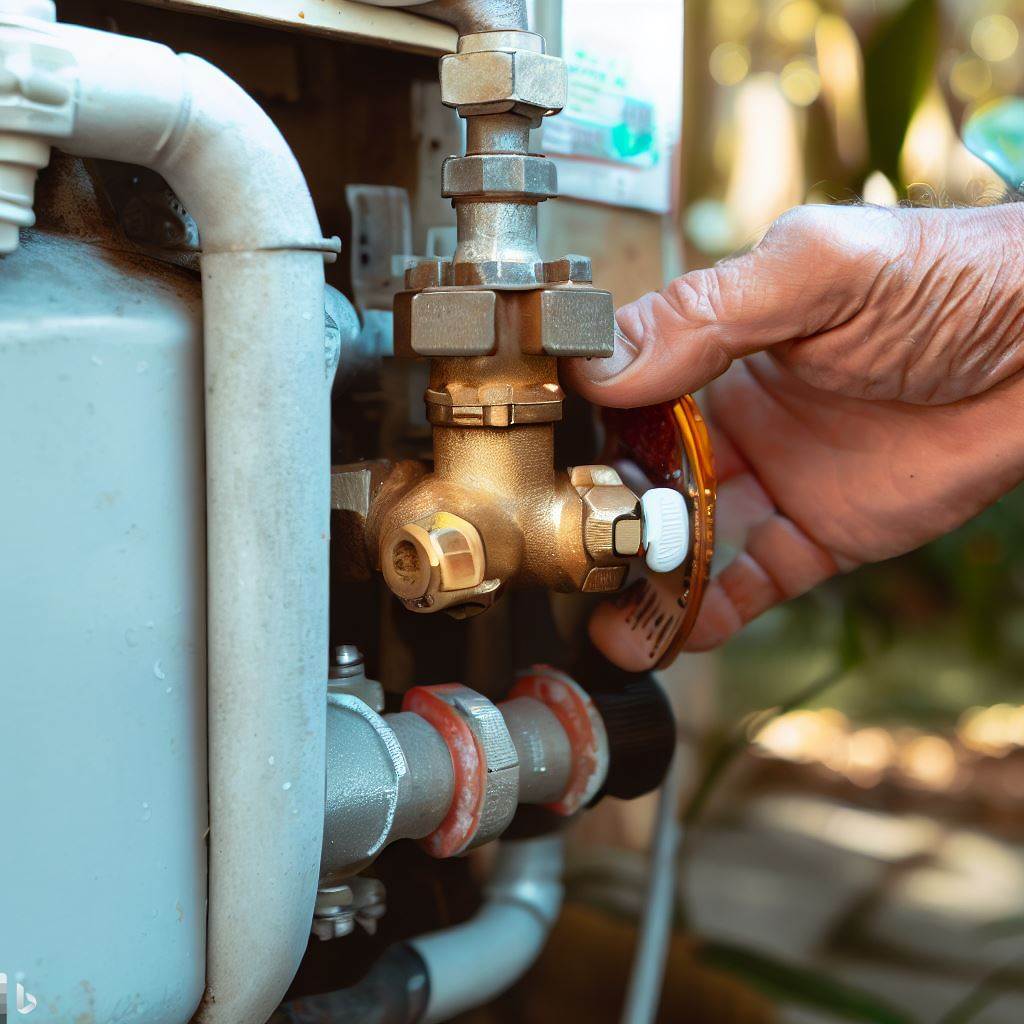
To prepare for the replacement of the gas control valve on your water heater, ensuring safety is crucial. Begin by turning off the gas supply to avoid any potential hazards. Additionally, draining the water heater before proceeding with the replacement is essential. These steps will help create a safe and effective environment for replacing the gas control valve.
Ensuring Safety: Turning Off the Gas Supply
Safety should be the number one priority when replacing gas appliances. Following a few steps can ensure a safe transition. Here’s a 6-step guide to help:
- Find the main gas shut-off valve near your meter.
- Turn off all gas-powered appliances, including stoves, ovens and water heaters.
- Use a wrench to turn clockwise until it stops. This turns off the gas flow.
- Check for any gas smells in case of a leak. If you smell gas, vacate the house and contact your local gas company.
- Keep the valve closed until a professional technician has completed the replacement.
- Have a qualified professional test the appliance before reopening the main valve.
Also, wear protective gear and follow manufacturer instructions. Prioritize safety and seek help from an expert.
The major 2015 explosion in a residential building highlighted the need to properly shut off gas supplies during replacements. Since then, government regulations have been strengthened for stricter safety.
Draining the water heater is also important for a successful replacement – nothing says “I’m ready” like hot water running down your leg!
Draining the Water Heater
Replacing your water heater? It’s essential to drain it properly for optimal performance and a longer lifespan. Follow these 6 easy steps:
- Switch off the power supply. Use the circuit breaker or the gas valve.
- Attach a garden hose to the drain valve at the bottom of the tank. Place the other end in a suitable drainage area.
- Open a hot water faucet to let air into the system and help with draining.
- Carefully open the drain valve. Hot water may still be present, so be careful.
- When all the water has drained out, close the drain valve tightly.
- For extra protection, flush the system before refilling with water.
Be sure to check for leaks and corrosion. If any problems arise, get professional help. Regular maintenance is key for efficient performance and a longer lifespan. Don’t forget these steps!
And, replacing the gas control valve is just as necessary for avoiding explosions as switching from regular to decaf coffee. Do it now and give your water heater the best chance of lasting for years!
Step-by-Step Guide to Replace the Gas Control Valve
To replace the gas control valve on your water heater, follow this step-by-step guide. Start by removing the old gas control valve, then proceed to install the new one. Once installed, reattach and test the gas supply to ensure proper functioning.
Removing the Old Gas Control Valve
- Shut off the gas supply to prevent accidents.
- Use a wrench to detach the nut from the gas pipe.
- Disconnect any electrical wires or connectors.
- Loosen and remove any screws or bolts.
- Slowly pull out the old control valve – be careful not to damage anything.
- Dispose of the old valve according to local regulations.
Also, check your manufacturer or manual for specific installation details and requirements. So, get ready to tackle this potentially explosive project and install the new gas control valve with ease and precision!
Installing the New Gas Control Valve
Switching out your gas control valve is required for your appliance to keep running. Here’s a guide to install the new one:
- Cut off gas supply: Before taking out the old one, make sure to turn off the gas supply. Locate the shut-off valve and twist it clockwise until it’s fully closed.
- Remove old gas control valve: Use a wrench to disconnect the fittings connecting the old valve to the gas line. Then, carefully take out the valve.
- Prepare for installation: Clear off any debris or residue from the area where the new valve will go. Check if any gaskets or seals need replacing.
- Install the new gas control valve: Position the new valve with the connections on your appliance and secure it with a wrench. Make sure all fittings are tight, but not too tight.
- Test for leaks and functionality: After installing the valve, turn on the gas supply and inspect for any leaks around the fittings with a leak detection solution. Lastly, test the appliance to double check it works.
Remember, safety is key when dealing with gas appliances or components. Consult the manual for specific instructions!
Plus, faulty or malfunctioning gas valves can cause hazards such as fires, so don’t wait to fix them. Reattaching and testing the gas supply is easy-peasy.
Reattaching and Testing the Gas Supply
Reattaching and testing the gas supply is key when replacing the gas control valve. Follow these steps for success:
- Shut off the gas supply. Find the shut-off valve close to the gas meter and turn it to “off”. This will prevent any gas flow during reattachment.
- Take off the old gas control valve. Use a wrench or pliers to disconnect the gas line from the old valve. Be careful not to damage anything.
- Prepare for reattachment. Clean and check the ends of the gas line and the new valve. Make sure there’s no dirt, debris, or damaged parts.
- Reattach the gas line. Align the connection points of the new valve and gas line. Tighten them securely with a wrench or pliers. Check that they’re tightly connected.
- Test for leaks. Turn on the gas supply at the shut-off valve. Put some soapy water around all connections, including those of the new valve and gas line. Look for bubbles, which mean there might be a leak. If so, turn off the gas and double-check the connections.
- Check if it’s working. Once you’re sure there are no leaks, turn on any appliances or equipment connected to the gas supply.
Troubleshooting Tips
To troubleshoot common issues with your gas control valve on a water heater, turn to this section that covers handy tips and solutions. Discover how to address concerns and when it’s best to call a professional plumber for assistance. Streamline the repair process and ensure your gas control valve is effectively replaced.
Common Issues and Solutions
Troubleshooting common website issues is key for quick and effective solutions. Here are some practical tips:
| Issue | Solution |
|---|---|
| Slow loading times | Clear cache & cookies. Check internet speed. Optimize images & files. Use CDN. |
| Broken links | Use online tools to check for broken links. Update URLs or redirect. |
| Error messages | Analyze error message code. Search for specific solutions online. Check server logs. |
| Mobile compatibility | Use responsive design. Test website on different devices & browsers. |
| Security vulnerabilities | Regularly update software/plugins/themes. Use strong passwords. Perform security scans. |
These are only general examples. Unique details may require specific troubleshooting steps. Careful analysis of the problem is essential before applying any solution.
Advancements in technology have brought better solutions than outdated methods. This allows for quicker problem resolution and improved user experience.
By staying up-to-date with web development best practices, we can ensure a smoother browsing experience for all users. But when your toilet starts singing opera in the middle of the night, it’s time to call a professional plumber.
When to Call a Professional Plumber?
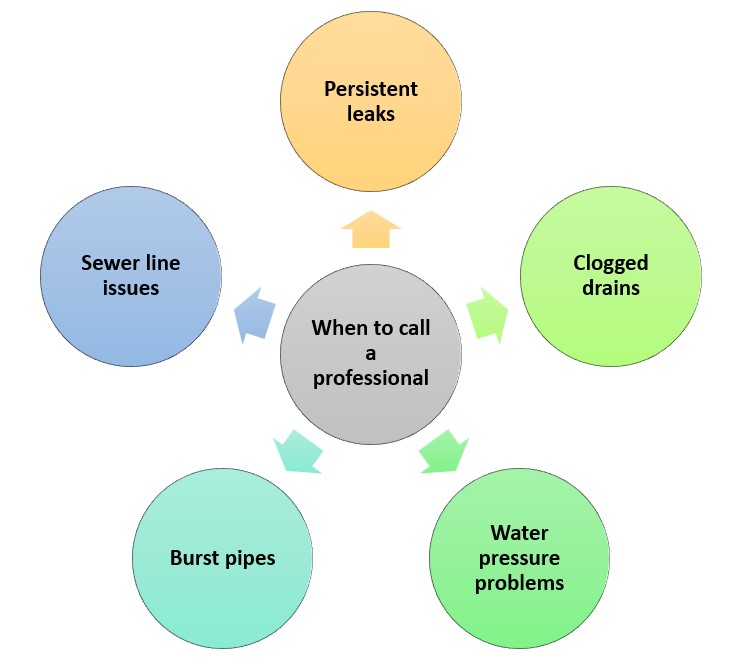
When dealing with plumbing problems, it’s essential to assess the situation and decide if you need a professional plumber. Here are some signs that you do:
- Persistent leaks: If you’ve tried to fix a leak multiple times and it keeps coming back, it’s time for a pro. They can find the source of the problem and provide a lasting solution.
- Clogged drains: Minor clogs can often be solved with household items. But if they keep happening, a plumber has the right tools and know-how to clear even tough blockages.
- Water pressure problems: Low water pressure might mean there are underlying plumbing issues. A pro can diagnose and address them.
- Burst pipes: This is a serious emergency and needs urgent attention from a pro. They’ll repair or replace the broken pipe to stop more damage.
- Sewer line issues: If you smell bad odors, hear gurgling, or experience slow drainage in multiple fixtures in your home, you may have a sewer line issue. A plumber is needed to prevent health hazards and further damage.
Remember, each plumbing issue is different and may require a different level of expertise. A professional plumber will have the skills and experience to accurately assess your issue and offer the right solutions.
Additional Resources and Recommendations
Continue your journey in replacing the gas control valve on your water heater with these resources and recommendations. Check out the table below for an overview of key components and factors.
| Component/Factor | Description |
|---|---|
| Gas Control Valve | The component that regulates pressure levels within the water heater. |
| Relief Valve | Safety device that releases excess pressure in the tank to prevent explosions or damage. Replace if malfunctioning. |
| Pressure Relief Valve | The device that prevents excessive heating by cutting off power or gas supply when temperatures exceed safe limits. Ensure it’s functioning during replacement. |
| Heat Limiter | Device that prevents excessive heating by cutting off power or gas supply when temperatures exceed safe limits. Ensure it’s functioning during replacement. |
For safety, turn off the gas supply and ensure proper ventilation. Also, follow manufacturer instructions and seek professional guidance to minimize risks.
Frequently Asked Questions
How to replace a gas control valve on a water heater?
To replace a gas control valve on a water heater, follow these steps:
– Turn off the gas supply to the water heater.
– Disconnect the gas line and pilot tube from the control valve.
– Remove the control valve by loosening the mounting screws.
– Install the new control valve and secure it in place.
– Reconnect the gas line and pilot tube.
– Turn on the gas supply and check for any leaks.
How much does it cost to replace a gas control valve on a water heater?
The cost to replace a gas control valve on a water heater can vary depending on factors such as the brand of the valve and the complexity of the installation. On average, it can cost anywhere from $150 to $300 for the replacement.
How to remove a gas control valve on a water heater?
To remove a gas control valve on a water heater, follow these steps:
– Turn off the gas supply to the water heater.
– Disconnect the gas line and pilot tube from the control valve.
– Loosen the mounting screws that secure the control valve.
– Carefully remove the control valve from the water heater.
How to replace the relief valve on a gas water heater?
To replace the relief valve on a gas water heater, follow these steps:
– Turn off the gas supply to the water heater.
– Shut off the cold water supply and turn on a hot water faucet to relieve pressure.
– Drain the water from the tank until it is below the relief valve.
– Unscrew and remove the old relief valve.
– Install the new relief valve and tighten it securely.
– Turn on the cold water supply and check for leaks.
How to replace the pressure relief valve on a gas water heater?
To replace the pressure relief valve on a gas water heater, follow these steps:
– Turn off the gas supply to the water heater.
– Shut off the cold water supply and turn on a hot water faucet to relieve pressure.
– Drain the water from the tank until it is below the pressure relief valve.
– Unscrew and remove the old pressure relief valve.
– Install the new pressure relief valve and tighten it securely.
– Turn on the cold water supply and check for leaks.
Should I hire a professional plumber to replace the gas control valve on my water heater?
While it is possible to replace the gas control valve on a water heater yourself, it is recommended to hire a professional plumber. They have the necessary knowledge and experience to safely handle gas lines and ensure proper installation. This will also help prevent any potential damage or safety hazards.
Conclusion
Replacing a gas control valve on a water heater requires careful attention and knowledge. Follow the right steps to ensure your heater works efficiently and you have constant hot water.
When installing the new gas control valve, follow the manufacturer’s instructions. Connect all components like the pilot tube and thermocouple firmly. Turn on the gas, then check for leaks with soapy water. Prices vary based on brand, model, and location when replacing a gas control valve. Get an estimate from a professional plumber, tailored to your situation.